Vue3-脚手架模块化开发
Vue3-脚手架模块化开发
1.需求分析/图解
1、使用 Vue3 的脚手架 Vue-cli 工具, 创建前端项目基础开发环境

2.代码实现
Vue CLI官方文档:https://cli.vuejs.org/zh/guide/installation.html

1.搭建 Vue 前端工程
- 先下载 node.js LTS 并安装 : node.js 的 npm,用于管理前端项目包依赖,安装 14.17.3 这 个版本,最好保持版本一致

2.node.js 安装非常简单,直接下一步即可
3.验证 node.js 是否安装成功

4.全局安装 Vue 插件 cli : npm install -g @vue/cli , 这样我们就可以创建 Vue 工程
npm install -g @vue/cli

5.创建Vue项目E:\IdeaProjects\llp_ssm_vue
6.创建 Vue 项目 ssm_vue,我创建在E:\IdeaProjects\llp_ssm_vue 整合项目 目录下, 指令vue create ssm_vue


7.选择你需要的插件


8.选择路由模式

9.选择项目依赖包管理方式

10.选择是否保存本次设置


11.回车开始创建项目,成功会提示如下界面

12.启动项目-按给出指令执行即可

13.启动项目成功, 会提示如下界面

14.完成测试,浏览器访问

2.idea打开 vue项目, 并配置项目启动
- 直接将 ssm_vue 项目拖到 idea


- 配置 ssm_vue 使用 npm 方式启动


3.Vue3 项目目录结构梳理
1.Vue3 项目结构介绍

2.index.html 页面说明

3.assets 目录和 components 目录说明

4.router/index.js 用于配置路由

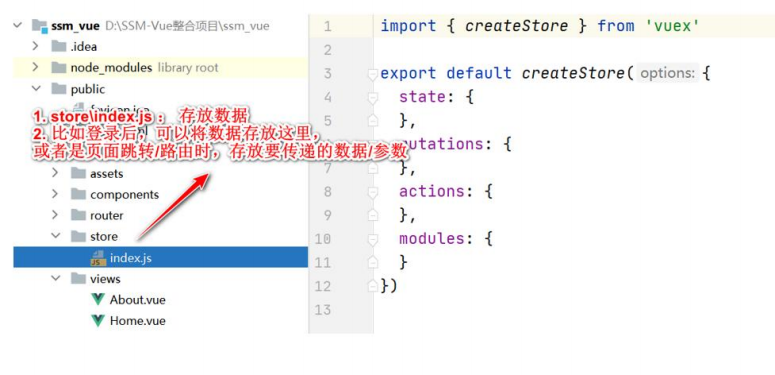
5.store/index.js 用于存放数据

6.视图使用的基本介绍

7.视图使用的基本介绍package.json 说明前端项目包依赖关系,类似 maven 的 pom.xml

8.main.js 用于引入资源(css/组件等), 同时也是创建 App 挂载#app, 引入 ./router ./store 等资源的所在

3.配置 Vue 服务端口
1、修改vue.config.js ,设置端口module.exports = {devServer: {port: 10001}}
const {defineConfig} = require('@vue/cli-service')
module.exports = defineConfig({
    transpileDependencies: true
})
//启动端口
module.exports = {devServer: {port: 10001}}
2、启动测试, 可以看到现在是 10001 端口了

4. Element Plus 和 Element UI
1.Element UI 官方文档
https://element.eleme.cn/#/zh-CN
2.Element Plus 官方文档
https://element-plus.gitee.io/zh-CN/
3.Element Plus:Element UI for Vue 3.0
4.其他说明
1、Element Plus 是 Element 对 Vue 3.0 的升级适配
2、Element 诞生于 2016 年,起初是饿了么内部的业务组件库,开源后深受广大前端开 发者的喜爱,成为 Vue 生态中最流行的 UI 组件库之一。
3、Element Plus 是重构的全新项目。Element 团队重写了 Element 的代码,用于支持 Vue 3
4、Element UI 还在维护和升级,因为 Vue2 仍然有项目在使用, Vue3 支持的浏览器范围 有所减少, 这是一个大的改变, 所以在一段时间内, Vue2 仍然会在项目使用.
5.安装 element-plus 插件
● 安装 element-plus 插件
# NPM
npm install element-plus --save

element-plus 官方文档 https://element-plus.gitee.io/#/zh-CN/component/layout

 JavaSE
 JavaWeb
 Spring
 MyBatis
 linux
linux
 消息队列
消息队列
 工具
工具
 片段
片段
 AI
AI
 搜索
搜索