JavaWeb
 Spring
 MyBatis
 linux
linux
 消息队列
消息队列
 JavaSE
 工具
工具
 AI
AI
 搜索
搜索
 dy
dy
Thymeleaf
Thymeleaf
1.官方文档
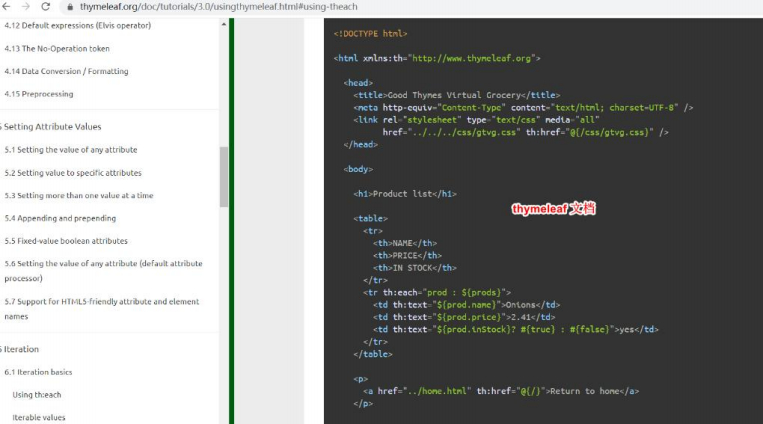
1.在线文档
https://www.thymeleaf.org/doc/tutorials/3.0/usingthymeleaf.html
2.基本介绍
● Thymeleaf 是什么
- Thymeleaf 是一个跟 Velocity、FreeMarker 类似的模板引擎,可完全替代 JSP
- Thymeleaf 是一个 java 类库,他是一个 xml/xhtml/html5 的模板引擎,可以作为 mvc 的 web 应用的 view 层
● Thymeleaf 的优点
- 实现 JSTL、 OGNL 表达式效果, 语法相似, java 程序员上手快
- Thymeleaf 模版页面无需服务器渲染,也可以被浏览器运行,页面简洁。
- SpringBoot 支持 FreeMarker、Thymeleaf、veocity 。
● Thymeleaf 的缺点
- Thymeleaf: Thymeleaf is a modern server-side Java template engine for both web and standalone environments(Thymeleaf是一个现代的服务器端Java模板引擎,适用于web和独立环境)
- 缺点: 并不是一个高性能的引擎,适用于单体应用
- 如果要做一个高并发的应用, 选择前后端分离更好
3.Thymeleaf 机制说明
- Thymeleaf 是服务器渲染技术, 页面数据是在服务端进行渲染的
- 比如: manage.html 中一段 thymeleaf 代码, 是在用户请求该页面时,有 thymeleaf 模板 引擎完成处理的(在服务端完成), 并将结果页面返回.
- 因此使用了 Thymeleaf , 并不是前后端分离
4.Thymeleaf 语法
1.表达式
- 表达式一览
| 表达式名字 | 语法 | 用途 |
|---|---|---|
| 变量取值 | ${...} | 获取请求域、session 域、对象等值 |
| 选择变量 | *{...} | 获取上下文对象值 |
| 消息 | #{...} | 获取国际化等值 |
| 链接 | @{...} | 生成链接 |
| 片段表达式 | ~{...} | jsp:include 作用,引入公共页面片段 |
- 字面量
文本值: 'hsp edu' , 'hello' ,…数字: 10 , 7 , 36.8 , …布尔值: true , false
空值: null
变量: name,age,.... 变量不能有空格
- 文本操作
文本操作
字符串拼接: +
变量替换: |age= ${age}|
2.运算符
- 数学运算
运算符: + , - , * , / , %
- 布尔运算
运算符: and , or
一元运算: ! , not
- 比较运算
比较: > , < , >= , <= ( gt , lt , ge , le )等式: == , != ( eq , ne )
- 条件运算
If-then: (if) ? (then)
If-then-else: (if) ? (then) : (else)
Default: (value) ?: (defaultvalue)
3.th 属性
html 有的属性,Thymeleaf 基本都有,而常用的属性大概有七八个。其中 th 属性执行的优 先级从 1~8,数字越低优先级越高
● th:text :设置当前元素的文本内容,相同功能的还有 th:utext,两者的区别在于前者不会转义 html 标签,后者会。优先级不高:order=7
● th:value:设置当前元素的 value 值,类似修改指定属性的还有 th:src,th:href。优先 级不高:order=6
● th:each:遍历循环元素,和 th:text 或 th:value 一起使用。注意该属性修饰的标签位 置,详细往后看。优先级很高:order=2
● th:if:条件判断,类似的还有 th:unless,th:switch,th:case。优先级较高:order=3
● th:insert:代码块引入,类似的还有 th:replace,th:include,三者的区别较大,若使 用不恰当会破坏 html 结构,常用于公共代码块提取的场景。优先级最高:order=1
● th:fragment:定义代码块,方便被 th:insert 引用。优先级最低:order=8
● th:object:声明变量,一般和*{}一起配合使用,达到偷懒的效果。优先级一般:order=4
● th:attr:修改任意属性,实际开发中用的较少,因为有丰富的其他 th 属性帮忙,类 似的还有 th:attrappend,th:attrprepend。优先级一般:order=5
4.迭代
<tr th:each="prod : ${prods}">
    <td th:text="${prod.name}">Onions</td>
    <td th:text="${prod.price}">2.41</td>
    <td th:text="${prod.inStock}? #{true} : #{false}">yes</td>
</tr>

<tr th:each="prod,iterStat : ${prods}" th:class="${iterStat.odd}? 'odd'">
    <td th:text="${prod.name}">Onions</td>
    <td th:text="${prod.price}">2.41</td> <td th:text="${prod.inStock}? #{true} : #{false}">yes</td>
</tr>
5.条件运算
<a href="comments.html" th:href="@{/product/comments(prodId=${prod.id})}"
   th:if="${not #lists.isEmpty(prod.comments)}">view</a>
<div th:switch="${user.role}">
    <p th:case="'admin'">User is an administrator</p>
    <p th:case="#{roles.manager}">User is a manager</p>
    <p th:case="*">User is some other thing</p>
</div>
6.使用 Thymeleaf -th 属性需要注意点
1、若要使用 Thymeleaf 语法,首先要声明名称空间:xmlns:th="http://www.thymeleaf.org"
2、设置文本内容 th:text,设置 input 的值 th:value,循环输出 th:each,条件判断 th:if, 插入代码块 th:insert,定义代码块 th:fragment,声明变量 th:object
3、th:each 的用法需要格外注意,打个比方:如果你要循环一个 div 中的 p 标签,则 th:each 属性必须放在 p 标签上。若你将 th:each 属性放在 div 上,则循环的是将整个 div。
4、变量表达式中提供了很多的内置方法,该内置方法是用#开头,请不要与#{}消息表达式 弄混。
5.Thymeleaf 综合案例
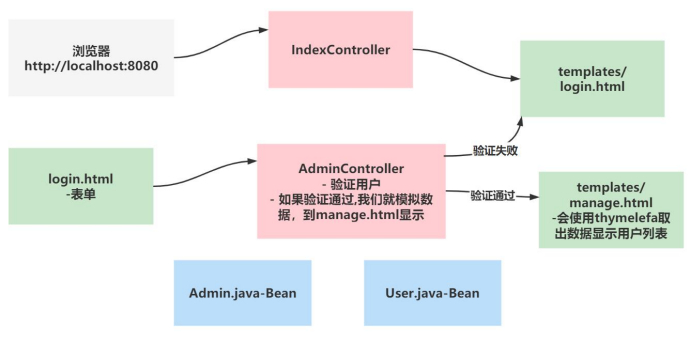
1.需求说明

2.思路分析/图解
3.代码实现
1.创建项目,springboot-sysuser
2.要支持 Thymeleaf, 需要加入 thymeleaf-starter, 在 pom.xml 配置
<!--导入springboot父工程-规定写法-->
<parent>
   <artifactId>spring-boot-starter-parent</artifactId>
   <groupId>org.springframework.boot</groupId>
   <version>2.5.3</version>
</parent>

<dependencies>
   <dependency>
      <groupId>org.springframework.boot</groupId>
      <artifactId>spring-boot-starter-web</artifactId>
   </dependency>
   <!--引入lombok-->
   <dependency>
      <groupId>org.projectlombok</groupId>
      <artifactId>lombok</artifactId>
   </dependency>

   <dependency>
      <groupId>org.springframework.boot</groupId>
      <artifactId>spring-boot-configuration-processor</artifactId>
   </dependency>
   <!--引入thymeleaf-start: 会进行默认配置-->
   <dependency>
      <groupId>org.springframework.boot</groupId>
      <artifactId>spring-boot-starter-thymeleaf</artifactId>
   </dependency>
</dependencies>
3.引入starter-Thymeleaf , 项目会自动完成配置, 程序员按照规则开发即可
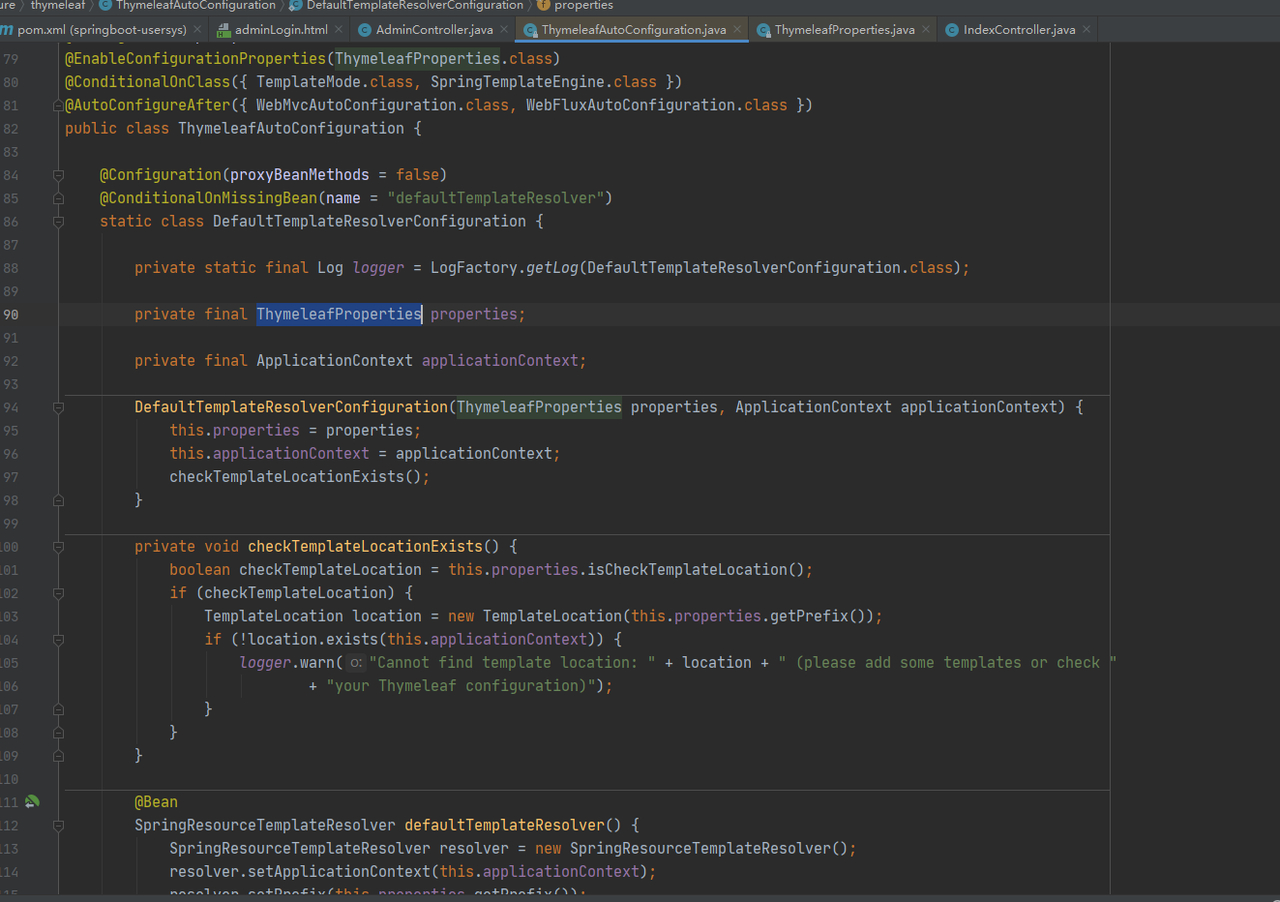
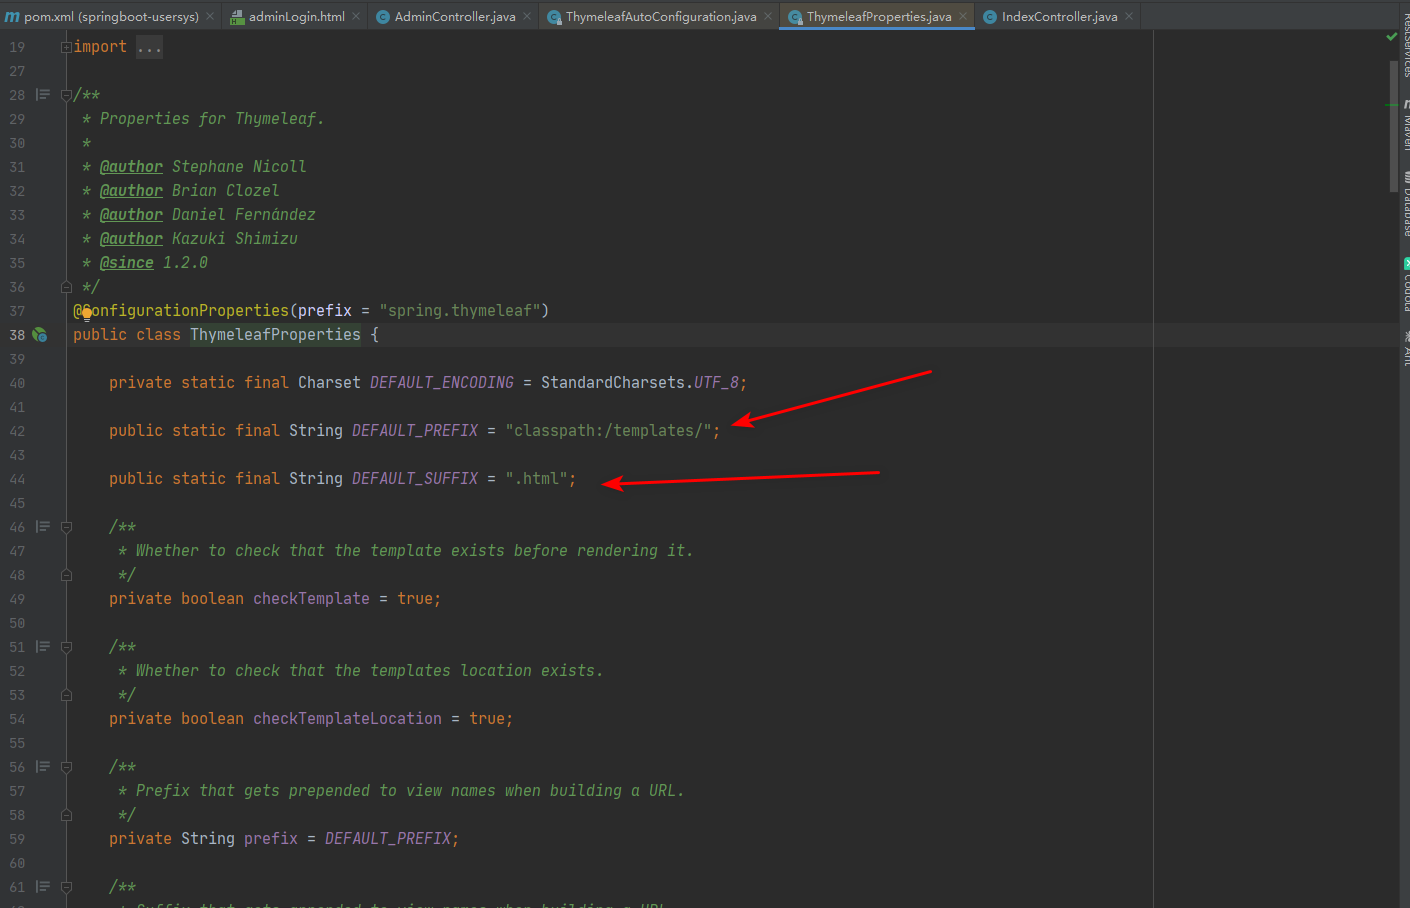
注意:Thymeleaf中定义了视图视图解析器前缀:classpath:/templates/、后缀:.html;
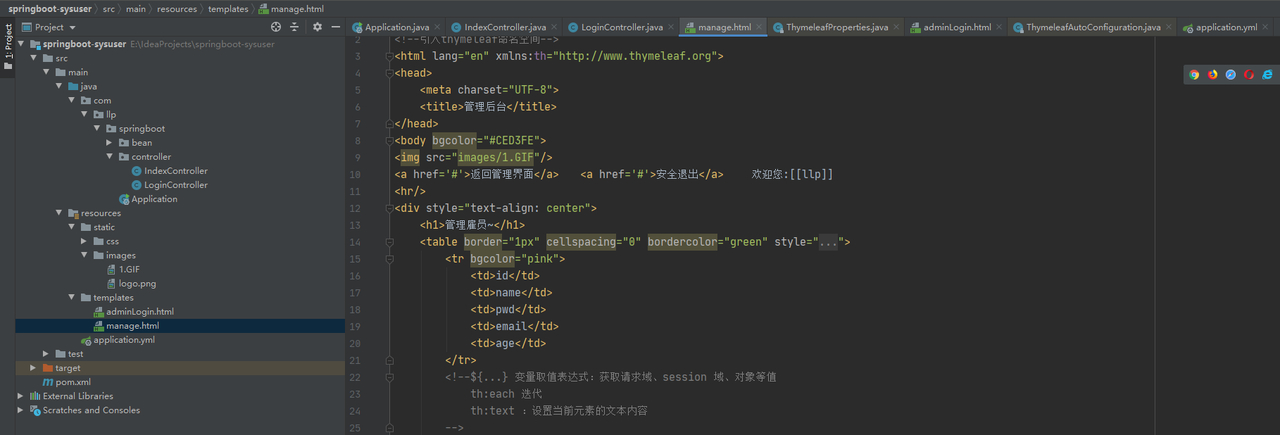
4.创建 adminLogin.html 和 manage.html 和静态图片到指定目录,从准备好的拷贝即可, 注意 我将 html 文件放到 templates/ 目录下, 该目录, 不能直接访问.
adminLogin.html
<!DOCTYPE html>
<html lang="en" xmlns:th="http://www.thymeleaf.org">
<head>
    <meta charset="UTF-8">
    <title>login</title>
</head>
<body bgcolor="#CED3FE">
<img src="images/1.GIF"/>
<hr/>
<div style="text-align: center">
    <h1>用户登陆</h1>
    <form action="#"  method="post">
        <label style="color: red" ></label><br/>
        用户名:<input type="text" style="width:150px" name="name"/><br/><br/>
        密 码:<input type="password" style="width:150px" name="password"/><br/><br/>
        <input type="submit" value="登录"/>
        <input type="reset" value="重新填写"/>
    </form>
</div>
<hr/>
</body>
</html>
manage.html
<!DOCTYPE html>
<!--引入thymeleaf命名空间-->
<html lang="en" xmlns:th="http://www.thymeleaf.org">
<head>
    <meta charset="UTF-8">
    <title>管理后台</title>
</head>
<body bgcolor="#CED3FE">
<img src="images/1.GIF"/>
<a href='#'>返回管理界面</a>  <a href='#'>安全退出</a>   欢迎您:[[llp]]
<hr/>
<div style="text-align: center">
    <h1>管理雇员~</h1>
    <table border="1px" cellspacing="0" bordercolor="green" style="width:800px;margin: auto">
        <tr bgcolor="pink">
            <td>id</td>
            <td>name</td>
            <td>pwd</td>
            <td>email</td>
            <td>age</td>
        </tr>

        <tr bgcolor="#ffc0cb" >
            <td >a</td>
            <td >b</td>
            <td >c</td>
            <td >d</td>
            <td >e</td>
        </tr>
    </table>
    <br/>
</div>
<hr/>
</body>
</html>
5.创建src\main\java\com\llp\springboot\bean\Admin.java
@Data
public class Admin {

    private String username;

    private String password;

}
6.创建src\main\java\com\llp\springboot\bean\User.java
@Data
@AllArgsConstructor
@NoArgsConstructor
public class User {
    private Integer id;

    private String name;

    private String pwd;

    private Integer age;

    private String email;

}
7.创建src\main\java\com\llp\springboot\controller\IndexController.java 默认进入登录页面
@Controller
public class IndexController {

    //编写方法转发到登录页
    @GetMapping(value = {"/","/login"})
    public String login(){
        /**
         * 1.因为我们引入spring-boot-starter-thymeleaf
         * 2.这里就会直接使用视图解析到/resources/templates/目录下的adminLogin.html模板文件
         * 3.thymeleaf本身就做了SpringResourceTemplateResolver视图解析,
         * 在ThymeleafProperties种做了前缀和后缀的配置,在ThymeleafAutoConfiguration进行配置
         *     public static final String DEFAULT_PREFIX = "classpath:/templates/";
         *     public static final String DEFAULT_SUFFIX = ".html";
         */
        return "adminLogin";
    }

}
8.创建src\main\java\com\llp\springboot\controller\AdminController.java 处理登录请求 完成测试
@Controller
public class AdminController {

    @PostMapping("/login")
    public String login(Admin admin, HttpSession session,Model model){
        if(StringUtils.hasText(admin.getPassword()) && "666".equals(admin.getPassword())){
            //1.这里使用重定向,不适用请求转发,防止刷新页面表单重复提交
            //2./manage.html /会被解析成ip:port ,而manage.html是指定浏览器下一次请求访问的路径
            //3.重定向会发起get请求
            return "redirect:/manage.html";
        }else {
            return "adminLogin";
        }
    }

    @GetMapping("manage.html")
    public String manage(){
        return "manage";
    }

}
9. 修改 AdminController.java 模拟返回用户列表
@Controller
public class AdminController {
@PostMapping("/login")
public String login(Admin admin, HttpSession session, Model model) {
if (StringUtils.hasText(admin.getUsername()) && "666".equals(admin.getPassword())) {
//1.这里使用重定向,不适用请求转发,防止刷新页面表单重复提交
//2./manage.html /会被解析成ip:port ,而manage.html是指定浏览器下一次请求访问的路径
//3.重定向会发起get请求
System.out.println(admin);
session.setAttribute("admin", admin);
return "redirect:/manage.html";
} else {
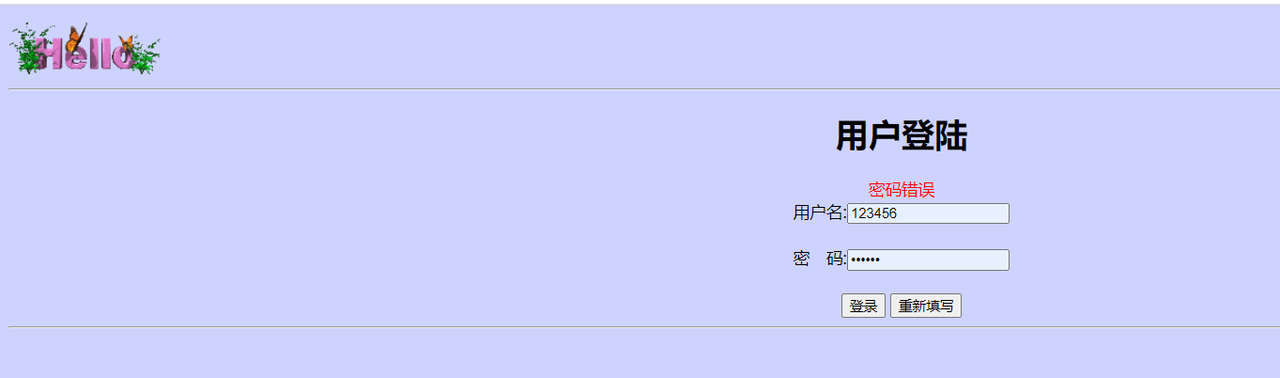
model.addAttribute("msg", "密码错误");
return "adminLogin";
}
}
@GetMapping("manage.html")
public String manage(Model model, HttpSession session) {
Admin admin = (Admin)session.getAttribute("admin");
if (admin == null) {
return "adminLogin";
} else {
//可以这里集合-模拟用户数据, 放入到request域中,并显示
ArrayList<User> users = new ArrayList<>();
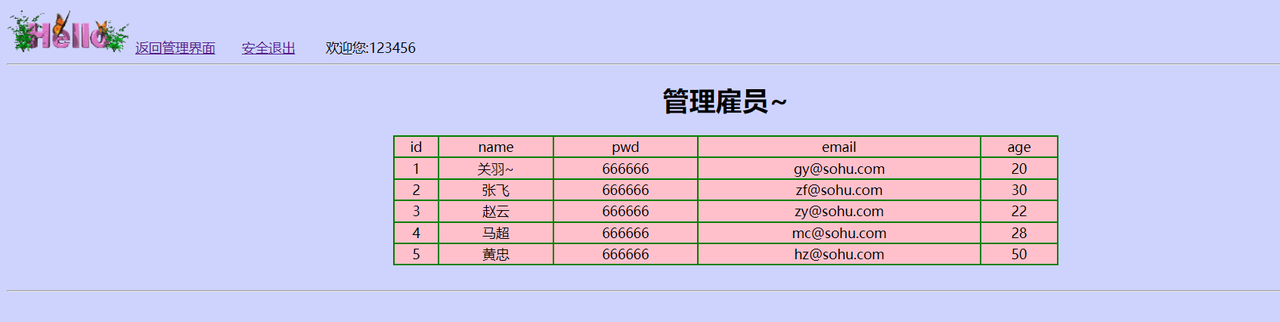
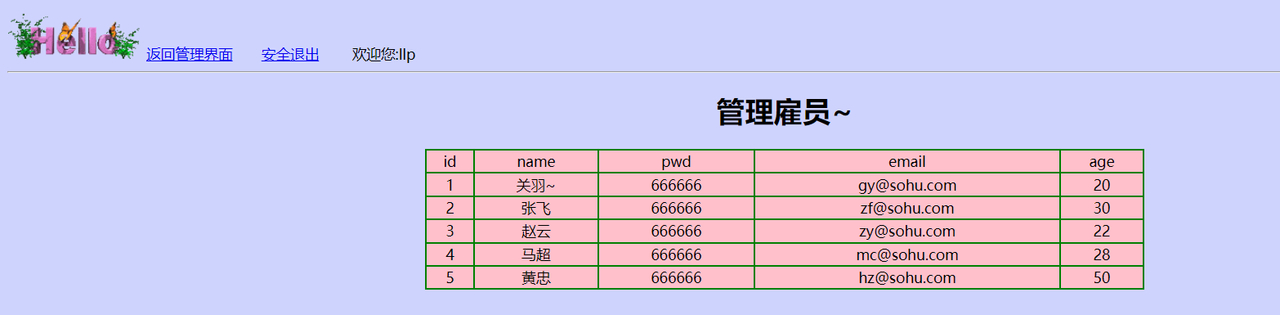
users.add(new User(1, "关羽~", "666666", 20, "gy@sohu.com"));
users.add(new User(2, "张飞", "666666", 30, "zf@sohu.com"));
users.add(new User(3, "赵云", "666666", 22, "zy@sohu.com"));
users.add(new User(4, "马超", "666666", 28, "mc@sohu.com"));
users.add(new User(5, "黄忠", "666666", 50, "hz@sohu.com"));
//将数据放入到request域
model.addAttribute("users", users);
return "manage";
}
}
}
10.修改 manage.html , 显示用户列表
<!DOCTYPE html>
<!--引入thymeleaf命名空间-->
<html lang="en" xmlns:th="http://www.thymeleaf.org">
<head>
    <meta charset="UTF-8">
    <title>管理后台</title>
</head>
<body bgcolor="#CED3FE">
<img src="images/1.GIF"/>
<a href='#'>返回管理界面</a>  <a href='#'>安全退出</a>   欢迎您:[[${session.admin.username}]]
<hr/>
<div style="text-align: center">
    <h1>管理雇员~</h1>
    <table border="1px" cellspacing="0" bordercolor="green" style="width:800px;margin: auto">
        <tr bgcolor="pink">
            <td>id</td>
            <td>name</td>
            <td>pwd</td>
            <td>email</td>
            <td>age</td>
        </tr>
        <!--${...} 变量取值表达式:获取请求域、session 域、对象等值
            th:each 迭代
            th:text :设置当前元素的文本内容
        -->
        <tr bgcolor="#ffc0cb" th:each="user:${users}" >
            <td th:text="${user.id}">a</td>
            <td th:text="${user.name}">b</td>
            <td th:text="${user.pwd}">c</td>
            <td th:text="${user.email}">d</td>
            <td th:text="${user.age}">e</td>
        </tr>
    </table>
    <br/>
</div>
<hr/>
</body>
</html>
11. 修改 adminLogin.html , 显示登录错误信息和提交 action
<!DOCTYPE html>
<html lang="en" xmlns:th="http://www.thymeleaf.org">
<head>
    <meta charset="UTF-8">
    <title>login</title>
</head>
<body bgcolor="#CED3FE">
<img src="images/1.GIF"/>
<hr/>
<div style="text-align: center">
    <h1>用户登陆</h1>
    <!--#默认提交给 /
     th:action="@{/login}"
     会替换用 /login替换 #
     -->
    <form th:action="@{/login}" action="#"  method="post">
        <label style="color: red" th:text="${msg}"></label><br/>
        用户名:<input type="text" style="width:150px" name="username"/><br/><br/>
        密 码:<input type="password" style="width:150px" name="password"/><br/><br/>
        <input type="submit" value="登录"/>
        <input type="reset" value="重新填写"/>
    </form>
</div>
<hr/>
</body>
</html>
4.完成测试- Thymeleaf 显示数据页面效果