 JavaWeb
 Spring
 MyBatis
 linux
linux
 消息队列
消息队列
 JavaSE
 工具
工具
 AI
AI
 搜索
搜索
 dy
dy
Linux-实用指令
Linux-实用指令
1.指定运行级别
1.基本介绍
运行级别说明:
0:关机
1:单用户【找回丢失密码】
2:多用户状态没有网络服务
3:多用户状态有网络服务
4:系统未使用保留给用户
5:图形界面
6:系统重启
常用运行级别是 3 和 5 ,也可以指定默认运行级别
2.应用实例
命令:init [0123456] 应用案例: 通过 init 来切换不同的运行级别,比如动 5-3 , 然后关机。
#关机shutdown指令
init 0

#切换到单用户
init 1

#切换到多用户状态没有网络服务
init 2

#切换到多用户状态又网络服务
init 3

#切换到系统未使用保留给用户
init 4

#切换到图像界面
init 5

#切换到系统重启
init 6
3.CentOS7后台运行级别说明
在 centos7 以前, /etc/inittab 文件中 .
centos7进行了简化 ,如下:
#多用户状态有网络服务,没有可视化界面
multi-user.target: analogous to runlevel 3
#图形界面
graphical.target: analogous to runlevel 5

#查看当前默认的后台运行级别
# To view current default target, run:
systemctl get-default
#设置默认的后台运行级别
# To set a default target, run:
systemctl set-default TARGET.target
[root@llp ~]# systemctl get-default
graphical.target
[root@llp ~]# systemctl set-default mutil-user.target
2.找回root密码
1.面试题
如何找回root密码?
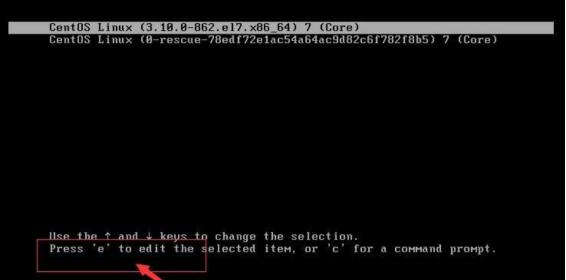
- 首先,启动系统,进入开机界面,在界面中按“e”进入编辑界面。如图
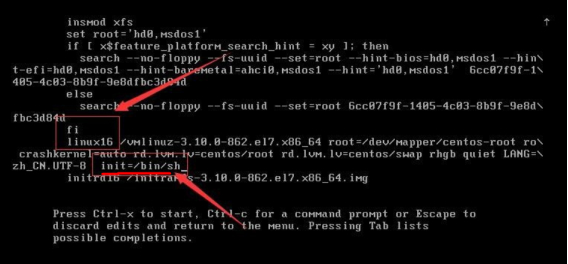
2.进入编辑界面,使用键盘上的上下键把光标往下移动,找到以““Linux16”开头内容所在的行数”,在行的最后面输入:init=/bin/sh。如图
3.接着,输入完成后,直接按快捷键:Ctrl+x 进入单用户模式。
4.接着,在光标闪烁的位置中输入:mount -o remount,rw /(注意:各个单词间有空格),完成后按键盘的回车键(Enter)。如图

5.在新的一行最后面输入:passwd, 完成后按键盘的回车键(Enter)。输入密码,然后再次确认密码即可(提示: 密码长度最好8位以上,但不是必须的), 密码修改成功后,会显示passwd.....的样式,说明密码修改成功

6.接着,在鼠标闪烁的位置中(最后一行中)输入:touch /.autorelabel(注意:touch与 /后面有一个空格),完成后按键盘的回车键(Enter)
7.继续在光标闪烁的位置中,输入:exec /sbin/init(注意:exec与 /后面有一个空格),完成后按键盘的回车键(Enter),等待系统自动修改密码(提示:这个过程时间可能有点长,耐心等待),完成后,系统会自动重启, 新的密码生效了

3.帮助指令
1.man获得帮助信息
基本语法:man [命令或配置文件](功能描述:获得帮助信息)
案例:查看 ls 命令的帮助信息 man ls
man ls
在 linux 下,隐藏文件是以 .开头 , 选项可以组合使用 比如 ls -al, 比如 ls -al /root
ls -al
ls -al /root
2.help指令
基本语法:help 命令 (功能描述:获得 shell 内置命令的帮助信息)
help
3.应用实例
案例:查看 cd 命令的帮助信息
[root@llp ~]# help cd
4.文件目录类
1.pwd指令
基本语法 :pwd (功能描述:显示当前工作目录的绝对路径)
应用实例:案例:显示当前工作目录的绝对路径
[root@llp ~]# pwd
/root
2.ls指令
基本语法:ls [选项] [目录或是文件]
常用选项
-a :显示当前目录所有的文件和目录,包括隐藏的。
-l :以列表的方式显示信息
应用实例
案例:查看当前目录的所有内容信息
#-a :显示当前目录所有的文件和目录,包括隐藏的。
ls -a
#-l	:以列表的方式显示信息
ls -l
3.cd指令
基本语法:cd [参数] (功能描述:切换到指定目录)
理解:绝对路径和相对路径
cd ~ 或者 cd :回到自己的家目录, 比如 你是 root , cd ~ 到 /root
cd .. 回到当前目录的上一级目录
应用实例
案例 1:使用绝对路径切换到 root 目录
cd /root
案例 2: 使用相对路径到/root 目录, 比如在 /home/tom
cd ../../root
案例 3:表示回到当前目录的上一级目录 ,
cd ..
案例 4:回到家目录
cd ~
4.mkdir指令
mkdir 指令用于创建目录
基本语法:mkdir [选项] 要创建的目录
常用选项
-p :创建多级目录
应用实例
案例 1:创建一个目录 /home/dog
#home是已经存在的目录,mkdir只能创建一级目录
mkdir /home/dog
mkdir /home/dog/tiger
mkdir: 无法创建目录"/home/dog/tiger": 没有那个文件或目录
案例 2:创建多级目录 /home/animal/tiger
mkdir -p /home/animal/tiger
5.rmdir指令删除空目录
基本语法
rmdir [选项] 要删除的空目录
应用实例
案例:删除一个目录 /home/dog
#删除空目录
rmdir /home/dog
使用细节
rmdir 删除的是空目录,如果目录下有内容时无法删除的。
提示:
如果需要删除非空目录,需要使用 rm -rf
要删除的目录比如: rm -rf /home/animal
#animal目录下有文件是非空目录,rmdir /home/animal
[root@llp home]# mkdir -p /home/animal/tiger
[root@llp home]# rmdir /home/animal
rmdir: 删除 "/home/animal" 失败: 目录非空

#-rf强制递归删除
rm -rf /home/animal
6.touch指令
touch 指令创建空文件
基本语法
touch 文件名称
应用实例
案例: 在/home 目录下 , 创建一个空文件 hello.txt
[root@llp home]# ls
llp  test  zuj
[root@llp home]# touch hello.txt
[root@llp home]# ls
hello.txt  llp  test  zuj
7.cp指令
cp 指令拷贝文件到指定目录

基本语法
cp [选项] source dest
常用选项
-r :递归复制整个文件夹
应用实例
案例 1: 将 /home/hello.txt 拷贝到 /home/bbb 目录下 cp hello.txt /home/bbb
[root@llp home]# ls
hello.txt  llp  test  zuj
#1.创建bbb目录
[root@llp home]# mkdir bbb
#2.将hello.txt拷贝到 /home/bbb目录下
[root@llp home]# cp hello.txt /home/bbb
[root@llp home]# ls
bbb  hello.txt  llp  test  zuj
[root@llp home]# cd bbb/
[root@llp bbb]# ls
hello.txt
[root@llp bbb]#
案例 2: 递归复制整个文件夹,举例, 比如将 /home/bbb 整个目录, 拷贝到 /opt cp -r /home/bbb /opt
[root@llp bbb]# ls
hello.txt
[root@llp bbb]# touch hello2.txt
[root@llp bbb]# ls
hello2.txt  hello.txt
[root@llp bbb]# cp -r /home/bbb/ /opt/
[root@llp bbb]# cd /opt/
[root@llp opt]# ls
bbb  rh  VMwareTools-10.3.10-13959562.tar.gz  vmware-tools-distrib
[root@llp opt]#
使用细节
强制覆盖不提示的方法:\cp -r /home/bbb /opt
[root@llp bbb]# cp -r /home/bbb/ /opt/
[root@llp bbb]# cd /opt/
[root@llp opt]# ls
bbb  rh  VMwareTools-10.3.10-13959562.tar.gz  vmware-tools-distrib
[root@llp opt]# cd /home/bbb
#如果bbb下面有很多个文件和opt下的bbb的文件是重复的就会提示很多次
[root@llp bbb]# cp -r /home/bbb/ /opt/
cp:是否覆盖"/opt/bbb/hello.txt"? y
cp:是否覆盖"/opt/bbb/hello2.txt"? y
#强制覆盖不提示的方法
[root@llp bbb]# \cp -r /home/bbb /opt
[root@llp bbb]#
8.rm指令
说明:rm 指令移除文件或目录
基本语法
rm [选项] 要删除的文件或目录
常用选项
-r :递归删除整个文件夹
rm -r bbb
-f : 强制删除不提示
rm -f hello.txt
应用实例
案例 1: 将 /home/hello.txt 删除 , rm /home/hello.txt
[root@llp home]# rm hello.txt
rm:是否删除普通空文件 "hello.txt"?y
[root@llp home]#
案例 2: 递归删除整个文件夹 /home/bbb , rm -rf /home/bbb [删除整个文件夹,不提示]
rm -rf /home/bbb
使用细节
强制删除不提示的方法:带上 -f 参数即可
9.mv指令
mv 移动文件与目录或重命名
基本语法
mv oldNameFile newNameFile (功能描述:重命名)
mv /temp/movefile /targetFolder (功能描述:移动文件)
应用实例
案例 1: 将 /home/cat.txt 文件 重新命名为 pig.txt
[root@llp home]# touch cat.txt
[root@llp home]# ls
cat.txt  llp  test  zuj
[root@llp home]# mv cat.txt pig.txt
[root@llp home]# ls
llp  pig.txt  test  zuj
[root@llp home]#
案例 2:将 /home/pig.txt 文件 移动到 /root 目录下
#mv pig.txt /root/www.txt 将pig.txt移动到root目录下且重命名未www.txt
#将pig.txt移动到root目录
[root@llp home]# mv pig.txt /root/
[root@llp home]# ls
llp  test  zuj
[root@llp home]# cd /root/
[root@llp ~]# ls
anaconda-ks.cfg  Hello.java  initial-setup-ks.cfg  pig.txt  公共  模板  视频  图片  文档  下载  音乐  桌面
[root@llp ~]#
案例 3: 移动整个目录 , 比如将 /opt/bbb 移动到 /home 下
#将 /opt/bbb  移动到 /home 下
mv /opt/bbb /home/
10.cat指令
cat 查看文件内容
基本语法
cat [选项] 要查看的文件
常用选项
-n :显示行号
应用实例
案例 1: /etc/profile 文件内容,并显示行号
cat -n /etc/profile
使用细节
cat 只能浏览文件,而不能修改文件,为了浏览方便,一般会带上 管道命令 | more
cat -n /etc/profile | more [进行交互]
#输入空格翻页,输入enter向下显示一行
cat -n /etc/profile | more
11.more指令
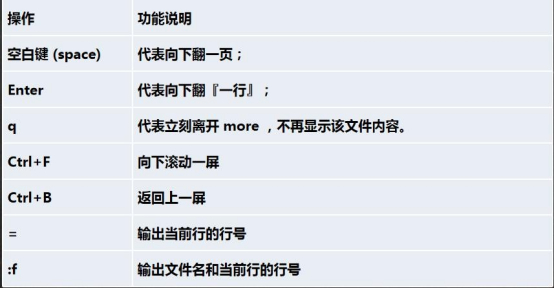
more 指令是一个基于 VI 编辑器的文本过滤器,它以全屏幕的方式按页显示文本文件的内容。more 指令中内置了若干快捷键(交互的指令),详见操作说明
基本语法
more 要查看的文件
操作说明,如图
应用实例
案例: 采用 more 查看文件/etc/profile
more /etc/profile
12.less 指令
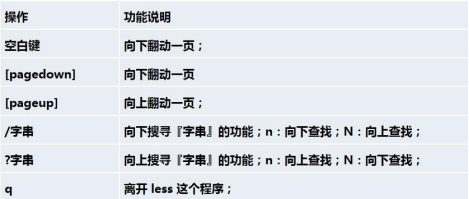
less 指令用来分屏查看文件内容,它的功能与 more 指令类似,但是比 more 指令更加强大,支持各种显示终端。less 指令在显示文件内容时,并不是一次将整个文件加载之后才显示,而是根据显示需要加载内容,对于显示大型文件具有较高的效率。
基本语法
less 要查看的文件
操作说明
应用实例
案例:
采用 less 查看一个大文件文件 /opt/杂文.txt
#查看比较大的文件建议使用less
 less /opt/杂文.txt
13.echo指令
echo 输出内容到控制台
基本语法
echo [选项] [输出内容]
应用实例
案例: 使用 echo 指令输出环境变量, 比如输出 $PATH $HOSTNAME, echo $HOSTNAME
[root@llp bbb]# echo $HOSTNAME
llp
[root@llp bbb]# echo $PATH
/usr/local/sbin:/usr/local/bin:/usr/sbin:/usr/bin:/root/bin
案例: 使用 echo 指令输出 hello,world!
[root@llp bbb]# echo "hello world"
hello world
14.head指令
head 用于显示文件的开头部分内容,默认情况下 head 指令显示文件的前 10 行内容
基本语法
head 文件 (功能描述:默认查看文件头 10 行内容)
head -n 5 文件 (功能描述:查看文件头 5 行内容,5 可以是任意行数)
应用实例
案例: 查看/etc/profile 的前面 5 行代码
head -n 5 /etc/profile
15.tail指令
tail 用于输出文件中尾部的内容,默认情况下 tail 指令显示文件的前 10 行内容。
基本语法
- tail 文件 (功能描述:默认查看文件尾 10 行内容)
- tail -n 5 文件 (功能描述:查看文件尾 5 行内容,5 可以是任意行数)
- tail -f 文件 (功能描述:实时追踪该文档的所有更新)
应用实例
案例 1: 查看/etc/profile 最后 5 行的代码
tail -n 5 /etc/profile
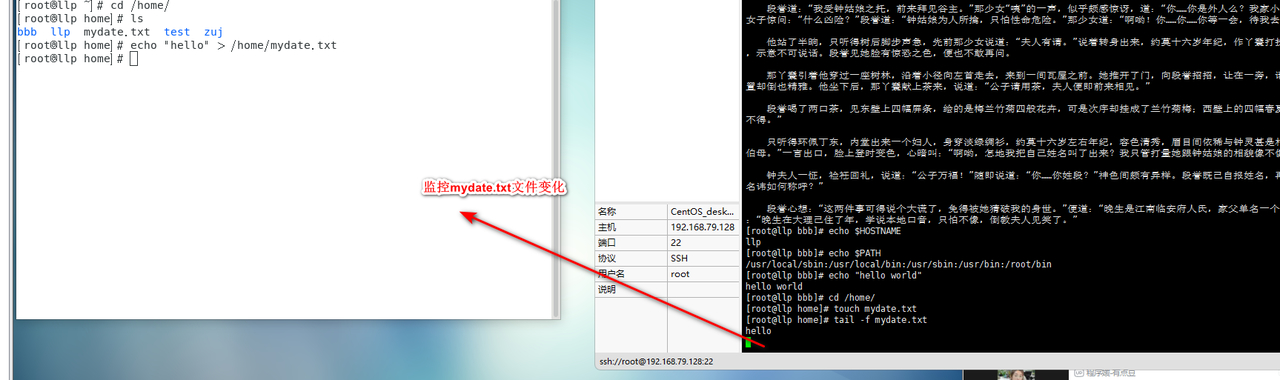
案例 2: 实时监控 mydate.txt , 看看到文件有变化时,是否看到, 实时的追加 hello,world
tail -f /home/mydate.txt
16. > 指令 和 >> 指令
> 输出重定向和 >> 追加
基本语法
- ls -l >文件 (功能描述:列表的内容写入文件 a.txt 中(覆盖写))
- ls -al >>文件 (功能描述:列表的内容追加到文件 aa.txt 的末尾)
- cat 文件 1 > 文件 2 (功能描述:将文件 1 的内容覆盖到文件 2)
- echo "内容">> 文件 (追加)
应用实例
案例 1: 将 /home 目录下的文件列表 写入到 /home/info.txt 中, 覆盖写入
ls -l /home > /home/info.txt [如果 info.txt 没有,则会创建]
[root@llp home]# ls -l /home > /home/info.txt
[root@llp home]# ls
bbb  info.txt  llp  mydate.txt  test  zuj
[root@llp home]# cat info.txt
总用量 20
drwxr-xr-x. 2 root root   4096 8月  28 15:45 bbb
-rw-r--r--. 1 root root      0 8月  28 16:01 info.txt
drwx------. 5 llp  llp    4096 8月  27 10:07 llp
-rw-r--r--. 1 root root      6 8月  28 15:55 mydate.txt
drwx------. 3 king king   4096 8月  27 16:40 test
drwx------. 3 zuj  mojiao 4096 8月  27 18:11 zuj
案例 2: 将当前日历信息 追加到 /home/mycal 文件中
指令为: cal >> /home/mycal
[root@llp home]# cal
      八月 2022
日 一 二 三 四 五 六
    1  2  3  4  5  6
 7  8  9 10 11 12 13
14 15 16 17 18 19 20
21 22 23 24 25 26 27
28 29 30 31
## >> 追加
[root@llp home]# cal >> /home/mycal
[root@llp home]# ls
bbb  info.txt  llp  mycal  mydate.txt  test  zuj
[root@llp home]# cat mycal
      八月 2022
日 一 二 三 四 五 六
    1  2  3  4  5  6
 7  8  9 10 11 12 13
14 15 16 17 18 19 20
21 22 23 24 25 26 27
28 29 30 31
17. ln指令
软链接也称为符号链接,类似于 windows 里的快捷方式,主要存放了链接其他文件的路径
基本语法
ln -s [原文件或目录] [软链接名] (功能描述:给原文件创建一个软链接)
应用实例
案例 1: 在/home 目录下创建一个软连接 myroot,连接到 /root 目录
ln -s /root /home/myroot
#在/home 目录下创建一个软连接 myroot,连接到 /root  目录
[root@llp home]# ln -s /root /home/myroot
[root@llp home]# ls
bbb  info.txt  llp  mycal  mydate.txt  myroot  test  zuj
[root@llp home]# cd myroot/
#进入到myroot查看文件目录,发现和root是一致的其实就是连接到了root目录
[root@llp myroot]# ls
anaconda-ks.cfg  Hello.java  initial-setup-ks.cfg  pig.txt  公共  模板  视频  图片  文档  下载  音乐  桌面
[root@llp myroot]#
案例 2: 删除软连接 myroot rm /home/myroot
[root@llp myroot]# rm /home/myroot/
rm: 无法删除"/home/myroot/": 是一个目录
[root@llp myroot]# rm /home/myroot
rm:是否删除符号链接 "/home/myroot"?y
[root@llp myroot]#
细节说明
当我们使用 pwd 指令查看目录时,仍然看到的是软链接所在目录。
[root@llp myroot]# pwd
/home/myroot
18.history指令
查看已经执行过历史命令,也可以执行历史指令
基本语法
history (功能描述:查看已经执行过历史命令)
应用实例
案例 1: 显示所有的历史命令
history
案例 2: 显示最近使用过的 10 个指令。
history 10
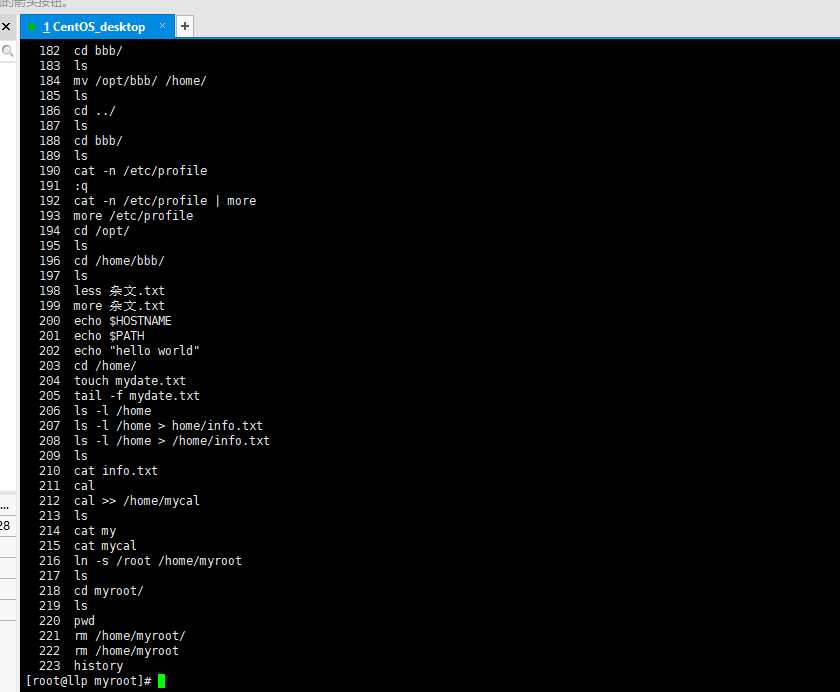
[root@llp myroot]# history 10
  215  cat mycal
  216  ln -s /root /home/myroot
  217  ls
  218  cd myroot/
  219  ls
  220  pwd
  221  rm /home/myroot/
  222  rm /home/myroot
  223  history
  224  history 10
案例 3:执行历史编号为 6 的指令 !6
[root@llp myroot]# !6
ls
anaconda-ks.cfg  Hello.java  initial-setup-ks.cfg  pig.txt  公共  模板  视频  图片  文档  下载  音乐  桌面
[root@llp myroot]#
5.时间日期类
1.date 指令-显示当前日期
基本语法
- date (功能描述:显示当前时间)
- date +%Y (功能描述:显示当前年份)
- date +%m(功能描述:显示当前月份)
- date +%d (功能描述:显示当前是哪一天)
- date "+%Y-%m-%d %H:%M:%S"(功能描述:显示年月日时分秒)
应用实例
案例 1: 显示当前时间信息
date
[root@llp myroot]# date
2022年 08月 28日 星期日 16:21:50 CST
案例 2: 显示当前时间年月日
date "+%Y-%m-%d"
[root@llp myroot]# date "+%Y-%m-%d"
2022-08-28
案例 3: 显示当前时间年月日时分秒
date "+%Y-%m-%d %H:%M:%S"
[root@llp myroot]# date "+%Y-%m-%d %H:%M:%S"
2022-08-28 16:22:39
2.date 指令-设置日期
基本语法
date -s 字符串时间
应用实例
案例 1: 设置系统当前时间 , 比如设置成 2020-11-03 20:02:10
date -s “2020-11-03 20:02:10”
3.cal指令
查看日历指令 cal
基本语法
cal [选项] (功能描述:不加选项,显示本月日历)
应用实例
案例 1: 显示当前日历 cal
[root@llp myroot]# cal
      八月 2022
日 一 二 三 四 五 六
    1  2  3  4  5  6
 7  8  9 10 11 12 13
14 15 16 17 18 19 20
21 22 23 24 25 26 27
28 29 30 31
案例 2: 显示 2022 年日历 : cal 2022
[root@llp myroot]# cal 2022
                               2022

        一月                   二月                   三月
日 一 二 三 四 五 六   日 一 二 三 四 五 六   日 一 二 三 四 五 六
                   1          1  2  3  4  5          1  2  3  4  5
 2  3  4  5  6  7  8    6  7  8  9 10 11 12    6  7  8  9 10 11 12
 9 10 11 12 13 14 15   13 14 15 16 17 18 19   13 14 15 16 17 18 19
16 17 18 19 20 21 22   20 21 22 23 24 25 26   20 21 22 23 24 25 26
23 24 25 26 27 28 29   27 28                  27 28 29 30 31
30 31
        四月                   五月                   六月
日 一 二 三 四 五 六   日 一 二 三 四 五 六   日 一 二 三 四 五 六
                1  2    1  2  3  4  5  6  7             1  2  3  4
 3  4  5  6  7  8  9    8  9 10 11 12 13 14    5  6  7  8  9 10 11
10 11 12 13 14 15 16   15 16 17 18 19 20 21   12 13 14 15 16 17 18
17 18 19 20 21 22 23   22 23 24 25 26 27 28   19 20 21 22 23 24 25
24 25 26 27 28 29 30   29 30 31               26 27 28 29 30

        七月                   八月                   九月
日 一 二 三 四 五 六   日 一 二 三 四 五 六   日 一 二 三 四 五 六
                1  2       1  2  3  4  5  6                1  2  3
 3  4  5  6  7  8  9    7  8  9 10 11 12 13    4  5  6  7  8  9 10
10 11 12 13 14 15 16   14 15 16 17 18 19 20   11 12 13 14 15 16 17
17 18 19 20 21 22 23   21 22 23 24 25 26 27   18 19 20 21 22 23 24
24 25 26 27 28 29 30   28 29 30 31            25 26 27 28 29 30
31
        十月                  十一月                 十二月
日 一 二 三 四 五 六   日 一 二 三 四 五 六   日 一 二 三 四 五 六
                   1          1  2  3  4  5                1  2  3
 2  3  4  5  6  7  8    6  7  8  9 10 11 12    4  5  6  7  8  9 10
 9 10 11 12 13 14 15   13 14 15 16 17 18 19   11 12 13 14 15 16 17
16 17 18 19 20 21 22   20 21 22 23 24 25 26   18 19 20 21 22 23 24
23 24 25 26 27 28 29   27 28 29 30            25 26 27 28 29 30 31
30 31
6. 搜索查找类
1.find指令
find 指令将从指定目录向下递归地遍历其各个子目录,将满足条件的文件或者目录显示在终端。
基本语法
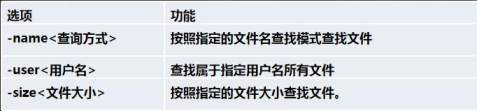
find [搜索范围] [选项]
选项说明
应用实例
案例 1: 按文件名:根据名称查找/home 目录下的 hello.txt 文件
find /home -name hello.txt
[root@llp myroot]# find /home -name hello.txt
/home/bbb/hello.txt
#如果没有就没有结果输出
[root@llp myroot]# find / -name hellox.txt
[root@llp myroot]#
案例 2:按拥有者:查找/opt 目录下,用户名称为 nobody 的文件
find /opt -user nobody
[root@llp myroot]# find /opt/  -user nobody
[root@llp myroot]# find /opt/  -user root
案例 3:查找整个 linux 系统下大于 200M 的文件(+n 大于 -n 小于 n 等于, 单位有 k,M,G)
find / -size +200M
# / 表示从根目录开始 +大于 -小于
find / -size +200M

[root@llp myroot]# find / -size +200M
/run/media/root/CentOS 7 x86_64/LiveOS/squashfs.img
/proc/kcore
find: ‘/proc/13727/task/13727/fd/5’: 没有那个文件或目录
find: ‘/proc/13727/task/13727/fdinfo/5’: 没有那个文件或目录
find: ‘/proc/13727/fd/6’: 没有那个文件或目录
find: ‘/proc/13727/fdinfo/6’: 没有那个文件或目录
[root@llp myroot]#
ls -lh 文件比较容易看的单位显示
[root@llp myroot]# ls -lh
总用量 44K
-rw-------. 1 root root 1.9K 8月  26 15:58 anaconda-ks.cfg
-rw-r--r--. 1 root root   79 8月  27 08:49 Hello.java
-rw-r--r--. 1 root root 1.9K 8月  26 15:59 initial-setup-ks.cfg
-rw-r--r--. 1 root root    0 8月  28 15:29 pig.txt
drwxr-xr-x. 2 root root 4.0K 8月  26 16:00 公共
drwxr-xr-x. 2 root root 4.0K 8月  26 16:00 模板
drwxr-xr-x. 2 root root 4.0K 8月  26 16:00 视频
drwxr-xr-x. 2 root root 4.0K 8月  26 16:00 图片
drwxr-xr-x. 2 root root 4.0K 8月  26 16:00 文档
drwxr-xr-x. 2 root root 4.0K 8月  26 16:00 下载
drwxr-xr-x. 2 root root 4.0K 8月  26 16:00 音乐
drwxr-xr-x. 2 root root
2.locate 指令
locate 指令可以快速定位文件路径。locate 指令利用事先建立的系统中所有文件名称及路径的 locate 数据库实现快速定位给定的文件。Locate 指令无需遍历整个文件系统,查询速度较快。为了保证查询结果的准确度,管理员必须定期更新 locate 时刻
基本语法
locate 搜索文件
特别说明
由于 locate 指令基于数据库进行查询,所以第一次运行前,必须使用 updatedb 指令创建 locate 数据库。
应用实例
案例 1: 请使用 locate 指令快速定位 hello.txt 文件所在目录
#使用locate必须先执行updatedb,否则即使文件存在页无法查找
[root@llp myroot]# updatedb
[root@llp myroot]# locate hello.txt
/home/bbb/hello.txt
[root@llp myroot]# locate helloxx.txt
[root@llp myroot]#
3.which 指令
which 指令,可以查看某个指令在哪个目录下,比如 ls 指令在哪个目录
[root@llp myroot]# which ls
alias ls='ls --color=auto'
	/usr/bin/ls
[root@llp myroot]# which reboot
/usr/sbin/reboot
[root@llp myroot]#
4. grep 指令和 管道符号 |
grep 过滤查找 , 管道符,“|”,表示将前一个命令的处理结果输出传递给后面的命令处理。

基本语法
grep [选项] 查找内容 源文件
常用选项

应用实例
案例 1: 请在 hello.txt 文件中,查找 "yes" 所在行,并且显示行号
写法 1: cat /home/hello.txt | grep "yes"
[root@llp home]# cat /home/hello.txt  | grep "yes"
hahahahyes
[root@llp home]# cat /home/hello.txt  | grep -n "no"
[root@llp home]#

写法 2: grep -n "yes" /home/hello.txt
[root@llp home]# grep -n "yes" /home/hello.txt
1:hahahahyes
3:yes
5:yes

7.压缩和解压类
1.gzip/gunzip 指令
gzip 用于压缩文件, gunzip 用于解压的
基本语法
gzip 文件 (功能描述:压缩文件,只能将文件压缩为*.gz 文件)
gunzip 文件.gz (功能描述:解压缩文件命令)
应用实例
案例 1: gzip 压缩, 将 /home 下的 hello.txt 文件进行压缩
gzip /home/hello.txt
[root@llp home]# gzip /home/hello.txt
[root@llp home]# ls
bbb  hello.txt.gz  info.txt  llp  mycal  mydate.txt  test  zuj
案例 2: gunzip 压缩, 将 /home 下的 hello.txt.gz 文件进行解压缩
gunzip /home/hello.txt.gz
[root@llp home]# gunzip /home/hello.txt.gz
[root@llp home]# ls
bbb  hello.txt  info.txt  llp  mycal  mydate.txt  test  zuj
2.zip/unzip 指令
zip 用于压缩文件, unzip 用于解压的,这个在项目打包发布中很有用的

基本语法
zip [选项] XXX.zip 将要压缩的内容(功能描述:压缩文件和目录的命令)
unzip [选项] XXX.zip (功能描述:解压缩文件)
zip 常用选项
-r:递归压缩,即压缩目录
unzip 的常用选项
-d<目录> :指定解压后文件的存放目录
应用实例
案例 1: 将 /home 下的 所有文件/文件夹进行压缩成 myhome.zip
zip -r myhome.zip /home/ [将 home 目录及其包含的文件和子文件夹都压缩]
#将 /home 下的 所有文件/文件夹进行压缩成 myhome.zip
[root@llp home]# zip  -r myhome.zip /home/
  adding: home/ (stored 0%)
  adding: home/mycal (deflated 26%)
  adding: home/llp/ (stored 0%)
  adding: home/llp/.bash_history (deflated 44%)
  adding: home/llp/.config/ (stored 0%)
  adding: home/llp/.config/abrt/ (stored 0%)
  adding: home/llp/.cache/ (stored 0%)
  adding: home/llp/.cache/abrt/ (stored 0%)
  adding: home/llp/.cache/abrt/lastnotification (stored 0%)
  adding: home/llp/.bashrc (deflated 23%)
  adding: home/llp/.Xauthority (stored 0%)
  adding: home/llp/.mozilla/ (stored 0%)
  adding: home/llp/.mozilla/plugins/ (stored 0%)
  adding: home/llp/.mozilla/extensions/ (stored 0%)
  adding: home/llp/.bash_profile (deflated 21%)
  adding: home/llp/.bash_logout (stored 0%)
  adding: home/mydate.txt (stored 0%)
  adding: home/hello.txt (deflated 21%)
  adding: home/test/ (stored 0%)
  adding: home/test/.bashrc (deflated 23%)
  adding: home/test/.mozilla/ (stored 0%)
  adding: home/test/.mozilla/plugins/ (stored 0%)
  adding: home/test/.mozilla/extensions/ (stored 0%)
  adding: home/test/.bash_profile (deflated 21%)
  adding: home/test/.bash_logout (stored 0%)
  adding: home/bbb/ (stored 0%)
  adding: home/bbb/hello.txt (stored 0%)
  adding: home/bbb/杂文.txt (deflated 58%)
  adding: home/bbb/hello2.txt (stored 0%)
  adding: home/info.txt (deflated 49%)
  adding: home/zuj/ (stored 0%)
  adding: home/zuj/.bashrc (deflated 23%)
  adding: home/zuj/.mozilla/ (stored 0%)
  adding: home/zuj/.mozilla/plugins/ (stored 0%)
  adding: home/zuj/.mozilla/extensions/ (stored 0%)
  adding: home/zuj/.bash_profile (deflated 21%)
  adding: home/zuj/.bash_logout (stored 0%)
[root@llp home]# ls
bbb  hello.txt  info.txt  llp  mycal  mydate.txt  myhome.zip  test  zuj
案例 2: 将 myhome.zip 解压到 /opt/tmp 目录下
mkdir /opt/tmp
unzip -d /opt/tmp /home/myhome.zip
[root@llp home]# mkdir /opt/tmp
#将 myhome.zip  解压到 /opt/tmp 目录下
[root@llp home]# unzip -d /opt/tmp /home/myhome.zip
Archive:  /home/myhome.zip
   creating: /opt/tmp/home/
  inflating: /opt/tmp/home/mycal
   creating: /opt/tmp/home/llp/
  inflating: /opt/tmp/home/llp/.bash_history
   creating: /opt/tmp/home/llp/.config/
   creating: /opt/tmp/home/llp/.config/abrt/
   creating: /opt/tmp/home/llp/.cache/
   creating: /opt/tmp/home/llp/.cache/abrt/
 extracting: /opt/tmp/home/llp/.cache/abrt/lastnotification
  inflating: /opt/tmp/home/llp/.bashrc
 extracting: /opt/tmp/home/llp/.Xauthority
   creating: /opt/tmp/home/llp/.mozilla/
   creating: /opt/tmp/home/llp/.mozilla/plugins/
   creating: /opt/tmp/home/llp/.mozilla/extensions/
  inflating: /opt/tmp/home/llp/.bash_profile
 extracting: /opt/tmp/home/llp/.bash_logout
 extracting: /opt/tmp/home/mydate.txt
  inflating: /opt/tmp/home/hello.txt
   creating: /opt/tmp/home/test/
  inflating: /opt/tmp/home/test/.bashrc
   creating: /opt/tmp/home/test/.mozilla/
   creating: /opt/tmp/home/test/.mozilla/plugins/
   creating: /opt/tmp/home/test/.mozilla/extensions/
  inflating: /opt/tmp/home/test/.bash_profile
 extracting: /opt/tmp/home/test/.bash_logout
   creating: /opt/tmp/home/bbb/
 extracting: /opt/tmp/home/bbb/hello.txt
  inflating: /opt/tmp/home/bbb/杂文.txt
 extracting: /opt/tmp/home/bbb/hello2.txt
  inflating: /opt/tmp/home/info.txt
   creating: /opt/tmp/home/zuj/
  inflating: /opt/tmp/home/zuj/.bashrc
   creating: /opt/tmp/home/zuj/.mozilla/
   creating: /opt/tmp/home/zuj/.mozilla/plugins/
   creating: /opt/tmp/home/zuj/.mozilla/extensions/
  inflating: /opt/tmp/home/zuj/.bash_profile
 extracting: /opt/tmp/home/zuj/.bash_logout
[root@llp home]# cd /opt/tmp/
[root@llp tmp]# ls
home
3.tar 指令
tar 指令 是打包指令,最后打包后的文件是 .tar.gz 的文件。
基本语法
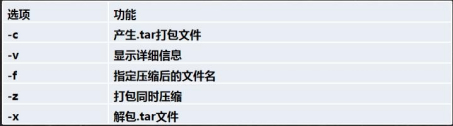
tar [选项] XXX.tar.gz 打包的内容 (功能描述:打包目录,压缩后的文件格式.tar.gz)
选项说明
应用实例
案例 1: 压缩多个文件,将 /home/pig.txt 和 /home/cat.txt 压缩成 pc.tar.gz
tar -zcvf pc.tar.gz /home/pig.txt /home/cat.txt
[root@llp home]# ls
bbb  cat.txt  hello.txt  info.txt  llp  mycal  mydate.txt  myhome.zip  pig.txt  test  zuj
#将home下的pig.txt和cat.txt压缩到pc.tar.gz
[root@llp home]# tar -zcvf pc.tar.gz  /home/pig.txt /home/cat.txt
tar: 从成员名中删除开头的“/”
/home/pig.txt
/home/cat.txt
[root@llp home]# ls
bbb  cat.txt  hello.txt  info.txt  llp  mycal  mydate.txt  myhome.zip  pc.tar.gz  pig.txt  test  zuj
[root@llp home]#
案例 2: 将/home 的文件夹 压缩成 myhome.tar.gz
tar -zcvf myhome.tar.gz /home/
案例 3: 将 pc.tar.gz 解压到当前目录
tar -zxvf pc.tar.gz
案例4: 将myhome.tar.gz 解压到 /opt/tmp2 目录下
mkdir /opt/tmp2

#将home下的myhome.tar.gz解压到/opt/tmp2
tar -zxvf /home/myhome.tar.gz -C /opt/tmp2