JavaWeb
 Spring
 MyBatis
 linux
linux
 消息队列
消息队列
 JavaSE
 工具
工具
 AI
AI
 搜索
搜索
 dy
dy
SpringCloud Alibaba-Seata
SpringCloud Alibaba-Seata
1.Seata 基础
1.先看一个问题,引出 Seata
-
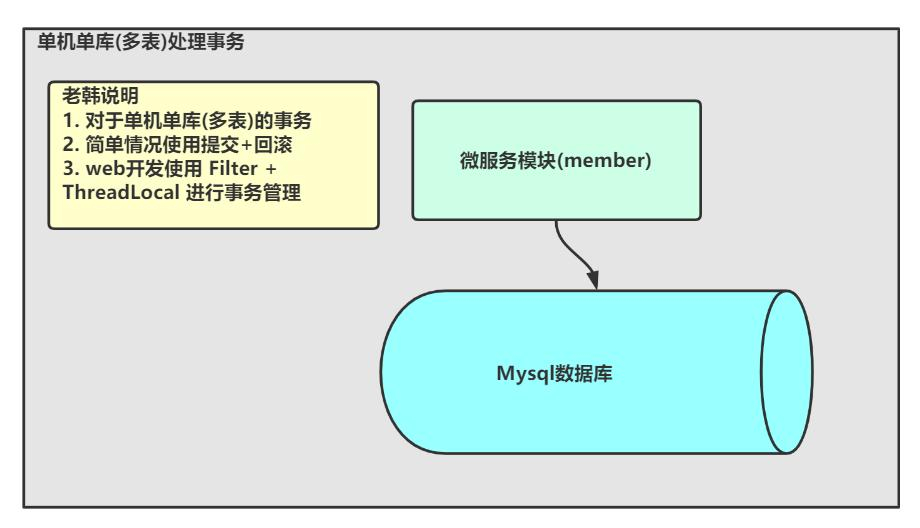
单机单库(多表)处理事务示意图
-
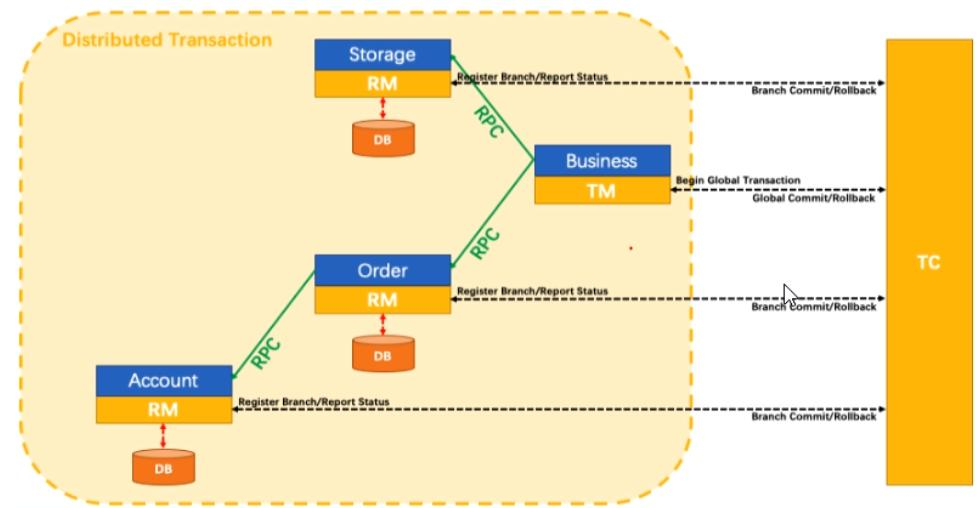
分布式微服务架构下的数据库事务示意图
- 梳理上图
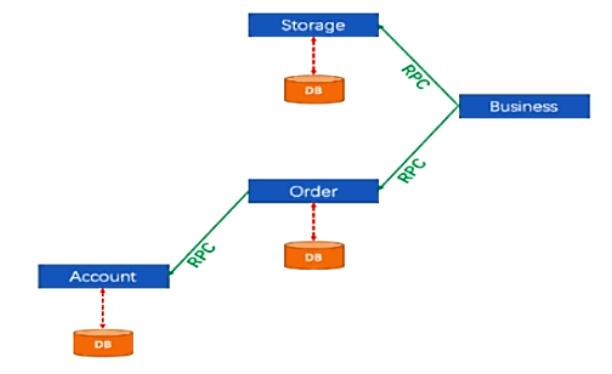
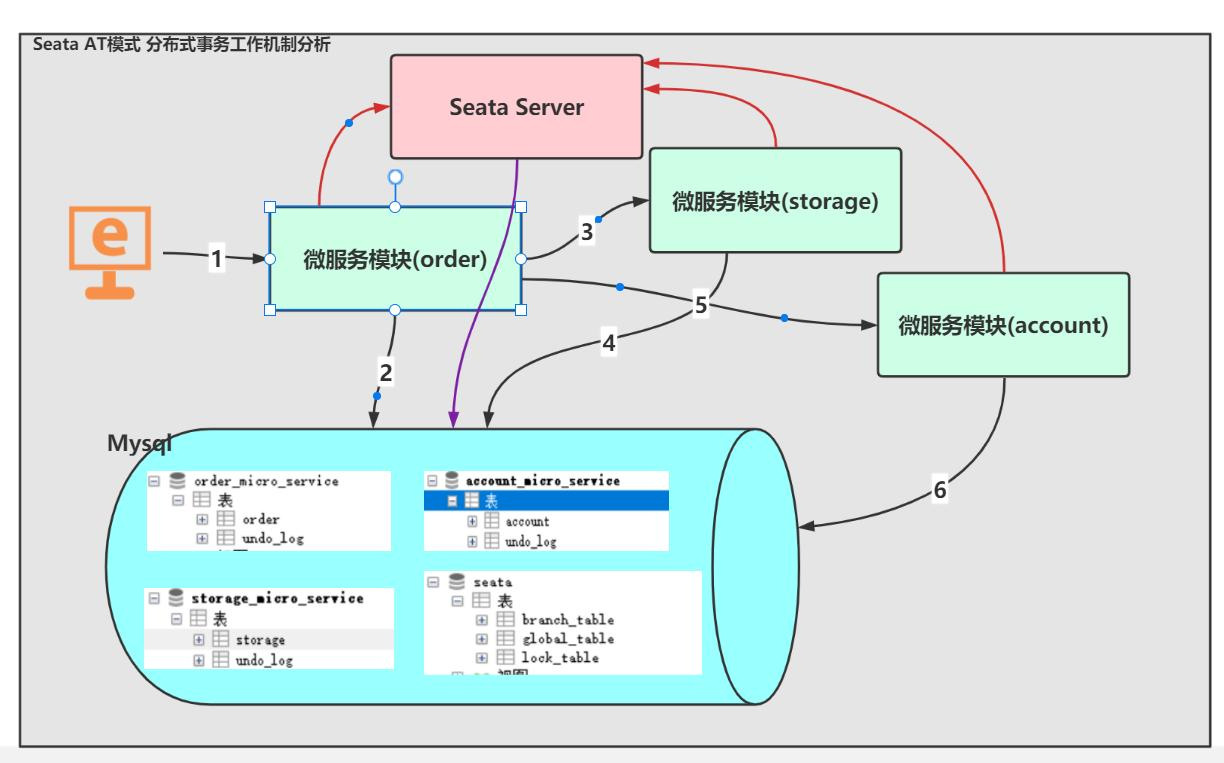
用户购买商品的业务逻辑。整个业务逻辑由3个微服务提供支持∶
- 仓储服务∶对给定的商品扣除仓库/商品数量
- 订单服务;根据采购需求创建订单
- 帐户服务∶从用户帐户中扣除余额
- 问题分析
- 单体应用被拆分成微服务应用,原来的三个模块被拆分成三个独立的应用,分别使用 三个独立的数据源
- 业务操作需要调用三个服务来完成。此时每个服务内部的数据一致性由本地事务来保 证
- 但是全局的数据—致性问题没法保证
- 简单的说: 一次业务操作需要跨多个数据源或需要跨多个系统进行远程调用,就会产 生分布式事务问题
2.分布式事务问题&解决方案
1.分布式事务问题
1.分布式微服务架构下的全局数据一致性问题 [即: 分布式事务问题]
2.解决方案: Seata
3.官网
使用手册: https://seata.io/zh-cn/docs/overview/what-is-seata.html
4.Seata 是什么?
Seata 是一款开源的分布式事务解决方案,致力于提供高性能和简单易用的分布式事务服务。Seata 将为用户提供了 AT、TCC、SAGA 和 XA 事务模式,为用户打造一站式的分布式解决方案。

2.Seata Server 安装
1.下载
https://github.com/seata/seata/releases/tag/v0.9.0
2.安装和配置
-
将 seata-server-0.9.0.zip 解压到 指定目录,比如 d:\program
-
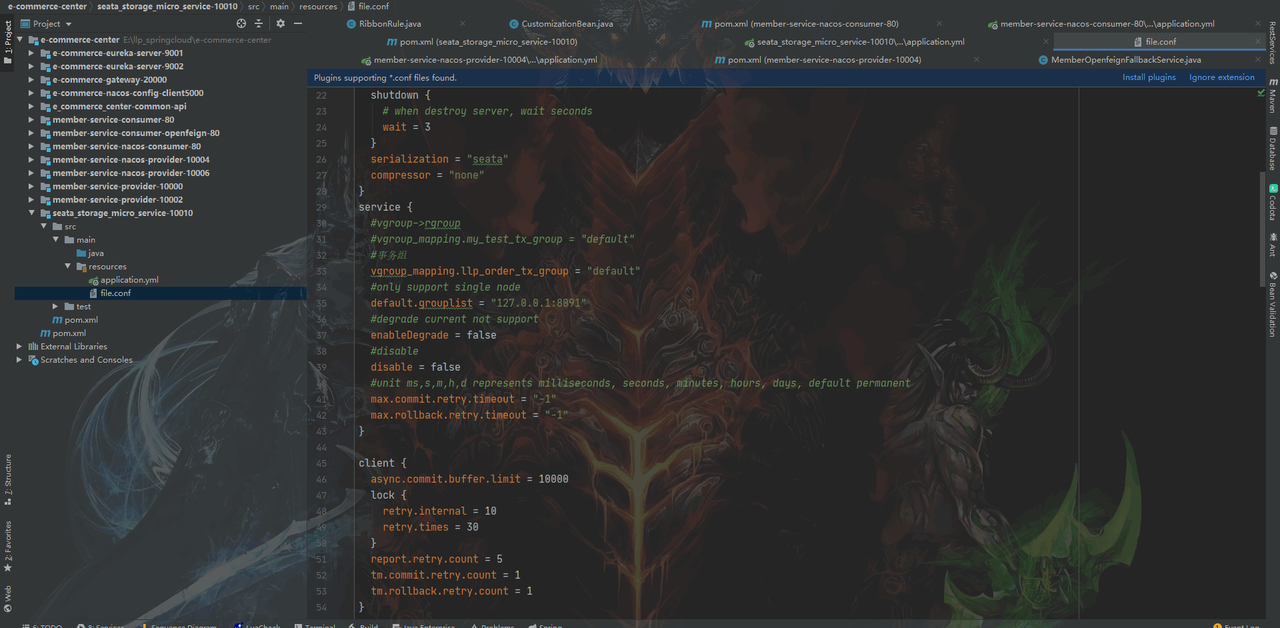
修改 conf\file.conf 文件, 如下(参考中文注释部分进行修改)
transport { # tcp udt unix-domain-socket type = "TCP" #NIO NATIVE server = "NIO" #enable heartbeat heartbeat = true #thread factory for netty thread-factory { boss-thread-prefix = "NettyBoss" worker-thread-prefix = "NettyServerNIOWorker" server-executor-thread-prefix = "NettyServerBizHandler" share-boss-worker = false client-selector-thread-prefix = "NettyClientSelector" client-selector-thread-size = 1 client-worker-thread-prefix = "NettyClientWorkerThread" # netty boss thread size,will not be used for UDT boss-thread-size = 1 #auto default pin or 8 worker-thread-size = 8 } shutdown { # when destroy server, wait seconds wait = 3 } serialization = "seata" compressor = "none" } service { #vgroup->rgroup #vgroup_mapping.my_test_tx_group = "default" #事务组 vgroup_mapping.my_test_tx_group = "llp_order_tx_group" #only support single node default.grouplist = "127.0.0.1:8091" #degrade current not support enableDegrade = false #disable disable = false #unit ms,s,m,h,d represents milliseconds, seconds, minutes, hours, days, default permanent max.commit.retry.timeout = "-1" max.rollback.retry.timeout = "-1" } client { async.commit.buffer.limit = 10000 lock { retry.internal = 10 retry.times = 30 } report.retry.count = 5 tm.commit.retry.count = 1 tm.rollback.retry.count = 1 } ## transaction log store store { ## store mode: file、db ## mode = "file" ##事务的日志存储到db-数据库中,file-文件 mode = "db" ## file store file { dir = "sessionStore" # branch session size , if exceeded first try compress lockkey, still exceeded throws exceptions max-branch-session-size = 16384 # globe session size , if exceeded throws exceptions max-global-session-size = 512 # file buffer size , if exceeded allocate new buffer file-write-buffer-cache-size = 16384 # when recover batch read size session.reload.read_size = 100 # async, sync flush-disk-mode = async } ## database store db { ## the implement of javax.sql.DataSource, such as DruidDataSource(druid)/BasicDataSource(dbcp) etc. datasource = "dbcp" ## mysql/oracle/h2/oceanbase etc. ## 数据库配置信息结合实际情况来,这里我就在本地进行连接 db-type = "mysql" driver-class-name = "com.mysql.jdbc.Driver" url = "jdbc:mysql://127.0.0.1:3306/seata" user = "root" password = "root" min-conn = 1 max-conn = 3 global.table = "global_table" branch.table = "branch_table" lock-table = "lock_table" query-limit = 100 } } lock { ## the lock store mode: local、remote mode = "remote" local { ## store locks in user's database } remote { ## store locks in the seata's server } } recovery { #schedule committing retry period in milliseconds committing-retry-period = 1000 #schedule asyn committing retry period in milliseconds asyn-committing-retry-period = 1000 #schedule rollbacking retry period in milliseconds rollbacking-retry-period = 1000 #schedule timeout retry period in milliseconds timeout-retry-period = 1000 } transaction { undo.data.validation = true undo.log.serialization = "jackson" undo.log.save.days = 7 #schedule delete expired undo_log in milliseconds undo.log.delete.period = 86400000 undo.log.table = "undo_log" } ## metrics settings metrics { enabled = false registry-type = "compact" # multi exporters use comma divided exporter-list = "prometheus" exporter-prometheus-port = 9898 } support { ## spring spring { # auto proxy the DataSource bean datasource.autoproxy = false } } -
在 mysql5.7 创建 seata 数据库
#创建 seata 数据库
CREATE DATABASE seata;
USE seata;
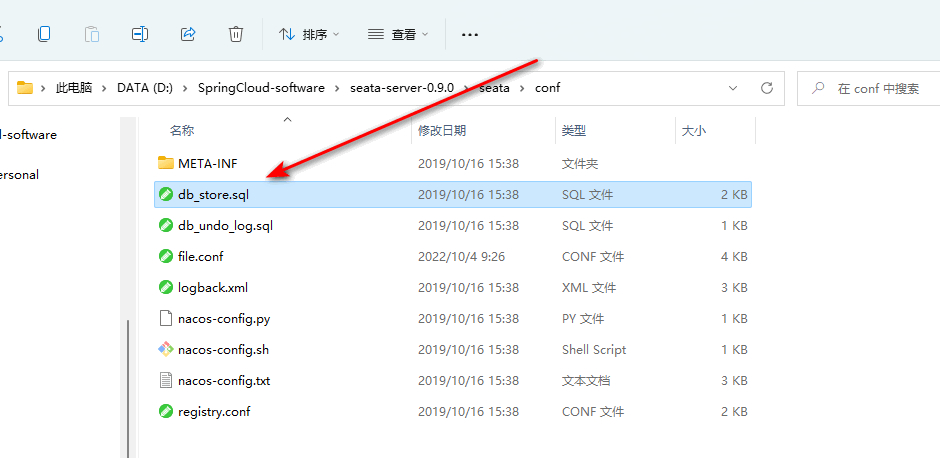
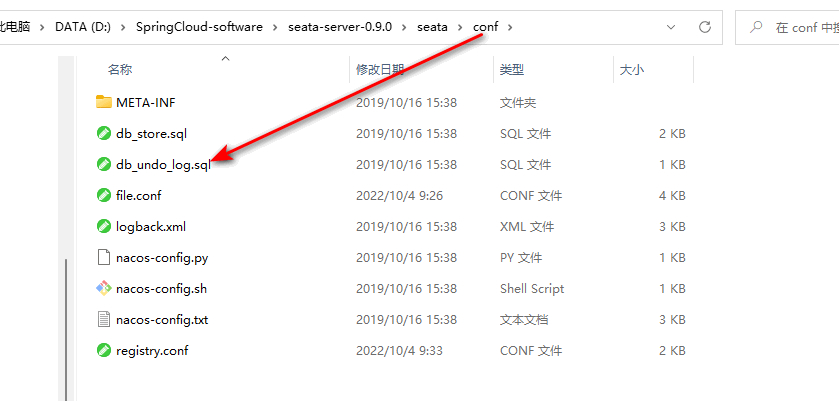
4.在 seata 数 据 库 创 建 表 , 使 用 seata 提 供 的 sql 脚 本 即 可 , 在 seata 安装目录下的 \conf\db_store.sql (在seata数据库中执行)
5.修改 seata 的 \conf\registry.conf , 配置注册中心 nacos server(参考中文部分修改)
registry {
  # file 、nacos 、eureka、redis、zk、consul、etcd3、sofa
  #type = "file"
  #修改注册中心类型
   type = "nacos"
  nacos {
    #serverAddr = "localhost"
    #serverAddr = "localhost:8848"
    namespace = ""
    cluster = "default"
  }
  eureka {
    serviceUrl = "http://localhost:8761/eureka"
    application = "default"
    weight = "1"
  }
  redis {
    serverAddr = "localhost:6379"
    db = "0"
  }
  zk {
    cluster = "default"
    serverAddr = "127.0.0.1:2181"
    session.timeout = 6000
    connect.timeout = 2000
  }
  consul {
    cluster = "default"
    serverAddr = "127.0.0.1:8500"
  }
  etcd3 {
    cluster = "default"
    serverAddr = "http://localhost:2379"
  }
  sofa {
    serverAddr = "127.0.0.1:9603"
    application = "default"
    region = "DEFAULT_ZONE"
    datacenter = "DefaultDataCenter"
    cluster = "default"
    group = "SEATA_GROUP"
    addressWaitTime = "3000"
  }
  file {
    name = "file.conf"
  }
}

config {
  # file、nacos 、apollo、zk、consul、etcd3
  type = "file"

  nacos {
    serverAddr = "localhost"
    namespace = ""
  }
  consul {
    serverAddr = "127.0.0.1:8500"
  }
  apollo {
    app.id = "seata-server"
    apollo.meta = "http://192.168.1.204:8801"
  }
  zk {
    serverAddr = "127.0.0.1:2181"
    session.timeout = 6000
    connect.timeout = 2000
  }
  etcd3 {
    serverAddr = "http://localhost:2379"
  }
  file {
    name = "file.conf"
  }
}
3.启动
1.启动 Nacos Server 8848
2.双击 Seata 的\bin\seata-server.bat , 启动 Seata Server
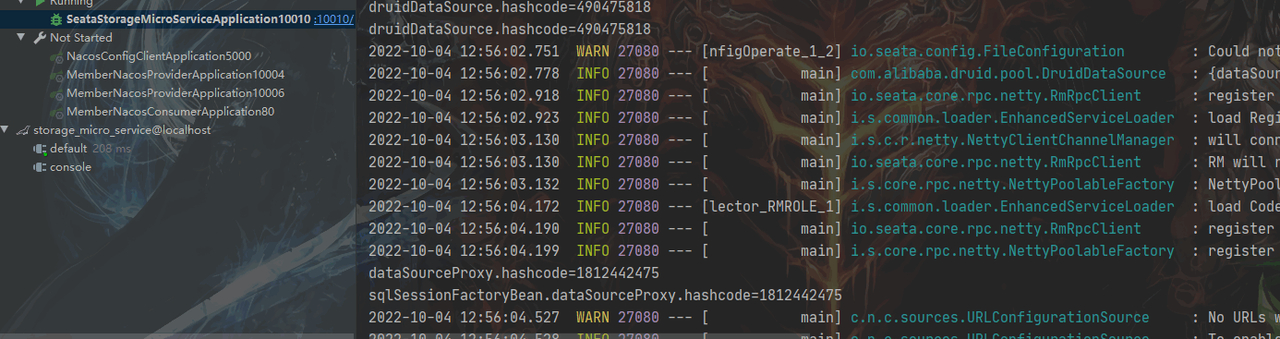
- 启动 seata-server.bat , 看到如下界面说明成功
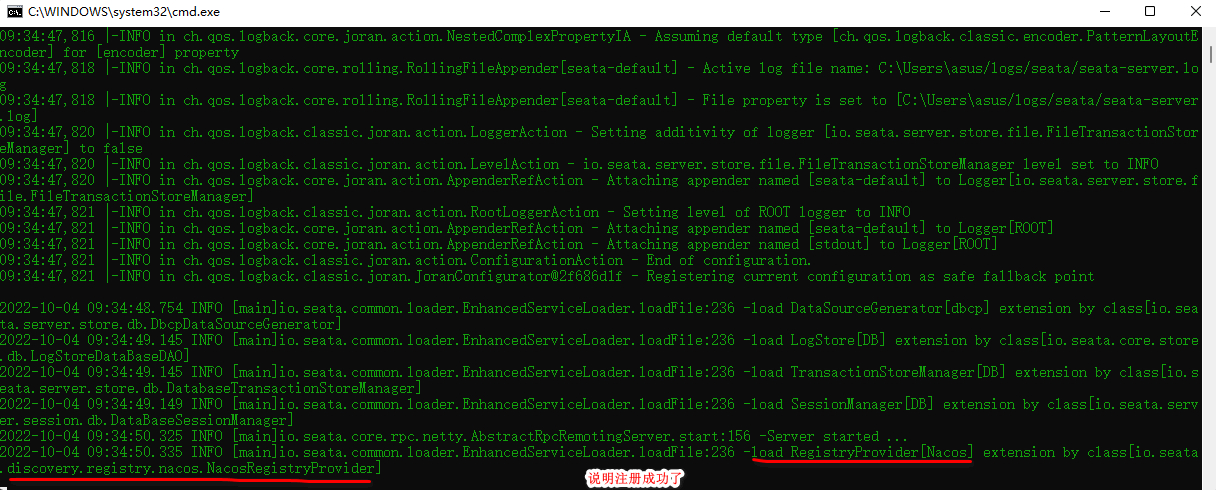
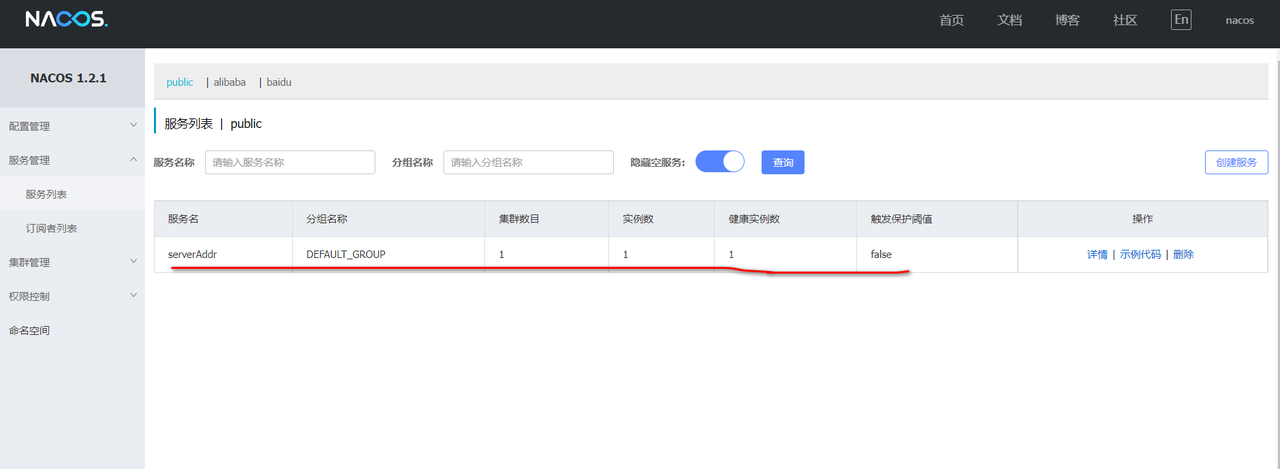
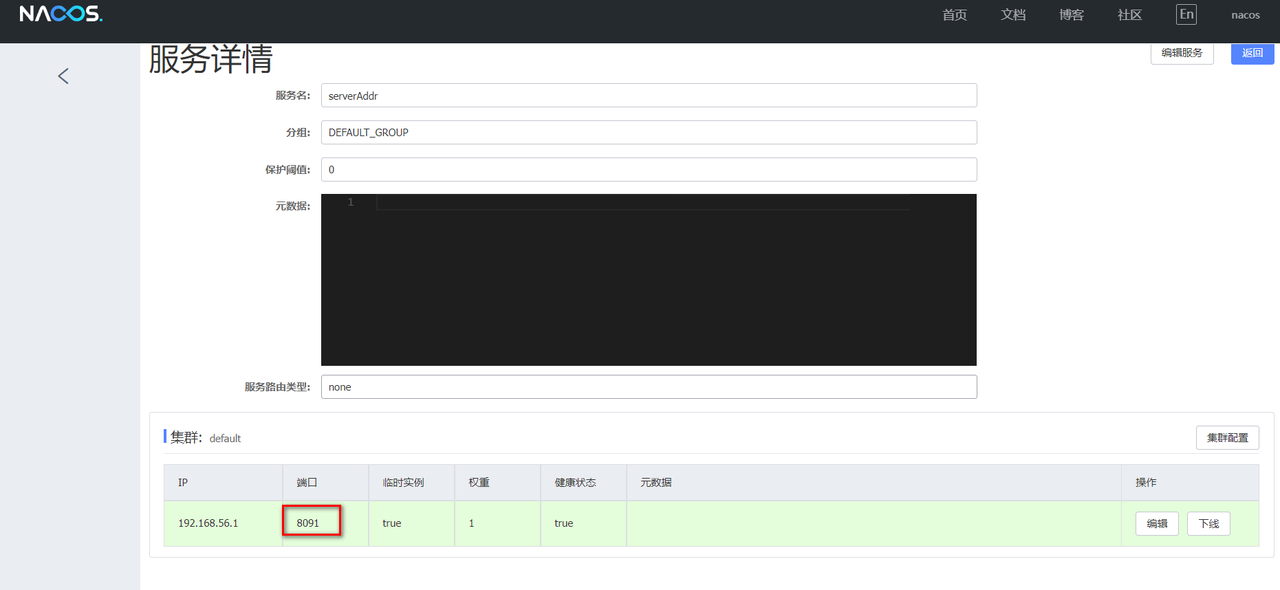
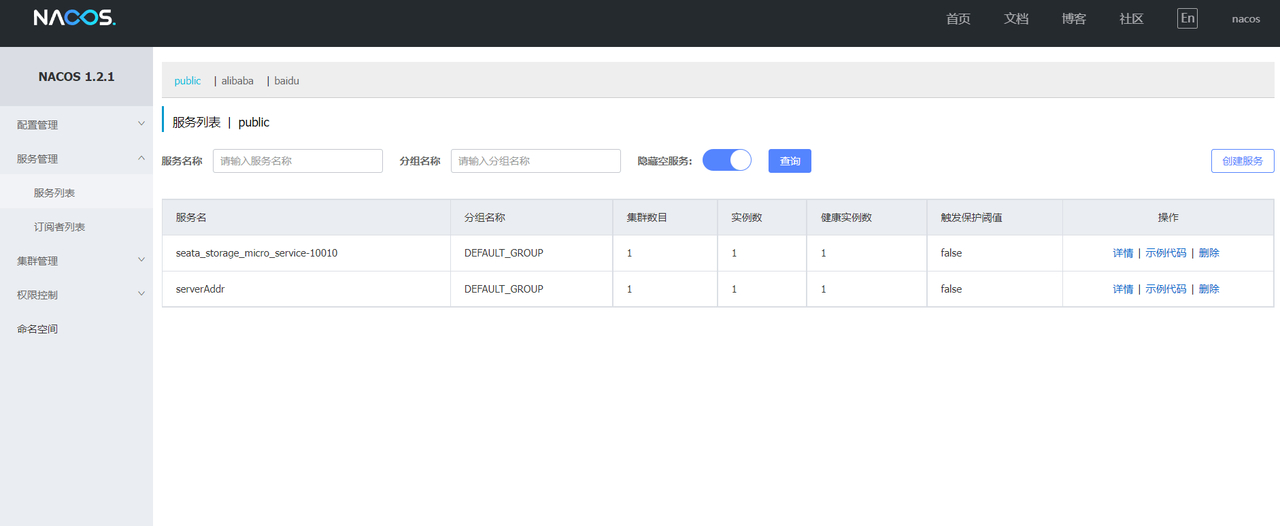
3.登录 Nacos Server , 查看 Seata Server 是否注册成功
- 登录 Nacos Server, 查看 Seata Server 是否注册成功
3.Seata 分布式事务-应用实例
1.需求分析/图解
- 需求:完成下订单功能,由三个微服务模块协同完成, 涉及到多数据库, 多张表
2.创建数据库和表
-
创建业务数据库和表
-- 订单微服务的数据库
CREATE DATABASE order_micro_service;
USE order_micro_service;
CREATE TABLE `order` (
	id BIGINT NOT NULL AUTO_INCREMENT PRIMARY KEY,
	user_id BIGINT DEFAULT NULL,
	product_id BIGINT DEFAULT NULL,
	nums INT DEFAULT NULL,
	money INT DEFAULT NULL,
	`status` INT DEFAULT NULL COMMENT '0:创建中; 1:已完结'
);
SELECT * FROM `order`;
-- 库存微服务的数据库`storage``order` CREATE DATABASE storage_micro_service; USE storage_micro_service; CREATE TABLE `storage` ( id BIGINT NOT NULL AUTO_INCREMENT PRIMARY KEY, product_id BIGINT DEFAULT NULL, amount INT DEFAULT NULL COMMENT '库存量' ); -- 初始化库存表 INSERT INTO `storage` VALUES(NULL, 1, 10); SELECT * FROM `storage`;-- 账号微服务的数据库 CREATE DATABASE account_micro_service ; USE account_micro_service; CREATE TABLE `account` ( id BIGINT NOT NULL AUTO_INCREMENT PRIMARY KEY, user_id BIGINT DEFAULT NULL, money INT DEFAULT NULL COMMENT '账户金额' ); -- 初始化账户表 INSERT INTO `account` VALUES(NULL, 666, 10000); select * from account; -
分 别 为 3 库 创 建 对 应 的 回 滚 日 志 表 , 说 明 回 滚 日 志 表 在 seata 的 \conf\db_undo_log.sql
3.开发 seata_storage_micro_service-10010 微服务
-
创建 seata_storage_micro_service-10010 微服务模块
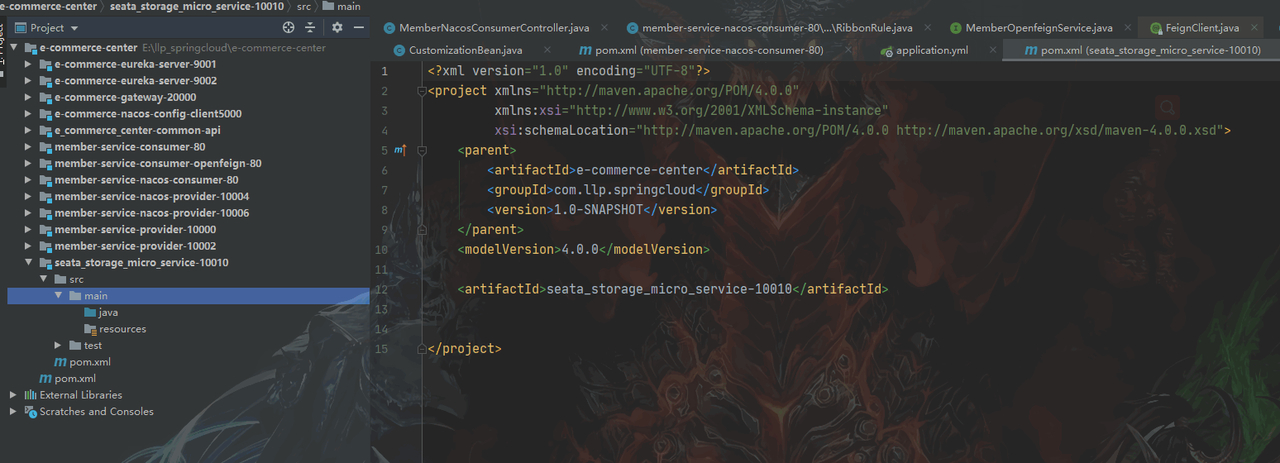
-
修改 pom.xml, 添加相关的 jar 依赖
<!--引入相关依赖--> <dependencies> <!--引入 seata starter --> <dependency> <groupId>com.alibaba.cloud</groupId> <artifactId>spring-cloud-starter-alibaba-seata</artifactId> <exclusions> <!--排除自带的seata-all, 引入自己的版本, 否则会出现冲突--> <exclusion> <groupId>io.seata</groupId> <artifactId>seata-all</artifactId> </exclusion> </exclusions> </dependency> <!--引入指定版本的seata-all--> <dependency> <groupId>io.seata</groupId> <artifactId>seata-all</artifactId> <!--版本号与安装的seata版本一致--> <version>0.9.0</version> </dependency> <!--引入openfeign starter --> <dependency> <groupId>org.springframework.cloud</groupId> <artifactId>spring-cloud-starter-openfeign</artifactId> </dependency> <!--引入nacos-starter nacos的场景启动器--> <dependency> <groupId>com.alibaba.cloud</groupId> <artifactId>spring-cloud-alibaba-nacos-discovery</artifactId> </dependency> <!--引入web-starter,在父项目中指定了依赖的版本不需要在指定版本--> <dependency> <groupId>org.springframework.boot</groupId> <artifactId>spring-boot-starter-web</artifactId> </dependency> <!--说明:spring-boot-starter-actuator是springboot程序的监控系统,可以实现系统健康检测 可以通过 http://localhost:10000/actuator 看到相关的连接和信息 --> <dependency> <groupId>org.springframework.boot</groupId> <artifactId>spring-boot-starter-actuator</artifactId> </dependency> <!--引入mybatis-starter整合到springboot程序--> <dependency> <groupId>org.mybatis.spring.boot</groupId> <artifactId>mybatis-spring-boot-starter</artifactId> </dependency> <!--引入druid-spring-boot-starter,在父项目没有对依赖指定版本,子项目引入时需要指定版本--> <dependency> <groupId>com.alibaba</groupId> <artifactId>druid-spring-boot-starter</artifactId> <version>1.1.17</version> </dependency> <!--引入mysql,使用版本仲裁--> <dependency> <groupId>mysql</groupId> <artifactId>mysql-connector-java</artifactId> </dependency> <!--引入spring-boot-starter-jdbc--> <dependency> <groupId>org.springframework.boot</groupId> <artifactId>spring-boot-starter-jdbc</artifactId> </dependency> <dependency> <groupId>org.projectlombok</groupId> <artifactId>lombok</artifactId> <optional>true</optional> </dependency> <!--引入springboot测试依赖--> <dependency> <groupId>org.springframework.boot</groupId> <artifactId>spring-boot-starter-test</artifactId> </dependency> <!--引入公共模块依赖--> <dependency> <groupId>com.llp.springcloud</groupId> <artifactId>e_commerce_center-common-api</artifactId> <version>1.0-SNAPSHOT</version> </dependency> </dependencies> -
创建 application.yml, 进行相关的配置
server:
  port: 10010
spring:
  application:
    name: seata_storage_micro_service-10010
  cloud:
    alibaba:
      seata:
        #指定事务组名,需要和seata-server中的对应 /conf/file.conf
        tx-service-group: llp_order_tx_group
    nacos:
      discovery:
        #指定nacos-server地址
        server-addr: localhost:8848

  datasource:
    #指定数据源类型,不需要在指定driver-class-name
    type: com.alibaba.druid.pool.DruidDataSource
    url: jdbc:mysql://localhost:3306/storage_micro_service?useUnicode=true&characterEncoding=utf-8&useSSL=false
    username: root
    password: root

#配置seata日志输出
logging:
  level:
    io:
      seata: info

#配置mybatis
mybatis:
  configuration:
    log-impl: org.apache.ibatis.logging.stdout.StdOutImpl
    #指定mapper.xml文件位置
  mapper-locations: classpath:mapper/*.xml
4.在类路径下创建 registry.conf, 进行相关的配置, 说明:该文件从 seata 的\conf\registry.conf 拷贝, 进行修改即可
修改事务组、数据库连接信息等(参考中文注释部分配置)
transport {
  # tcp udt unix-domain-socket
  type = "TCP"
  #NIO NATIVE
  server = "NIO"
  #enable heartbeat
  heartbeat = true
  #thread factory for netty
  thread-factory {
    boss-thread-prefix = "NettyBoss"
    worker-thread-prefix = "NettyServerNIOWorker"
    server-executor-thread-prefix = "NettyServerBizHandler"
    share-boss-worker = false
    client-selector-thread-prefix = "NettyClientSelector"
    client-selector-thread-size = 1
    client-worker-thread-prefix = "NettyClientWorkerThread"
    # netty boss thread size,will not be used for UDT
    boss-thread-size = 1
    #auto default pin or 8
    worker-thread-size = 8
  }
  shutdown {
    # when destroy server, wait seconds
    wait = 3
  }
  serialization = "seata"
  compressor = "none"
}
service {
  #vgroup->rgroup
  #vgroup_mapping.my_test_tx_group = "default"
  #事务组
  vgroup_mapping.llp_order_tx_group = "default"
  #only support single node
  default.grouplist = "127.0.0.1:8091"
  #degrade current not support
  enableDegrade = false
  #disable
  disable = false
  #unit ms,s,m,h,d represents milliseconds, seconds, minutes, hours, days, default permanent
  max.commit.retry.timeout = "-1"
  max.rollback.retry.timeout = "-1"
}

client {
  async.commit.buffer.limit = 10000
  lock {
    retry.internal = 10
    retry.times = 30
  }
  report.retry.count = 5
  tm.commit.retry.count = 1
  tm.rollback.retry.count = 1
}

## transaction log store
store {
  ## store mode: file、db
  ## mode = "file"
  ##事务的日志存储到db-数据库中,file-文件
  mode = "db"
  ## file store
  file {
    dir = "sessionStore"

    # branch session size , if exceeded first try compress lockkey, still exceeded throws exceptions
    max-branch-session-size = 16384
    # globe session size , if exceeded throws exceptions
    max-global-session-size = 512
    # file buffer size , if exceeded allocate new buffer
    file-write-buffer-cache-size = 16384
    # when recover batch read size
    session.reload.read_size = 100
    # async, sync
    flush-disk-mode = async
  }

  ## database store
  db {
    ## the implement of javax.sql.DataSource, such as DruidDataSource(druid)/BasicDataSource(dbcp) etc.
    datasource = "dbcp"
    ## mysql/oracle/h2/oceanbase etc.
    ## 数据库配置信息结合实际情况来,这里我就在本地进行连接
    db-type = "mysql"
    driver-class-name = "com.mysql.jdbc.Driver"
    url = "jdbc:mysql://127.0.0.1:3306/seata"
    user = "root"
    password = "root"
    min-conn = 1
    max-conn = 3
    global.table = "global_table"
    branch.table = "branch_table"
    lock-table = "lock_table"
    query-limit = 100
  }
}
lock {
  ## the lock store mode: local、remote
  mode = "remote"

  local {
    ## store locks in user's database
  }

  remote {
    ## store locks in the seata's server
  }
}
recovery {
  #schedule committing retry period in milliseconds
  committing-retry-period = 1000
  #schedule asyn committing retry period in milliseconds
  asyn-committing-retry-period = 1000
  #schedule rollbacking retry period in milliseconds
  rollbacking-retry-period = 1000
  #schedule timeout retry period in milliseconds
  timeout-retry-period = 1000
}

transaction {
  undo.data.validation = true
  undo.log.serialization = "jackson"
  undo.log.save.days = 7
  #schedule delete expired undo_log in milliseconds
  undo.log.delete.period = 86400000
  undo.log.table = "undo_log"
}

## metrics settings
metrics {
  enabled = false
  registry-type = "compact"
  # multi exporters use comma divided
  exporter-list = "prometheus"
  exporter-prometheus-port = 9898
}

support {
  ## spring
  spring {
    # auto proxy the DataSource bean
    datasource.autoproxy = false
  }
}
- 在类路径下创建 registry.conf, 进行相关的配置, 说明:该文件从 seata 的\conf\registry.conf 拷贝, 进行修改即可
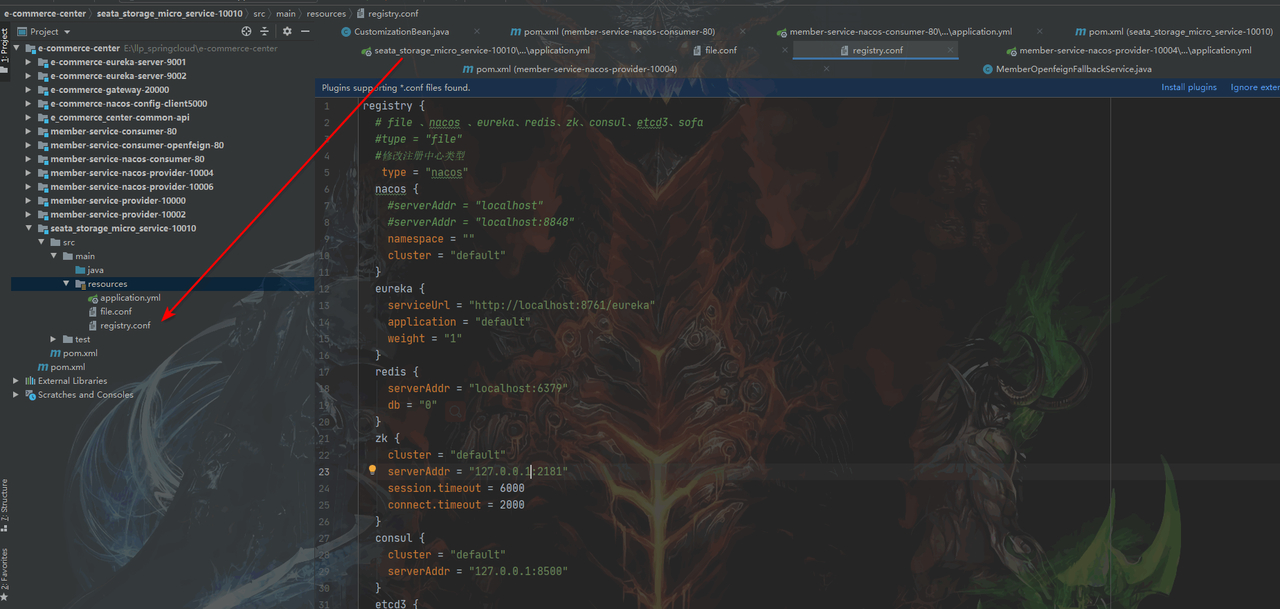
registry {
  # file 、nacos 、eureka、redis、zk、consul、etcd3、sofa
  #type = "file"
  #修改注册中心类型
   type = "nacos"
  nacos {
    #serverAddr = "localhost"
    #serverAddr = "localhost:8848"
    namespace = ""
    cluster = "default"
  }
  eureka {
    serviceUrl = "http://localhost:8761/eureka"
    application = "default"
    weight = "1"
  }
  redis {
    serverAddr = "localhost:6379"
    db = "0"
  }
  zk {
    cluster = "default"
    serverAddr = "127.0.0.1:2181"
    session.timeout = 6000
    connect.timeout = 2000
  }
  consul {
    cluster = "default"
    serverAddr = "127.0.0.1:8500"
  }
  etcd3 {
    cluster = "default"
    serverAddr = "http://localhost:2379"
  }
  sofa {
    serverAddr = "127.0.0.1:9603"
    application = "default"
    region = "DEFAULT_ZONE"
    datacenter = "DefaultDataCenter"
    cluster = "default"
    group = "SEATA_GROUP"
    addressWaitTime = "3000"
  }
  file {
    name = "file.conf"
  }
}

config {
  # file、nacos 、apollo、zk、consul、etcd3
  type = "file"

  nacos {
    serverAddr = "localhost"
    namespace = ""
  }
  consul {
    serverAddr = "127.0.0.1:8500"
  }
  apollo {
    app.id = "seata-server"
    apollo.meta = "http://192.168.1.204:8801"
  }
  zk {
    serverAddr = "127.0.0.1:2181"
    session.timeout = 6000
    connect.timeout = 2000
  }
  etcd3 {
    serverAddr = "http://localhost:2379"
  }
  file {
    name = "file.conf"
  }
}
6.创建com.llp.springcloud.entity.Storage.java
/**
 * 实体类对应storage 库存表
 */
@Data
@AllArgsConstructor
@NoArgsConstructor
public class Storage {
    private Long id;
    private Long productId;
    private Integer amount;
}
7.创建com\llp\springcloud\entity\Storage.java
public interface StorageDao {
    //扣减库存信息
    void reduce(@Param("productId") Long productId, @Param("nums") Integer nums);
}
8.创建 resources/mapper/StorageMapper.xml
<?xml version="1.0" encoding="UTF-8" ?>
<!DOCTYPE mapper
      PUBLIC "-//mybatis.org//DTD Mapper 3.0//EN"
      "http://mybatis.org/dtd/mybatis-3-mapper.dtd">
<mapper namespace="com.llp.springcloud.dao.StorageDao">

   <resultMap id="BaseResultMap" type="com.llp.springcloud.entity.Storage">
      <id column="id" property="id" jdbcType="BIGINT"/>
      <result column="product_id" property="productId" jdbcType="BIGINT"/>
      <result column="amount" property="amount" jdbcType="INTEGER"/>
   </resultMap> <!-- 减少库存 -->
   <update id="reduce">
      UPDATE storage
      SET amount = amount - #{nums}
      WHERE product_id = #{productId} </update>
</mapper>
9.创建com\llp\springcloud\service\StorageService.java
public interface StorageService {
    // 扣减库存
     void reduce(Long productId, Integer nums);
}
10.创建com\llp\springcloud\service\impl\StorageServiceImpl.java
@Slf4j
@Service
public class StorageServiceImpl implements StorageService {
    @Resource
    private StorageDao storageDao;

    @Override
    public void reduce(Long productId, Integer nums) {
        log.info("==========seata_storage_micro_service-10010 扣 减 库 存 start==========");
        storageDao.reduce(productId, nums);
        log.info("==========seata_storage_micro_service-10010 扣 减 库 存 end==========");
    }
}
11.com\llp\springcloud\controller\StorageController.java
@RestController
public class StorageController {
    @Resource
    private StorageService storageService;

    //扣减库存
    @PostMapping("/storage/reduce")
    public Result reduce(Long productId, Integer nums) {
        storageService.reduce(productId, nums);
        return Result.success("扣减库存成功 ok", null);
    }
}
12.创建com\llp\springcloud\config\DataSourceProxyConfig.java 常规配置(拿来使 用即可)
/**
 * 常规配置 Mybatis 和 dao关联
 */
@Configuration
@MapperScan({"com.llp.springcloud.dao"})
public class MyBatisConfig {

}
package com.llp.springcloud.config;

import com.alibaba.druid.pool.DruidDataSource;
import io.seata.rm.datasource.DataSourceProxy;
import org.apache.ibatis.session.SqlSessionFactory;
import org.mybatis.spring.SqlSessionFactoryBean;
import org.mybatis.spring.transaction.SpringManagedTransactionFactory;
import org.springframework.beans.factory.annotation.Value;
import org.springframework.boot.context.properties.ConfigurationProperties;
import org.springframework.context.annotation.Bean;
import org.springframework.context.annotation.Configuration;
import org.springframework.core.io.support.PathMatchingResourcePatternResolver;

import javax.sql.DataSource;

/**
 * 1. 这里很重要: 配置数据源的代理是seata 也就是使用seata代理数据源
 * 2. DataSourceProxy 是引入的 io.seata.rm.datasource
 */
@Configuration
public class DataSourceProxyConfig {

    @Value("${mybatis.mapper-locations}")
    private String mapperLocations;

    //配置druidDataSource
    @Bean
    @ConfigurationProperties(prefix = "spring.datasource")
    public DataSource druidDataSource() {
        DruidDataSource druidDataSource = new DruidDataSource();
        System.out.println("druidDataSource.hashcode="+druidDataSource.hashCode());
        return druidDataSource;
    }

    //配置DataSourceProxy- 使用seata代理数据源
    @Bean
    public DataSourceProxy dataSourceProxy(DataSource dataSource) {
        System.out.println("druidDataSource.hashcode="+dataSource.hashCode());
        DataSourceProxy dataSourceProxy = new DataSourceProxy(dataSource);
        System.out.println("dataSourceProxy.hashcode="+dataSourceProxy.hashCode());
        return dataSourceProxy;
    }

    //配置SqlSessionFactory-常规写法
    @Bean
    public SqlSessionFactory sqlSessionFactoryBean(DataSourceProxy dataSourceProxy)
            throws Exception {
        SqlSessionFactoryBean sqlSessionFactoryBean =
                new SqlSessionFactoryBean();
        //使用seata代理数据源
        sqlSessionFactoryBean.setDataSource(dataSourceProxy);
        System.out.println("sqlSessionFactoryBean.dataSourceProxy.hashcode="+dataSourceProxy.hashCode());
        //指定mapper.xml文件位置
        sqlSessionFactoryBean.setMapperLocations
                (new PathMatchingResourcePatternResolver().getResources(mapperLocations));
        sqlSessionFactoryBean.setTransactionFactory
                (new SpringManagedTransactionFactory());
        return sqlSessionFactoryBean.getObject();
    }

}
- 创 建 主 启 动 类
//注意: 需要取消数据源的自动配置
//而是使用seata 代理数据源, DataSourceProxy
@SpringBootApplication(exclude = DataSourceAutoConfiguration.class)
//开启nacos服务发现
@EnableDiscoveryClient
//开启openfeign远程调用支持
@EnableFeignClients
public class SeataStorageMicroServiceApplication10010 {
    public static void main(String[] args) {
        SpringApplication.run
                (SeataStorageMicroServiceApplication10010.class,args);
    }
}
4.测试 seata_storage_micro_service-10010 微服务
1.启动 Nacos Server 8848
2.双击 Seata 的\bin\seata-server.bat , 启动 Seata Server
3.启动 seata_storage_micro_service-10010 4.
4.登录 Nacos Server , 查看 10010 微服务是否注册成功
5.开发 seata_account_micro_service-10012 微服务
-
参考以前的方式,创建 seata_account_micro_service-10012 微服务模块
-
修改 pom.xml, 添加相关的 jar 依赖
<!--引入相关依赖-->
<dependencies>
   <!--引入 seata starter -->
   <dependency>
      <groupId>com.alibaba.cloud</groupId>
      <artifactId>spring-cloud-starter-alibaba-seata</artifactId>
      <exclusions>
         <!--排除自带的seata-all, 引入自己的版本, 否则会出现冲突-->
         <exclusion>
            <groupId>io.seata</groupId>
            <artifactId>seata-all</artifactId>
         </exclusion>
      </exclusions>
   </dependency>
   <!--引入指定版本的seata-all-->
   <dependency>
      <groupId>io.seata</groupId>
      <artifactId>seata-all</artifactId>
      <!--版本号与安装的seata版本一致-->
      <version>0.9.0</version>
   </dependency>
   <!--引入openfeign starter -->
   <dependency>
      <groupId>org.springframework.cloud</groupId>
      <artifactId>spring-cloud-starter-openfeign</artifactId>
   </dependency>
   <!--引入nacos-starter nacos的场景启动器-->
   <dependency>
      <groupId>com.alibaba.cloud</groupId>
      <artifactId>spring-cloud-alibaba-nacos-discovery</artifactId>
   </dependency>
   <!--引入web-starter,在父项目中指定了依赖的版本不需要在指定版本-->
   <dependency>
      <groupId>org.springframework.boot</groupId>
      <artifactId>spring-boot-starter-web</artifactId>
   </dependency>
   <!--说明:spring-boot-starter-actuator是springboot程序的监控系统,可以实现系统健康检测
      可以通过 http://localhost:10000/actuator 看到相关的连接和信息
   -->
   <dependency>
      <groupId>org.springframework.boot</groupId>
      <artifactId>spring-boot-starter-actuator</artifactId>
   </dependency>
   <!--引入mybatis-starter整合到springboot程序-->
   <dependency>
      <groupId>org.mybatis.spring.boot</groupId>
      <artifactId>mybatis-spring-boot-starter</artifactId>
   </dependency>
   <!--引入druid-spring-boot-starter,在父项目没有对依赖指定版本,子项目引入时需要指定版本-->
   <dependency>
      <groupId>com.alibaba</groupId>
      <artifactId>druid-spring-boot-starter</artifactId>
      <version>1.1.17</version>
   </dependency>
   <!--引入mysql,使用版本仲裁-->
   <dependency>
      <groupId>mysql</groupId>
      <artifactId>mysql-connector-java</artifactId>
   </dependency>
   <!--引入spring-boot-starter-jdbc-->
   <dependency>
      <groupId>org.springframework.boot</groupId>
      <artifactId>spring-boot-starter-jdbc</artifactId>
   </dependency>
   <dependency>
      <groupId>org.projectlombok</groupId>
      <artifactId>lombok</artifactId>
      <optional>true</optional>
   </dependency>
   <!--引入springboot测试依赖-->
   <dependency>
      <groupId>org.springframework.boot</groupId>
      <artifactId>spring-boot-starter-test</artifactId>
   </dependency>
   <!--引入公共模块依赖-->
   <dependency>
      <groupId>com.llp.springcloud</groupId>
      <artifactId>e_commerce_center-common-api</artifactId>
      <version>1.0-SNAPSHOT</version>
   </dependency>
</dependencies>
-
创建 application.yml, 进行相关的配置
server: port: 10012 spring: application: name: seata-account-micro-service-10012 cloud: alibaba: seata: #指定事务组名,需要和seata-server中的对应 /conf/file.conf tx-service-group: llp_order_tx_group nacos: discovery: #指定nacos-server地址 server-addr: localhost:8848 datasource: #指定数据源类型,不需要在指定driver-class-name #type: com.alibaba.druid.pool.DruidDataSource driver-class-name: com.mysql.jdbc.Driver url: jdbc:mysql://localhost:3306/account_micro_service?useUnicode=true&characterEncoding=utf-8&useSSL=false username: root password: root #配置seata日志输出 logging: level: io: seata: info #配置mybatis mybatis: configuration: log-impl: org.apache.ibatis.logging.stdout.StdOutImpl #指定mapper.xml文件位置 mapper-locations: classpath:mapper/*.xml -
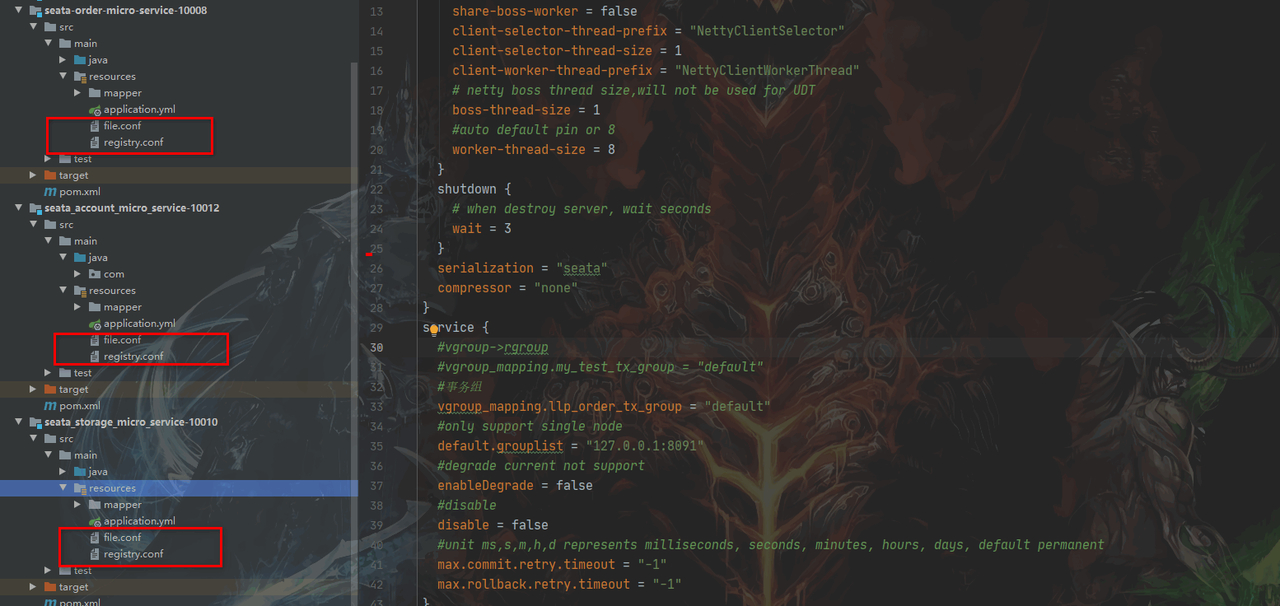
在类路径下创建 file.conf, 进行相关的配置, 说明:该文件从 seata 的\conf\file.conf 拷贝,进行修 改即可
-
在类路径创建 registry.conf, 进行相关的配置, 说明:该文件从 seata 的\conf\registry.conf 拷贝, 进行修改即可
6.创建com\llp\springcloud\entity\Account.java
@Data
@AllArgsConstructor
@NoArgsConstructor
public class Account {
    private Long id;
    private Long userId;
    private Integer money;
}
7.创建com\llp\springcloud\dao\AccountDao.java
public interface AccountDao {
    void reduce(@Param("userId") Long userId, @Param("money") Integer money);
}
8.创建mapper\AccountMapper.xml
<?xml version="1.0" encoding="UTF-8" ?>
<!DOCTYPE mapper
      PUBLIC "-//mybatis.org//DTD Mapper 3.0//EN"
      "http://mybatis.org/dtd/mybatis-3-mapper.dtd">
<mapper namespace="com.llp.springcloud.dao.AccountDao">

   <resultMap id="BaseResultMap" type="com.llp.springcloud.entity.Account">
      <id column="id" property="id" jdbcType="BIGINT"/>
      <result column="user_id" property="userId" jdbcType="BIGINT"/>
      <result column="money" property="money" jdbcType="INTEGER"/>
   </resultMap>

   <!-- 扣减金额 -->
   <update id="reduce">
       UPDATE account SET money = money - #{money} WHERE user_id = #{userId};
     </update>
</mapper>
9.创建com\llp\springcloud\service\AccountService.java
public interface AccountService {
    void reduce(Long userId, Integer money);
}
10.创建com\llp\springcloud\service\impl\AccountServiceImpl.java
@Slf4j
@Service
public class AccountServiceImpl implements AccountService {

    @Resource
    private AccountDao accountDao;

    @Override
    public void reduce(Long userId, Integer money) {
        log.info("========seata_account_micro_service-10012 扣减账户余额 start ======");
        accountDao.reduce(userId, money);
        log.info("========seata_account_micro_service-10012 扣减账户余额 end ======");
    }

}
11.创建com\llp\springcloud\controller\AccountController.java
@RestController
public class AccountController {
    @Resource
    AccountService accountService;

    /*** 扣减账户余额 */
    @PostMapping("/account/reduce")
    public Result reduce(@RequestParam("userId") Long userId, @RequestParam("money") Integer money) {
        accountService.reduce(userId, money);
        return Result.success("200", "扣减账户余额 OK");
    }

}
12.mybatis mapper映射配置
/**
 * 常规配置 Mybatis 和 dao关联
 */
@Configuration
@MapperScan({"com.llp.springcloud.dao"})
public class MyBatisConfig {

}
13.创建com\llp\springcloud\config\DataSourceProxyConfig.java 使用seata代理数据源
/**
 * 1. 这里很重要: 配置数据源的代理是seata 也就是使用seata代理数据源
 * 2. DataSourceProxy 是引入的 io.seata.rm.datasource
 */
@Configuration
public class DataSourceProxyConfig {

    @Value("${mybatis.mapper-locations}")
    private String mapperLocations;

    //配置druidDataSource
    @Bean
    @ConfigurationProperties(prefix = "spring.datasource")
    public DataSource druidDataSource() {
        DruidDataSource druidDataSource = new DruidDataSource();
        System.out.println("druidDataSource.hashcode="+druidDataSource.hashCode());
        return druidDataSource;
    }

    //配置DataSourceProxy- 使用seata代理数据源
    @Bean
    public DataSourceProxy dataSourceProxy(DataSource dataSource) {
        System.out.println("druidDataSource.hashcode="+dataSource.hashCode());
        DataSourceProxy dataSourceProxy = new DataSourceProxy(dataSource);
        System.out.println("dataSourceProxy.hashcode="+dataSourceProxy.hashCode());
        return dataSourceProxy;
    }

    //配置SqlSessionFactory-常规写法
    @Bean
    public SqlSessionFactory sqlSessionFactoryBean(DataSourceProxy dataSourceProxy)
            throws Exception {
        SqlSessionFactoryBean sqlSessionFactoryBean =
                new SqlSessionFactoryBean();
        //使用seata代理数据源
        sqlSessionFactoryBean.setDataSource(dataSourceProxy);
        System.out.println("sqlSessionFactoryBean.dataSourceProxy.hashcode="+dataSourceProxy.hashCode());
        //指定mapper.xml文件位置
        sqlSessionFactoryBean.setMapperLocations
                (new PathMatchingResourcePatternResolver().getResources(mapperLocations));
        sqlSessionFactoryBean.setTransactionFactory
                (new SpringManagedTransactionFactory());
        return sqlSessionFactoryBean.getObject();
    }

}
14.创建com\llp\springcloud\SeataAccountMicroServiceApplication10012.java 主启动类
@SpringBootApplication(exclude = DataSourceAutoConfiguration.class)
@EnableFeignClients
@EnableDiscoveryClient
public class SeataAccountMicroServiceApplication10012 {
    public static void main(String[] args) {
        SpringApplication.run
                (SeataAccountMicroServiceApplication10012.class,args);
    }
}
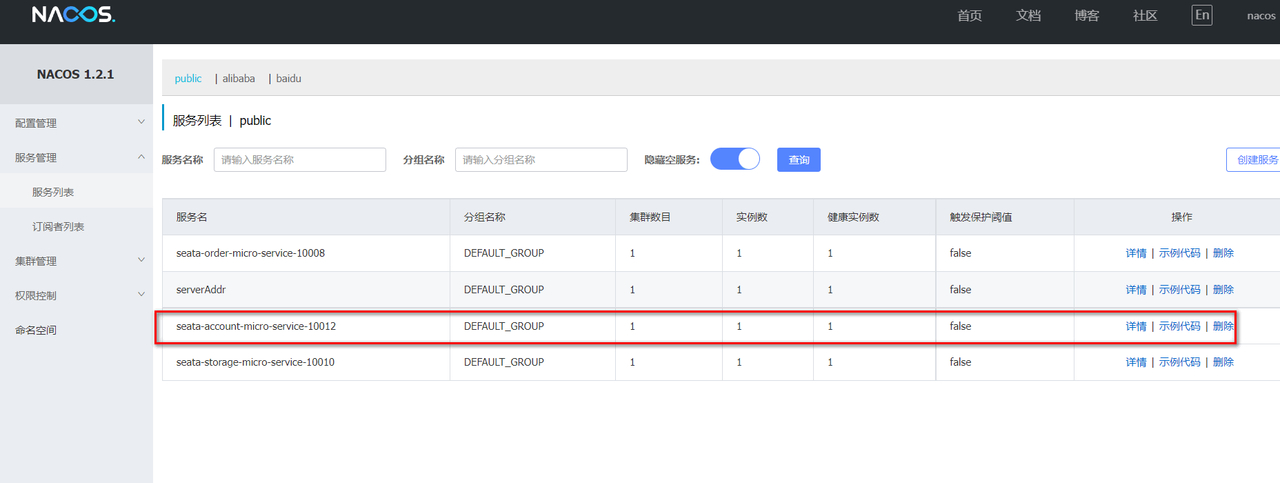
6.测试seata_account_micro_service-10012 微服务
-
登录 Nacos Server, 查看 10012 是否注册成功
7.开发 seata-order-micro-service-10008 微服务
- 参考以前的方式,创建 seata-order-micro-service-10008 微服务模块
- 修改 pom.xml, 添加相关的 jar 依赖
<!--引入相关依赖-->
<dependencies>
   <!--引入 seata starter -->
   <dependency>
      <groupId>com.alibaba.cloud</groupId>
      <artifactId>spring-cloud-starter-alibaba-seata</artifactId>
      <exclusions>
         <!--排除自带的seata-all, 引入自己的版本, 否则会出现冲突-->
         <exclusion>
            <groupId>io.seata</groupId>
            <artifactId>seata-all</artifactId>
         </exclusion>
      </exclusions>
   </dependency>
   <!--引入指定版本的seata-all-->
   <dependency>
      <groupId>io.seata</groupId>
      <artifactId>seata-all</artifactId>
      <!--版本号与安装的seata版本一致-->
      <version>0.9.0</version>
   </dependency>
   <!--引入openfeign starter -->
   <dependency>
      <groupId>org.springframework.cloud</groupId>
      <artifactId>spring-cloud-starter-openfeign</artifactId>
   </dependency>
   <!--引入nacos-starter nacos的场景启动器-->
   <dependency>
      <groupId>com.alibaba.cloud</groupId>
      <artifactId>spring-cloud-alibaba-nacos-discovery</artifactId>
   </dependency>
   <!--引入web-starter,在父项目中指定了依赖的版本不需要在指定版本-->
   <dependency>
      <groupId>org.springframework.boot</groupId>
      <artifactId>spring-boot-starter-web</artifactId>
   </dependency>
   <!--说明:spring-boot-starter-actuator是springboot程序的监控系统,可以实现系统健康检测
      可以通过 http://localhost:10000/actuator 看到相关的连接和信息
   -->
   <dependency>
      <groupId>org.springframework.boot</groupId>
      <artifactId>spring-boot-starter-actuator</artifactId>
   </dependency>
   <!--引入mybatis-starter整合到springboot程序-->
   <dependency>
      <groupId>org.mybatis.spring.boot</groupId>
      <artifactId>mybatis-spring-boot-starter</artifactId>
   </dependency>
   <!--引入druid-spring-boot-starter,在父项目没有对依赖指定版本,子项目引入时需要指定版本-->
   <dependency>
      <groupId>com.alibaba</groupId>
      <artifactId>druid-spring-boot-starter</artifactId>
      <version>1.1.17</version>
   </dependency>
   <!--引入mysql,使用版本仲裁-->
   <dependency>
      <groupId>mysql</groupId>
      <artifactId>mysql-connector-java</artifactId>
   </dependency>
   <!--引入spring-boot-starter-jdbc-->
   <dependency>
      <groupId>org.springframework.boot</groupId>
      <artifactId>spring-boot-starter-jdbc</artifactId>
   </dependency>
   <dependency>
      <groupId>org.projectlombok</groupId>
      <artifactId>lombok</artifactId>
      <optional>true</optional>
   </dependency>
   <!--引入springboot测试依赖-->
   <dependency>
      <groupId>org.springframework.boot</groupId>
      <artifactId>spring-boot-starter-test</artifactId>
   </dependency>
   <!--引入公共模块依赖-->
   <dependency>
      <groupId>com.llp.springcloud</groupId>
      <artifactId>e_commerce_center-common-api</artifactId>
      <version>1.0-SNAPSHOT</version>
   </dependency>
</dependencies>
3.创建 application.yml, 进行相关的配置
server:
  port: 10008
spring:
  application:
    name: seata-order-micro-service-10008
  cloud:
    alibaba:
      seata:
        #指定事务组名,需要和seata-server中的对应 /conf/file.conf
        tx-service-group: llp_order_tx_group
    nacos:
      discovery:
        #指定nacos-server地址
        server-addr: localhost:8848

  datasource:
    #指定数据源类型,不需要在指定driver-class-name
    #type: com.alibaba.druid.pool.DruidDataSource
    driver-class-name: com.mysql.jdbc.Driver
    url: jdbc:mysql://localhost:3306/order_micro_service?useUnicode=true&characterEncoding=utf-8&useSSL=false
    username: root
    password: root


#配置seata日志输出
logging:
  level:
    io:
      seata: info

#配置mybatis
mybatis:
  configuration:
    log-impl: org.apache.ibatis.logging.stdout.StdOutImpl
    #指定mapper.xml文件位置
  mapper-locations: classpath:mapper/*.xml
4.在类路径下·创建 registry.conf, 进行相关的配置, 说明:该文件从 seata 的\conf\registry.conf 拷贝, 进行修改即可
5.在类路径下创建 file.conf, 进行相关的配置, 说明:该文件从 seata 的\conf\file.conf 拷贝,进行修 改即可
6.创建com\llp\springcloud\entity\Order.java
@Data
@AllArgsConstructor
@NoArgsConstructor
public class Order {
    private Long id;
    private Long userId;
    private Long productId;
    private Integer nums;
    private Integer money;
    private Integer status;
}
7.创建com\llp\springcloud\dao\OrderDao.java
public interface OrderDao {
    //新建订单
    void save(Order order);

    //修改订单状态
    void update(@Param("userId") Long userId, @Param("status") Integer status);
}
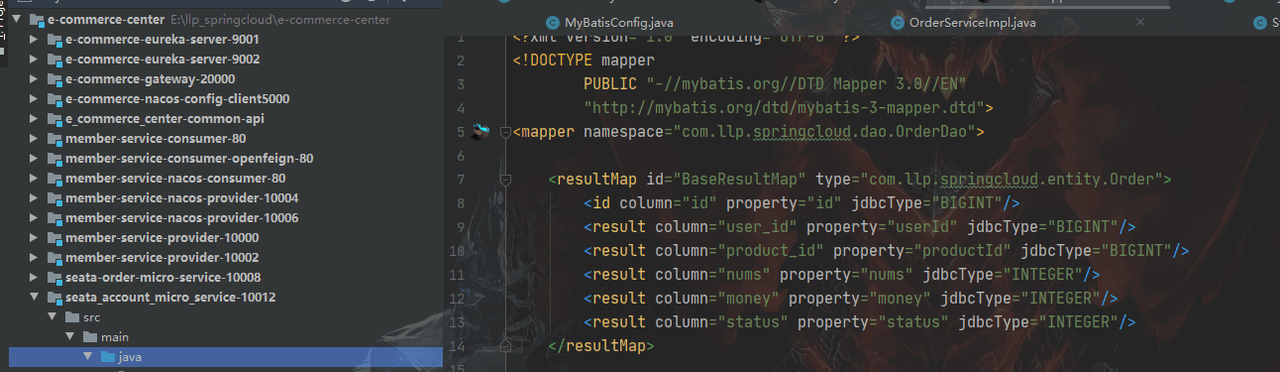
8.创建mapper\OrderMapper.xml
<?xml version="1.0" encoding="UTF-8" ?>
<!DOCTYPE mapper
      PUBLIC "-//mybatis.org//DTD Mapper 3.0//EN"
      "http://mybatis.org/dtd/mybatis-3-mapper.dtd">
<mapper namespace="com.llp.springcloud.dao.OrderDao">

   <resultMap id="BaseResultMap" type="com.llp.springcloud.entity.Order">
      <id column="id" property="id" jdbcType="BIGINT"/>
      <result column="user_id" property="userId" jdbcType="BIGINT"/>
      <result column="product_id" property="productId" jdbcType="BIGINT"/>
      <result column="nums" property="nums" jdbcType="INTEGER"/>
      <result column="money" property="money" jdbcType="INTEGER"/>
      <result column="status" property="status" jdbcType="INTEGER"/>
   </resultMap>

   <!--新建订单-->
   <insert id="save">
      insert into `order` (id, user_id, product_id, nums, money, status)
      values (null, #{userId}, #{productId}, #{nums}, #{money}, 0);
   </insert>

   <!--修改订单状态-->
   <update id="update">
      update `order`
      set status = 1
      where user_id = #{userId}
        and status = #{status};
   </update>

</mapper>
9.创建com\llp\springcloud\service\OrderService.java
public interface OrderService {
    void save(Order order);
}
10.创建com\llp\springcloud\service\AccountService.java
/***
 * 1. 这里使用 Openfeign 接口方式进行远程调用
 * 2. seata-account-micro-service-10012 就是 被调用微服务在 Nacos Server 注册名
 * */
@FeignClient(value = "seata-account-micro-service-10012")
public interface AccountService {

    /**
     * 扣减账户余额
     * 这里@RequestParam在 AccountController添加了,在这里也是需要添加的
     * 建议请求的方法书写和调用服务的controller层一致!!!
     */
    @PostMapping("/account/reduce")
    Result reduce(@RequestParam("userId") Long userId, @RequestParam("money") Integer money);

}
11.创建com\llp\springcloud\service\StorageService.java
/**
 * 指定远程调用url,用于固定访问某个服务不经过注册中心做服务的发现
 * value 和 name 的作用一样,如果没有配置url那么配置的值将作为服务名称,用于服务发现。反之只是一个名称。
 * @FeignClient 修饰的类会注入到springioc容器中不需要添加@compent注解
 */
@FeignClient(value = "seata-storage-micro-service-10010")
public interface StorageService {

    /**
     * 1. 远程调用的方式是get
     * 2. 远程调用的url http://seata_storage_micro_service-10010/storage/reduce
     * 3. seata_storage_micro_service-10010 就是服务提供方在Nacos 注册的服务
     * 4. openfeign 会根据负载均衡来决定调用哪一个服务,默认是轮询
     * 5. 因为openfeign 好处是支持了springmvc注解 + 接口解耦
     */
    //扣减库存
    @PostMapping("/storage/reduce")
    Result reduce(@RequestParam("productId") Long productId,@RequestParam("nums") Integer nums);

}
12.创建com\llp\springcloud\service\impl\OrderServiceImpl.java
@Slf4j
@Service
public class OrderServiceImpl implements OrderService {

    @Resource
    private OrderDao orderDao;
    @Resource
    private StorageService storageService;
    @Resource
    private AccountService accountService;

    /*** 创建订单->调用库存服务扣减库存-> * 调用账户服务扣减账户余额->修改订单状态 */
    @Override
    public void save(Order order) {
        log.info("=========开始新建订单 start ==========");

        //1.创建订单
        orderDao.save(order);
        System.out.println("order=" + order);

        //2.扣减库存
        log.info("=========减库存 start ==========");
        storageService.reduce(order.getProductId(), order.getNums());
        log.info("=========减库存 end ==========");

        //3.扣减账户金额
        log.info("=========减账户金额 start ==========");
        accountService.reduce(order.getUserId(), order.getMoney());
        log.info("=========减账户金额 end ==========");

        //4.修改订单状态
        log.info("=========修改订单状态 start ==========");
        orderDao.update(order.getUserId(), 0);
        log.info("=========修改订单状态 end ==========");


        log.info("=========下订单 end==========");
    }
}
13.创建com\llp\springcloud\controller\OrderController.java
@RestController
public class OrderController {

    @Resource
    private OrderService orderService;

    @GetMapping("/order/save")
    public Result save(Order order) {
        orderService.save(order);
        return Result.success("订单创建成功", null);
    }
}
14.创建com\llp\springcloud\config\DataSourceProxyConfig.java 使用seata代理数据源
/**
 * 1. 这里很重要: 配置数据源的代理是seata 也就是使用seata代理数据源
 * 2. DataSourceProxy 是引入的 io.seata.rm.datasource
 */
@Configuration
public class DataSourceProxyConfig {

    @Value("${mybatis.mapper-locations}")
    private String mapperLocations;

    //配置druidDataSource
    @Bean
    @ConfigurationProperties(prefix = "spring.datasource")
    public DataSource druidDataSource() {
        DruidDataSource druidDataSource = new DruidDataSource();
        System.out.println("druidDataSource.hashcode="+druidDataSource.hashCode());
        return druidDataSource;
    }

    //配置DataSourceProxy- 使用seata代理数据源
    @Bean
    public DataSourceProxy dataSourceProxy(DataSource dataSource) {
        System.out.println("druidDataSource.hashcode="+dataSource.hashCode());
        DataSourceProxy dataSourceProxy = new DataSourceProxy(dataSource);
        System.out.println("dataSourceProxy.hashcode="+dataSourceProxy.hashCode());
        return dataSourceProxy;
    }

    //配置SqlSessionFactory-常规写法
    @Bean
    public SqlSessionFactory sqlSessionFactoryBean(DataSourceProxy dataSourceProxy)
            throws Exception {
        SqlSessionFactoryBean sqlSessionFactoryBean =
                new SqlSessionFactoryBean();
        //使用seata代理数据源
        sqlSessionFactoryBean.setDataSource(dataSourceProxy);
        System.out.println("sqlSessionFactoryBean.dataSourceProxy.hashcode="+dataSourceProxy.hashCode());
        //指定mapper.xml文件位置
        sqlSessionFactoryBean.setMapperLocations
                (new PathMatchingResourcePatternResolver().getResources(mapperLocations));
        sqlSessionFactoryBean.setTransactionFactory
                (new SpringManagedTransactionFactory());
        return sqlSessionFactoryBean.getObject();
    }

}
15.创建com\llp\springcloud\config\MyBatisConfig.java
/**
 * 常规配置 Mybatis 和 dao关联
 */
@Configuration
@MapperScan({"com.llp.springcloud.dao"})
public class MyBatisConfig {

}
16.创建com\llp\springcloud\SeataOrderMicroServiceApplication10008.java主启动类
@SpringBootApplication(exclude = DataSourceAutoConfiguration.class)
@EnableDiscoveryClient
@EnableFeignClients
public class SeataOrderMicroServiceApplication10008 {
    public static void main(String[] args) {
        SpringApplication.run(SeataOrderMicroServiceApplication10008.class, args);
    }
}
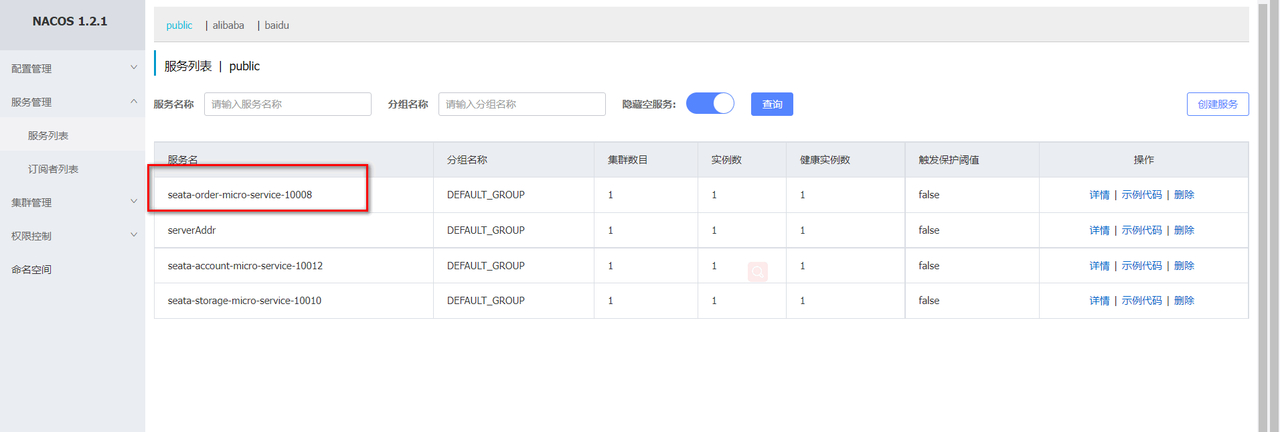
8.测试 seata-order-micro-service-10008 微服务
- 登录 Nacos Server, 查看 10008 是否注册成功
9.集成测试(1) 三个微服务协同完成-正常下单
1.访问测试
1.浏览器 : http://localhost:10008/order/save?userId=666&productId=1&nums=1&money=100
因为我们在添加订单时并没有添加@RequestBody注解,因此采用表单方式请求
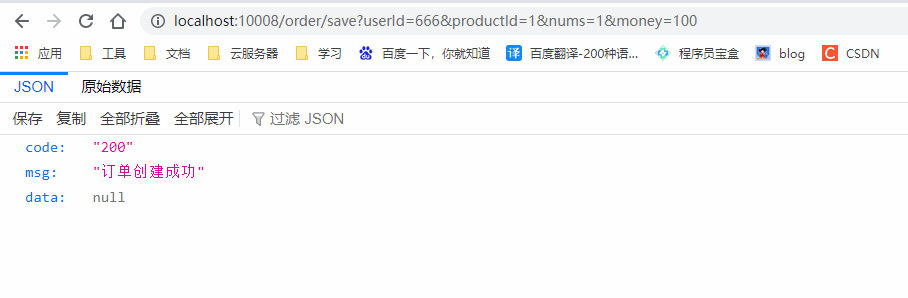
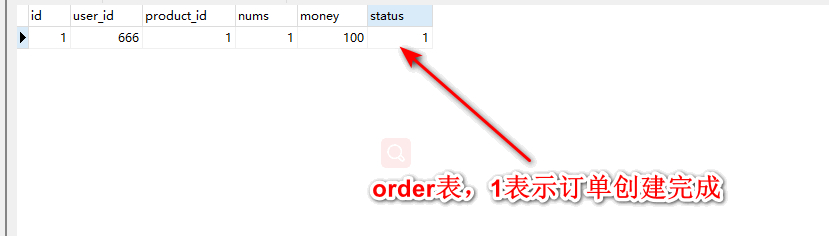
- 查看数据库/表的情况是否正常, 结论:如果没有异常出现,正常下单,数据库三张表 数据一致性是 OK 的
2.注意事项和细节
- MySQL 出现 too many connections(1040)错误解决方法 在 my.ini 设置 在 my.ini 设置 max_connections=1000
- 如果出现: service id not legal hostname 报错 Service id not legal hostname 的原因是服务名称不能带有下划线,可以使用中划线, springcloud 无法识别下划线,把下划线改成中划线就好
10.集成测试(2) 三个微服务协同完成-模拟异常
1.模拟创建订单出现异常,修改seata_account_micro_service-10012服务,扣减账户余额方法模拟订单创建超时异常
@RestController
public class AccountController {
    @Resource
    AccountService accountService;

    /*** 扣减账户余额 */
    @PostMapping("/account/reduce")
    public Result reduce(@RequestParam("userId") Long userId, @RequestParam("money") Integer money) {
        //模拟异常, 超时
        // openfeign 接口调用默认超时时间为 1s
        try {
            TimeUnit.SECONDS.sleep(12);
        } catch (InterruptedException e) {
            e.printStackTrace();
        }
        accountService.reduce(userId, money);
        return Result.success("200", "扣减账户余额 OK");
    }

}
2.浏览器输入: http://localhost:10008/order/save?userId=666&productId=1&nums=1&money=100
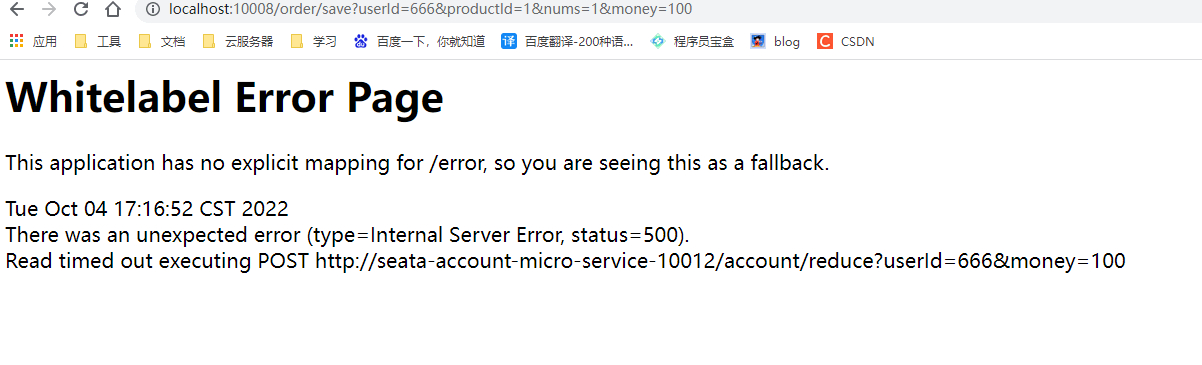
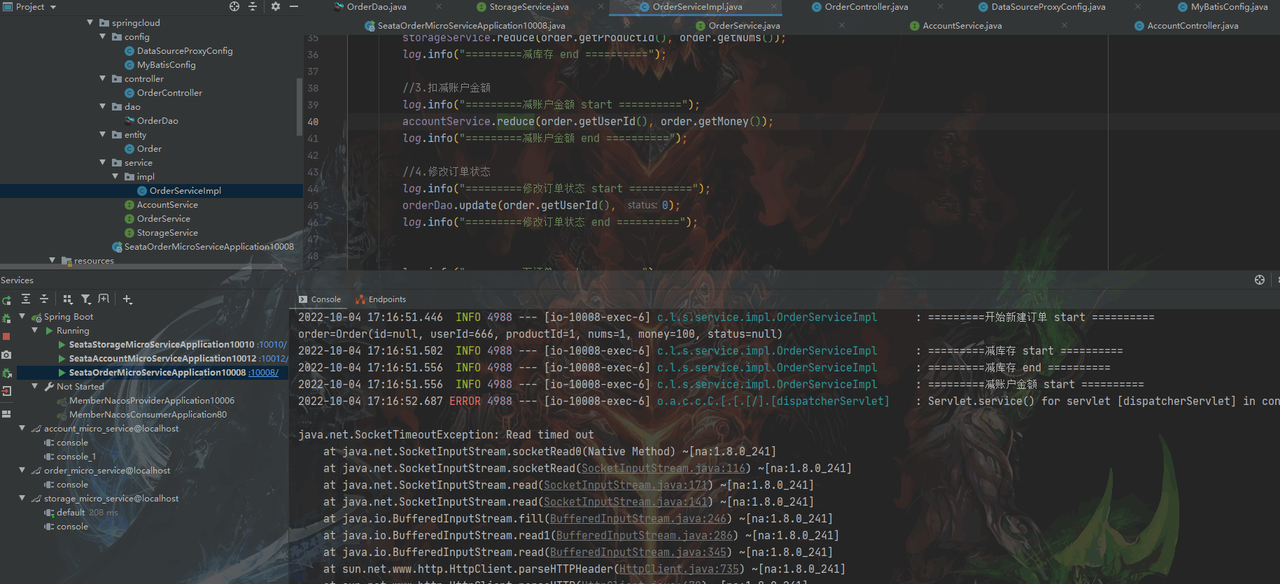
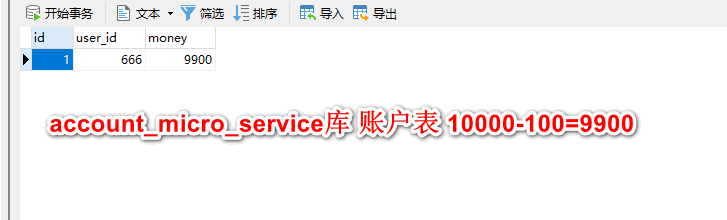
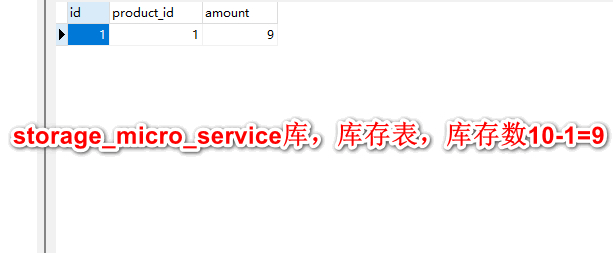
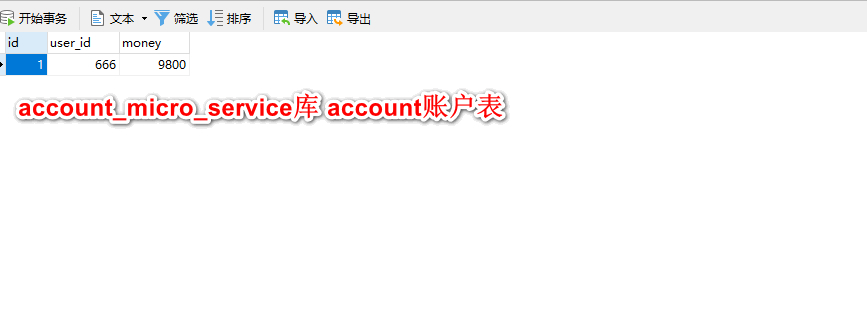
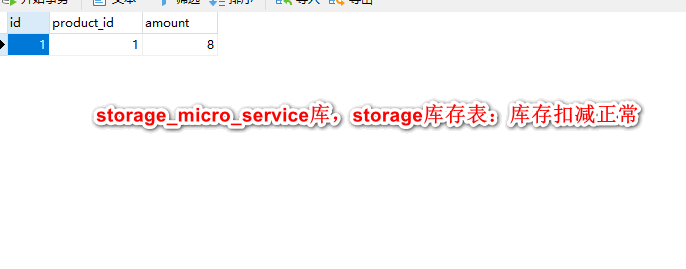
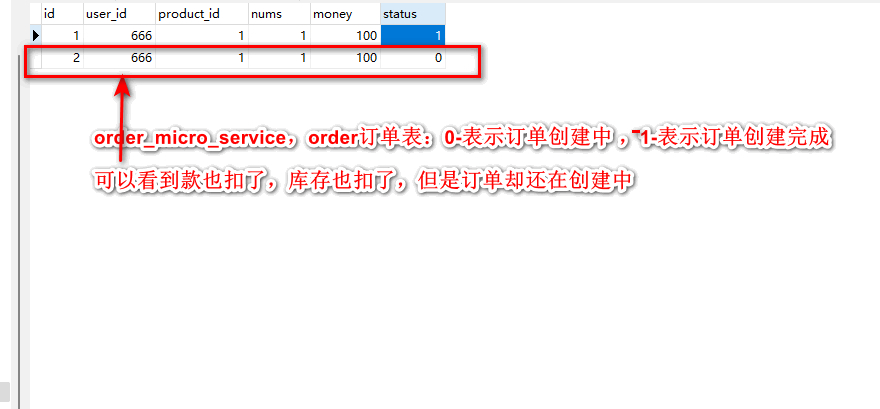
3.查看数据库/表的情况是否正常, 结论:这时数据库/表,出现数据不一致现象, 订单是未支付,但是库存减少了,账号钱也扣了(提示: 等休眠时间完成后,再查看 account 表, 会看到数据不一致.)
11.集成测试(3) 三个微服务协同完成-使用@GlobalTransactional 完成分布式事务控制 (出现异常,也能保证数据一致性)
-
修 改 seata-order-micro-service-10008 的com\llp\springcloud\service\impl\OrderServiceImpl.java
添加
@GlobalTransactional(name = "llp-save-order",rollbackFor = {Exception.class})@Slf4j @Service public class OrderServiceImpl implements OrderService { @Resource private OrderDao orderDao; @Resource private StorageService storageService; @Resource private AccountService accountService; /*** 创建订单->调用库存服务扣减库存-> * 调用账户服务扣减账户余额->修改订单状态 */ /** * 1.@GlobalTransactional 分布式事务控制 io.seata.spring.annotation.GlobalTransactional * 2.name = "llp-save-order" 名称,程序员自己指定,保证唯一即可 * 3.rollbackFor 指定发生什么异常就回滚,这里我们指定Exception.class只要发生了这类的异常及其子类异常就回滚 */ @Override @GlobalTransactional(name = "llp-save-order",rollbackFor = {Exception.class}) public void save(Order order) { log.info("=========开始新建订单 start =========="); //1.创建订单 orderDao.save(order); System.out.println("order=" + order); //2.扣减库存 log.info("=========减库存 start =========="); storageService.reduce(order.getProductId(), order.getNums()); log.info("=========减库存 end =========="); //3.扣减账户金额 log.info("=========减账户金额 start =========="); accountService.reduce(order.getUserId(), order.getMoney()); log.info("=========减账户金额 end =========="); //4.修改订单状态 log.info("=========修改订单状态 start =========="); orderDao.update(order.getUserId(), 0); log.info("=========修改订单状态 end =========="); log.info("=========下订单 end=========="); } }
2.再次访问测试http://localhost:10008/order/save?userId=666&productId=1&nums=1&money=100
3.查看数据库/表的情况是否正常, 结论:这时数据库/表,数据不一致性得到保证. 回在创建新的订单、库存、金额都不会在扣除了
12.注意事项和细节
1.如果数据库/表使用到关键字,需要使用反引号
- 举例说明: 比如mapper/OrderMapper.xml , 这里的 order 就要使用``, 否则会报错
2.openfeign 在远程调用 api 接口时, 默认超时时间为 1s
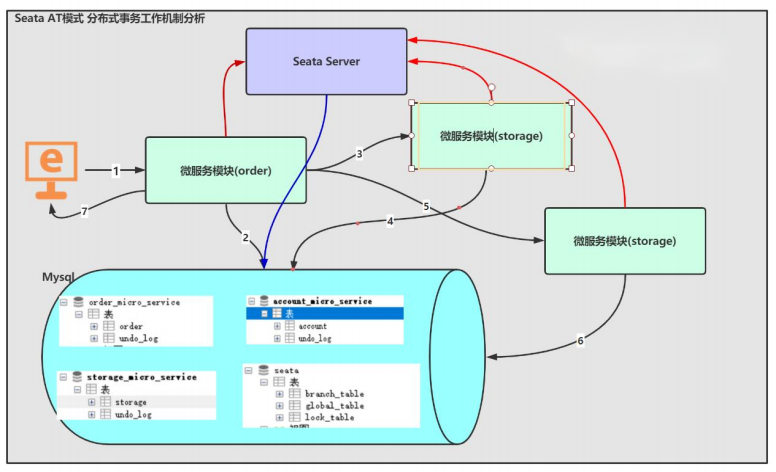
4.Seata 工作机制
1.分布式事务过程分析
-
Seata 分布式事务处理过程-ID+三组件模型
-
图解
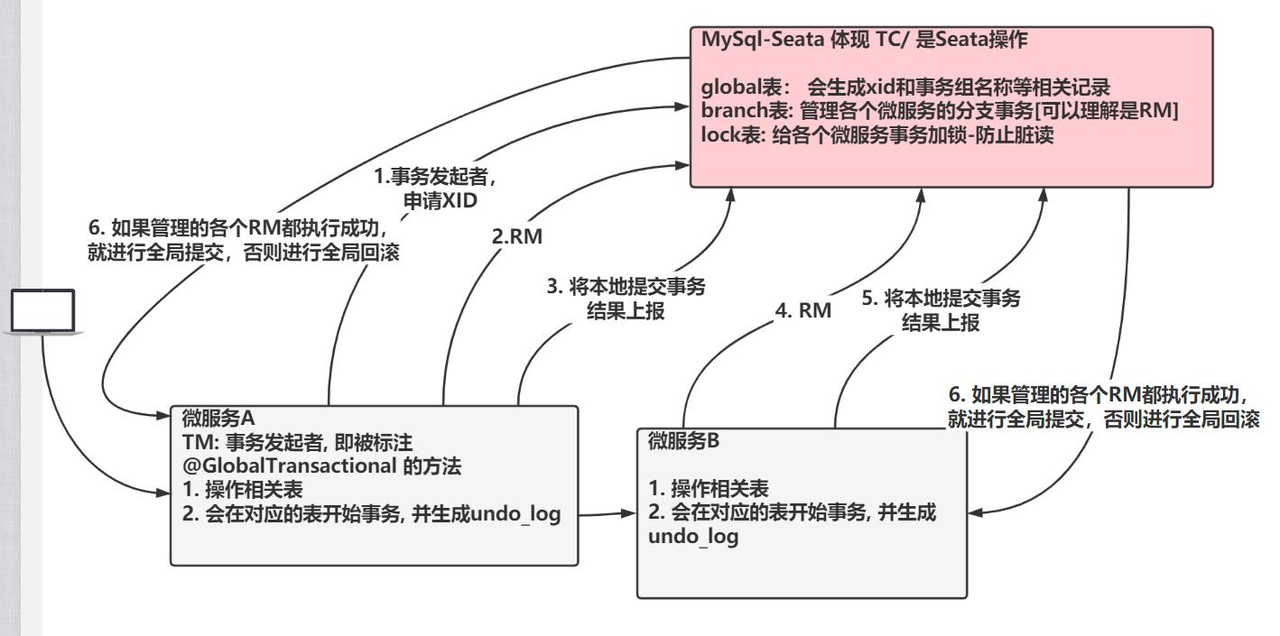
3.梳理: 先说出现了几个术语 XID, TC, TM, RM
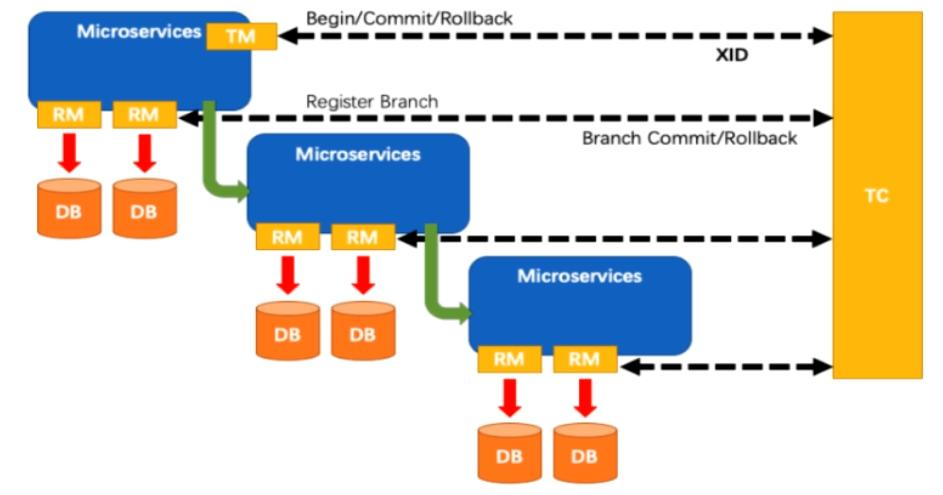
- 上图展示了一个分布式事务在Seata的处理过程
- Transaction ID XID: 全局唯一的事务ID
- Transaction Coordinator(TC) : 事务协调器,维护全局事务的运行状态,负责协调并驱动 全局事务的提交或回滚
- Transaction Manager(TM) : 控制全局事务的边界,负责开启一个全局事务,并最终发 起全局提交或全局回滚的决议;
- Resource Manager(RM) : 控制分支事务,负责分支注册,状态汇报,并接收事务协调 器的指令,驱动分支(本地)事务的提交和回滚
4.执行过程
- TM向 TC申请开启一个全局事务,全局事务创建成功并生成一个全局唯一的 XID
- XID在微服务调用链路的上下文中传播;
- RM 向 TC注册分支事务,将其纳入 XID 对应全局事务的管辖
- TM 向 TC 发起针对 XID 的全局提交或回滚决议
- TC 调度 XID下管辖的全部分支事务完成提交或回滚请求。
2.Seata 事务模式
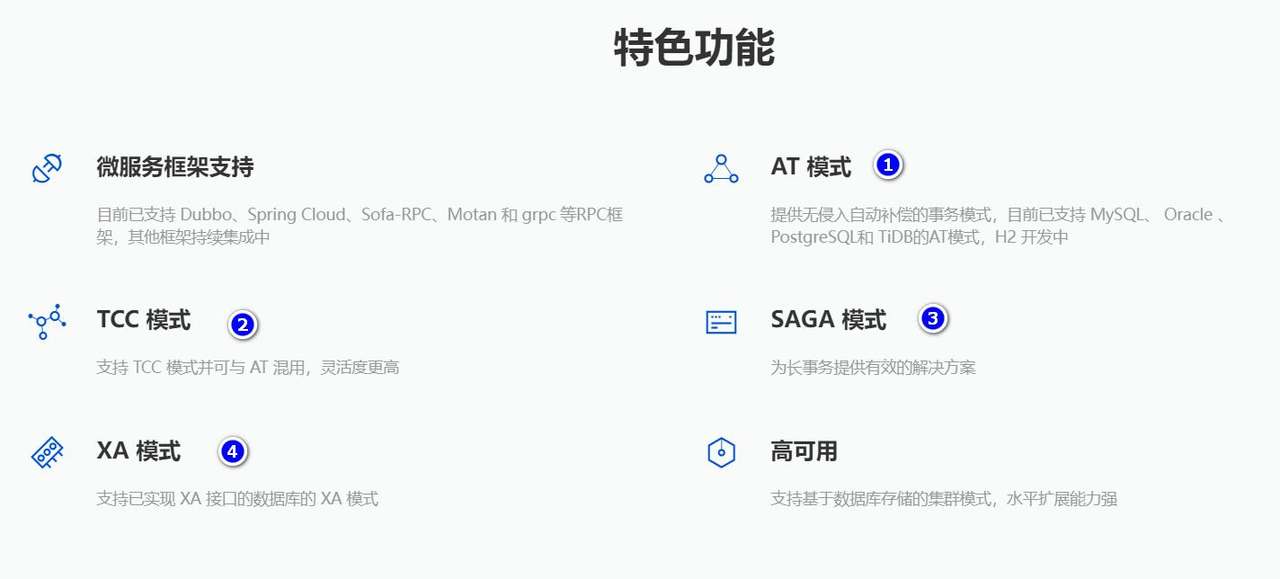
1.AT(默认模式)
2.TCC
3.SAGA
4.XA
3.AT无侵入模式
1.文档
https://seata.io/zh-cn/docs/overview/what-is-seata.html
2.一阶段加载
在一阶段,Seata 会拦截"业务 SQL"
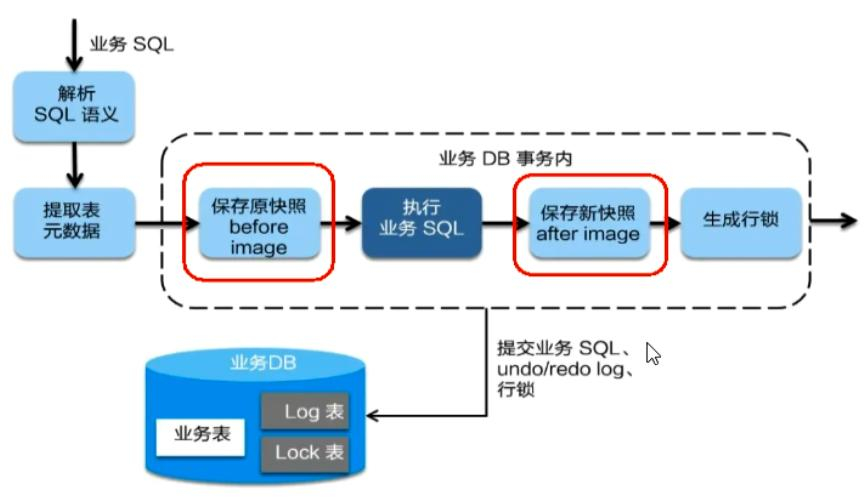
- 解析 SQL 语义,找到"业务 SQL"要更新的业务数据,在业务数据被更新前,将其保存成"before image" (前置镜像)
- 执行"业务 SQL"更新业务数据,在业务数据更新之后, 其保存成"after image"/后置镜像
- 最后生成行锁
- 以上操作全部在一个数据库事务内完成,这样保证了一阶段操作的原子性
3.二阶段提交
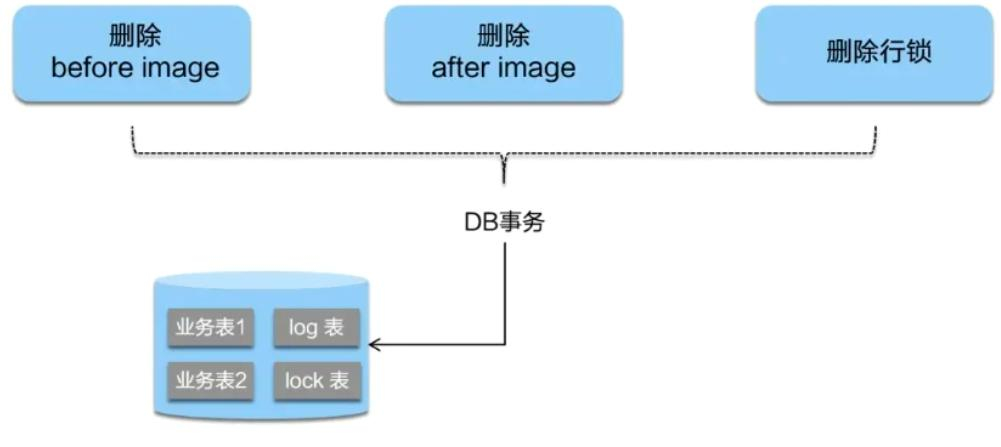
- 二阶段如果是顺利提交
- 因为"业务 SQL"在一阶段已经提交至数据库,所以 Seata 框架只需将一阶段保存的快 照数据和行锁删掉,完成数据清理即可
4.二阶段回滚
二阶段回滚
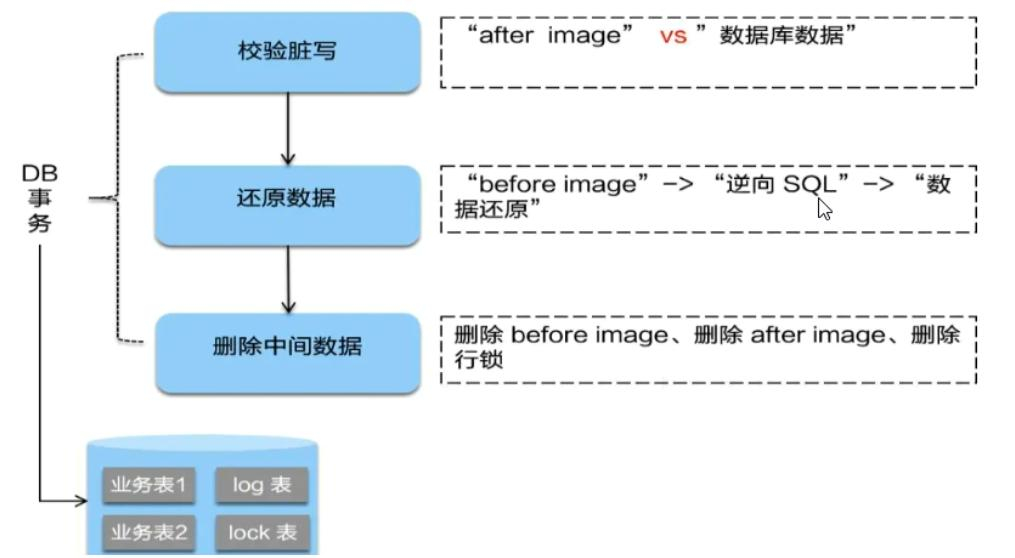
- 二阶段如果是回滚的话,Seata 就需要回滚一阶段已经执行的"业务 SQL",还原业务 数据。
- 回滚方式便是用"before image"还原业务数据;但在还原前要首先要校验脏写,对比"数 据库当前业务数据"和"after image 如果两份数据完全一致就说明没有脏写,可以还原业 务数据
- 如果不一致就说明有脏写,出现脏写就需要转人工处理。
4.SEATA 的分布式交易解决方案