 JavaWeb
 Spring
 MyBatis
 linux
linux
 消息队列
消息队列
 JavaSE
 工具
工具
 AI
AI
 搜索
搜索
 dy
dy
SpringBoot集成RabbitMQ
SpringBoot 集成 RabbitMQ
1.应用实例
- 需求说明/图解
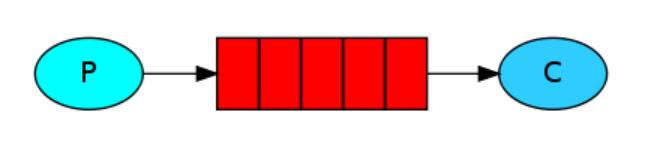
-P : 消息的发送者/生产者
-C : 消息的接受者/消费者
-中间表示队列

- 完成步骤
- 添加依赖
<!--rabbitmq-需要的 AMQP 依赖-->
<dependency>
    <groupId>org.springframework.boot</groupId>
    <artifactId>spring-boot-starter-amqp</artifactId>
</dependency>
- 修改yaml配置
spring:
  #rabbitmq 配置
  rabbitmq:
    host: 192.168.79.202
    username: guest
    password: guest
    #虚拟主机
    virtual-host: /
    #端口
    port: 5672
    listener:
      simple:
        #消费者最小数量
        concurrency: 10
        #消费者最大数量
        max-concurrency: 10
        #限制消费者,每次只能处理一条消息,处理完才能继续下一条消息
        prefetch: 1
        #启动时是否默认启动容器,默认为 true
        auto-startup: true
        #被拒绝时重新进入队列的
        default-requeue-rejected: true
    template:
      retry:
        #启用消息重试机制,默认为 false
        enabled: true
        #初始重试间隔时间
        initial-interval: 1000ms
        #重试最大次数,默认为 3 次
        max-attempts: 3
        #重试最大时间间隔,默认 10000ms
        max-interval: 10000ms
        #重试的间隔乘数,
        #配置 2 的话,第一次等 1s,第二次等 2s,第三次等 4s
        multiplier: 1

        #在 RabbitMQ 中,initial-interval 和 max-interval 是用于指定消息重试机制的两个参数,
        #它们的区别如下:
        #1. initial-interval(初始间隔时间):表示第一次重试的时间间隔,也就是在消息第一次处
        #理失败后,等待多长时间再尝试重新发送消息。这个参数的默认值是 1 秒。
        #2.max-interval(最大间隔时间):表示重试过程中的最大时间间隔,也就是每次重试时,
        #最长等待多长时间再尝试重新发送消息。这个参数的默认值是 10 秒。
- 在RabbitMQ配置类中创建队列
import org.springframework.amqp.core.Binding;
import org.springframework.amqp.core.BindingBuilder;
import org.springframework.amqp.core.FanoutExchange;
import org.springframework.amqp.core.Queue;
import org.springframework.context.annotation.Bean;
import org.springframework.context.annotation.Configuration;

@Configuration
public class RabbitMQConfig {

    //定义队列名
    private static final String QUEUE = "queue";

	//创建队列
    /**
     * 1. 配置队列
     * 2. 队列名为 queue
     * 3. true 表示: 持久化 (不填,默认为true,默认持久化)
     * durable: 队列是否持久化。 队列默认是存放到内存中的,rabbitmq 重启则丢失,
     * 若想重启之后还存在则队列要持久化,
     * 保存到 Erlang 自带的 Mnesia 数据库中,当 rabbitmq 重启之后会读取该数据库
     * @return
     */
    @Bean
    public Queue queue(){
        return new Queue(QUEUE,true);
    }

}
- 创建消息发送者
/**
 * 消息发送者
 */
@Slf4j
@Service
public class MQSender {

    @Resource
    private RabbitTemplate rabbitTemplate;

    //方法:发送消息
    public void send(Object msg){
        log.info("发送消息-" + msg);
        //没有指定交换机会走默认的交换机,AMQP default
        //AMQP default是一个direct路由模式的交换机
        rabbitTemplate.convertAndSend("queue",msg);
    }

}
- 创建消息接收者
/**
 * 消息接收者
 */
@Service
@Slf4j
public class MQReceiver {

    //方法:接收消息
    @RabbitListener(queues = "queue")
    public void receive(Object msg) {
        log.info("接收到消息--" + msg);
    }

}
- 创建controller进行测试
@Controller
public class RabbitMQHandler {

    //装配MQSender
    @Resource
    private MQSender mqSender;

    //方法:调用消息生产者,发送消息
    @RequestMapping("/mq")
    @ResponseBody
    public void mq(){
        mqSender.send("hello llp");
    }
}
2.完成测试
- 配置 RabbitMQ 所在的 Linux, 开放 5672 端口, 因为 Java 访问 RabbitMQ, 走的是 5672测试前,将 Mysql, Redis,RabbitMQ 启动。
- 防火墙开启端口访问
firewall-cmd --zone=public --add-port=5672/tcp --permanent
- 开启后需要重启防火墙才生效
firewall-cmd --reload
- 执行 firewall-cmd --list-ports 查看端口
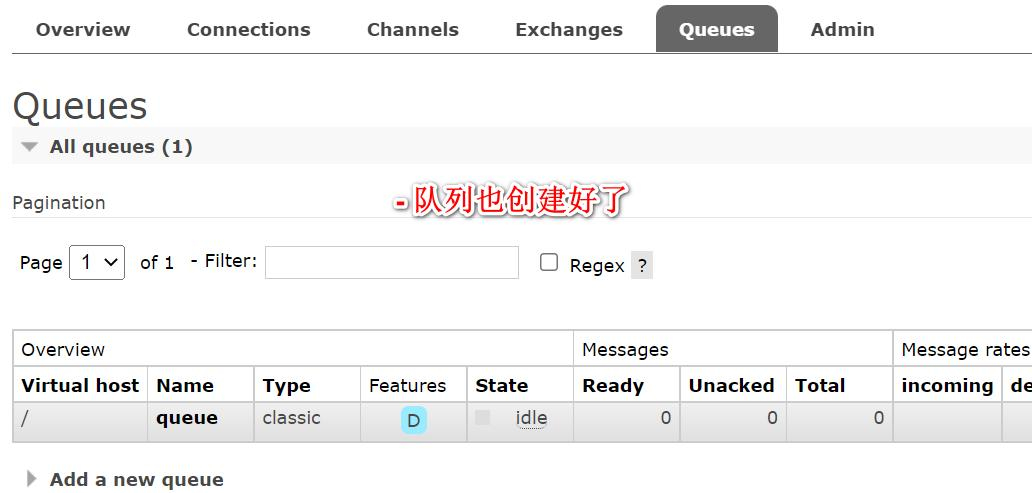
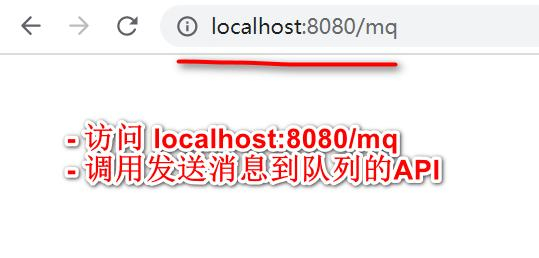
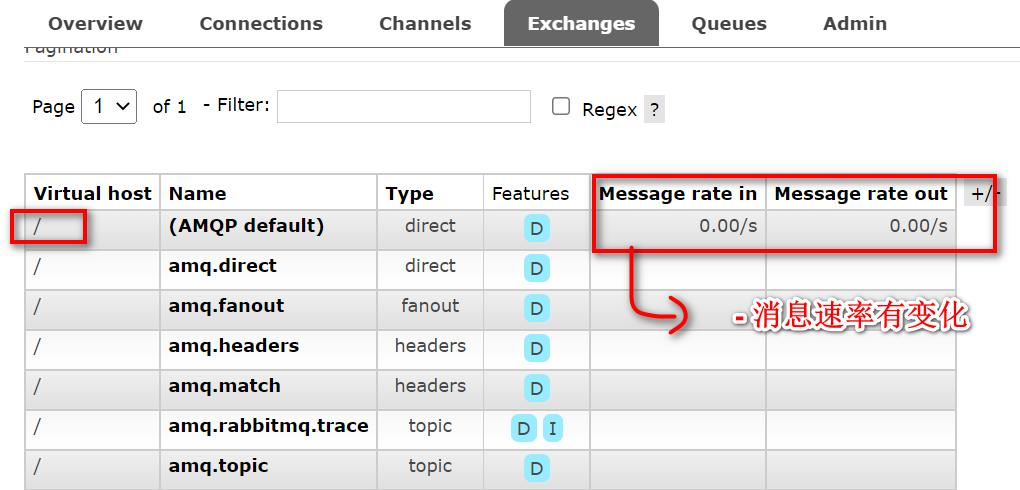
- 启动项目, 再观察 RabbitMQ 管控台
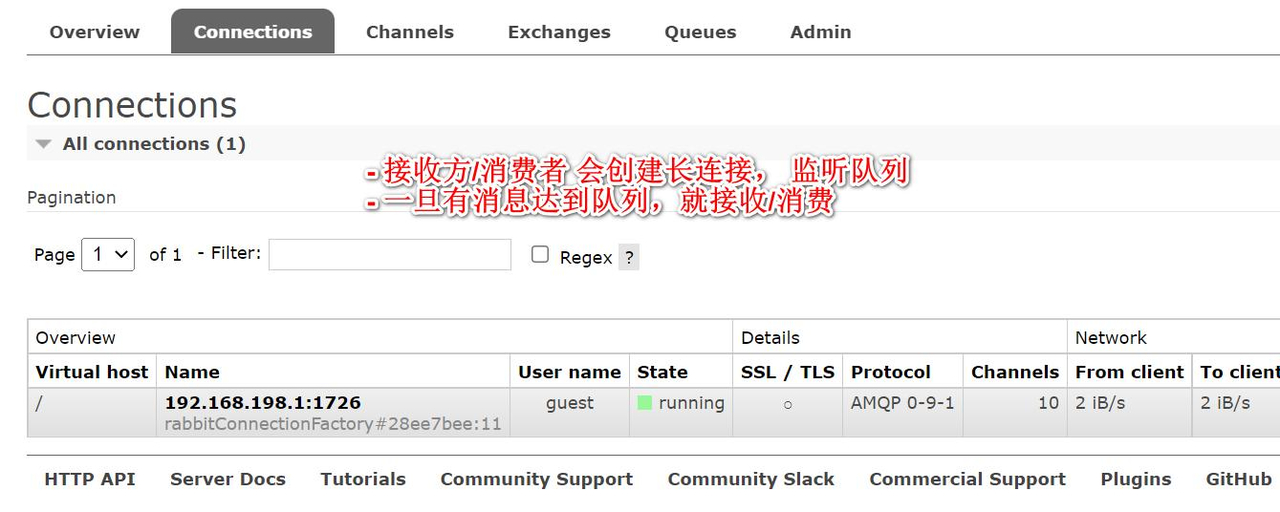

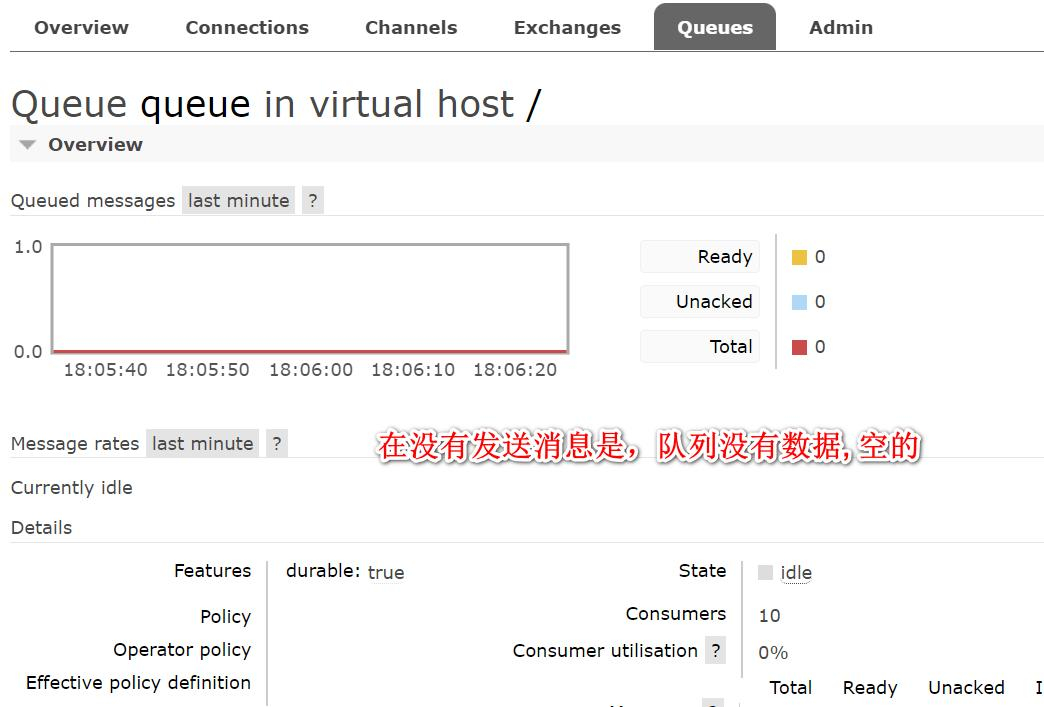
观察后端输出

当前案例, 走的是默认交换机 (AMQP Default)
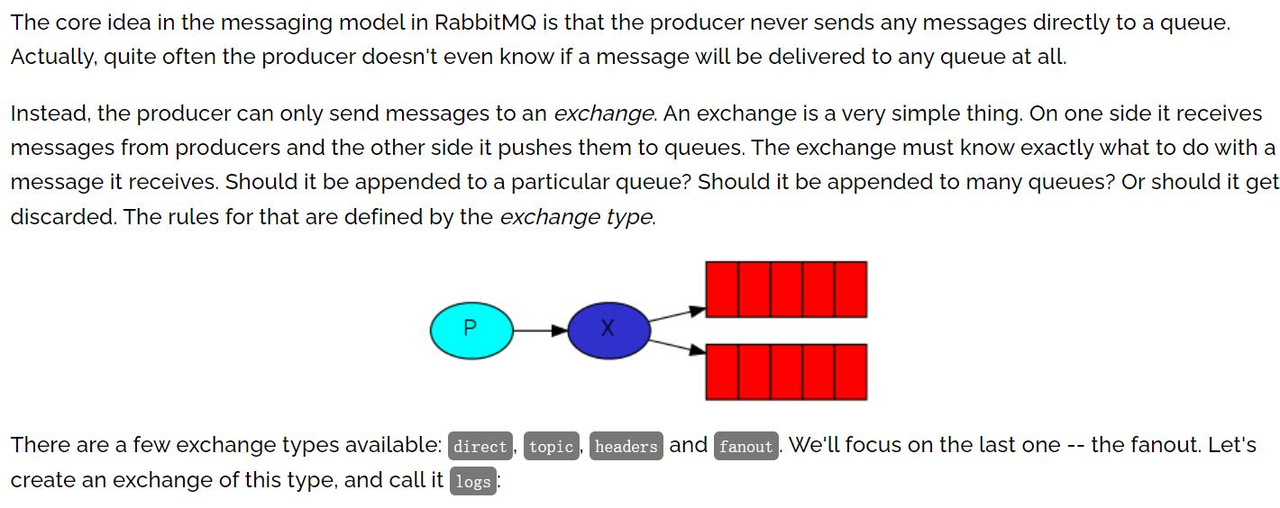
RabbitMQ 使用模式
1. Fanout-广播模式
Fanout简介
- fanout 就是广播模式, 就是把交换机(Exchange)里的消息发送给所有绑定该交换机的
队列,忽略 routingKey(也就是路由)。 - 示意图
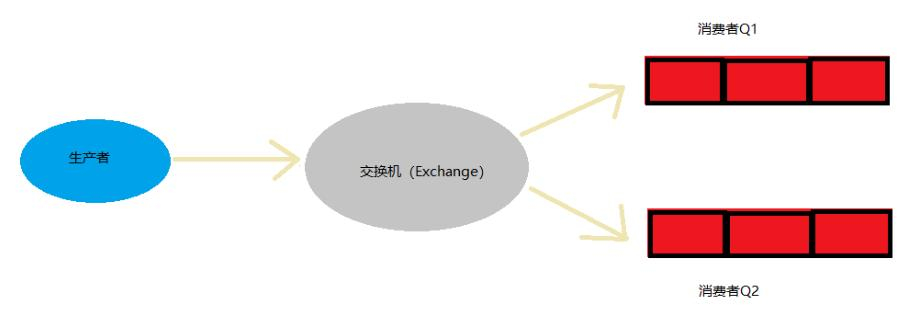
解读上图:
- 生产者把消息发送给指定的交换机
- 再把交换机的消息发送给所有绑定该交换机的队列, 忽略 routingKey/路由
应用实例
- 需求说明/图解
- 执行效果

代码实现
添加队列和交换机,绑定队列和交换机
@Configuration
public class RabbitMQConfig {

    private static final String QUEUE1 = "queue_fanout01";
    private static final String QUEUE2 = "queue_fanout02";
    private static final String EXCHANGE = "fanoutExchange";

     //--------fanout广播模式---------
   /**
     * 1. 配置队列
     * 2. 队列名为 queue
     * 3. true 表示: 持久化 (不填,默认为true,默认持久化)
     * durable: 队列是否持久化。 队列默认是存放到内存中的,rabbitmq 重启则丢失,
     * 若想重启之后还存在则队列要持久化,
     * 保存到 Erlang 自带的 Mnesia 数据库中,当 rabbitmq 重启之后会读取该数据库
     * @return
     */
    @Bean
    public Queue queue1(){
        return new Queue(QUEUE1);
    }


    @Bean
    public Queue queue2(){
        return new Queue(QUEUE2);
    }

    //创建交换机
    @Bean
    public FanoutExchange exchange(){
        return new FanoutExchange(EXCHANGE);
    }

    //将队列和交换机进行绑定
    @Bean
    public Binding binding01(){
        //将队列queue1和交换机进行绑定
        return BindingBuilder.bind(queue1()).to(exchange());
    }

    @Bean
    public Binding binding02(){
        //将队列queue1和交换机进行绑定
        return BindingBuilder.bind(queue2()).to(exchange());
    }
}
消息发送者
/**
 * 消息发送者
 */
@Slf4j
@Service
public class MQSender {

    @Resource
    private RabbitTemplate rabbitTemplate;

    //fanout广播模式发送消息
    public void sendFanout(Object msg){
        log.info("发送消息-" + msg);
        //因为是fanout广播模式,不需要指定路由,这里路由赋空值处理
        rabbitTemplate.convertAndSend("fanoutExchange","",msg);
    }

}
消息接收者
/**
* 消息接收者
*/
@Service
@Slf4j
public class MQReceiver {
//queues对应接收消息的队列
@RabbitListener (queues = "queue_fanout01")
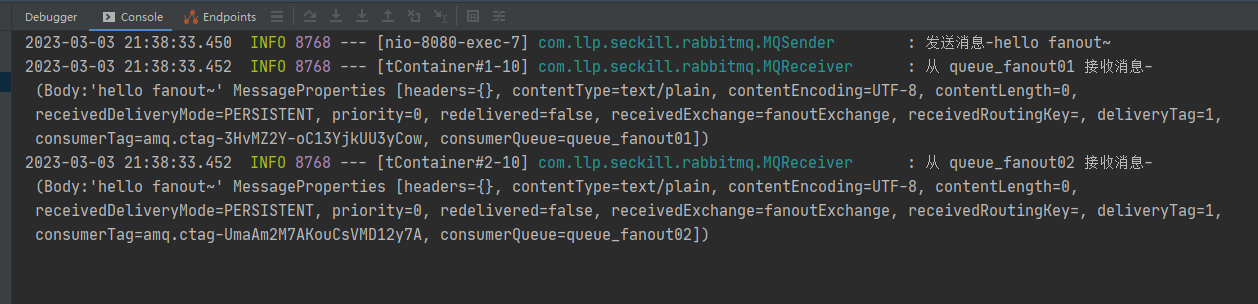
public void receive1(Object msg) {
log.info("从 queue_fanout01 接收消息-" + msg);
}
@RabbitListener(queues = "queue_fanout02")
public void receive2(Object msg){
log.info("从 queue_fanout02 接收消息-" + msg);
}
}
controller层测试类
@Controller
public class RabbitMQHandler {
//装配MQSender
@Resource
private MQSender mqSender;
//调用消息生产者,发送消息到交换机
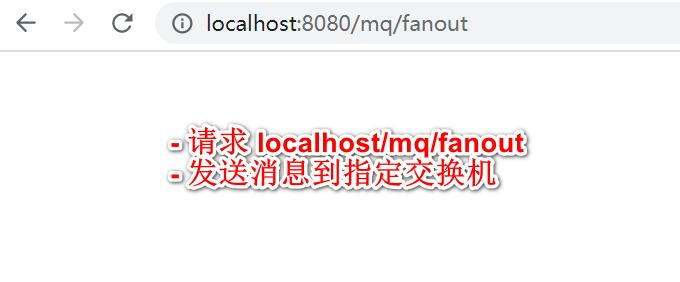
@RequestMapping("/mq/fanout")
@ResponseBody
public void fanout(){
mqSender.sendFanout("hello fanout~");
}
}
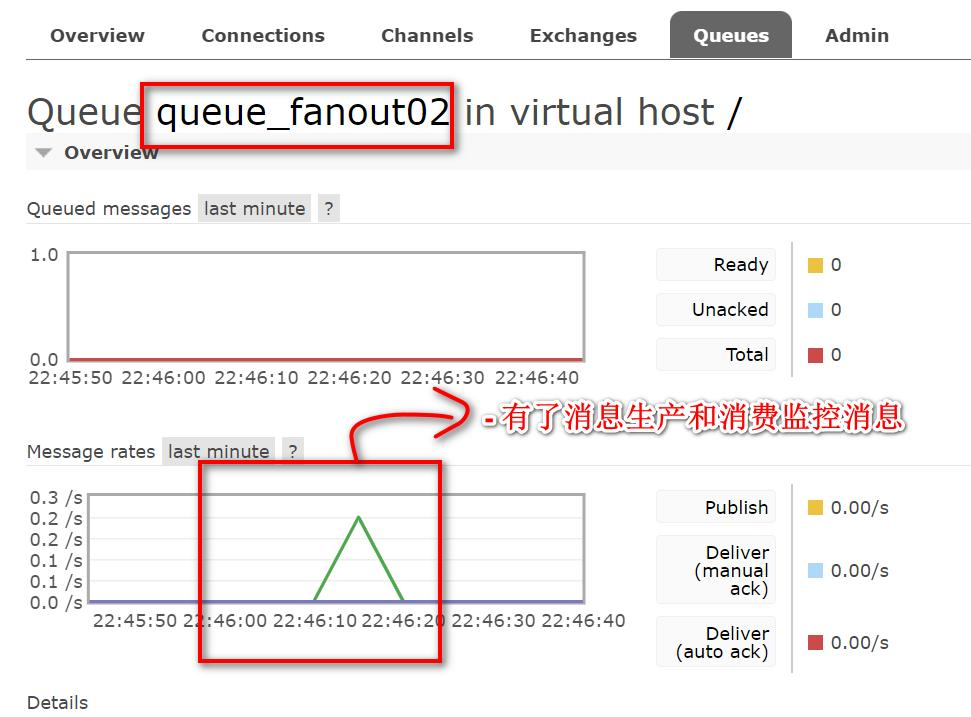
完成测试

- 点击交换机 fanoutExchange, 查看绑定情况
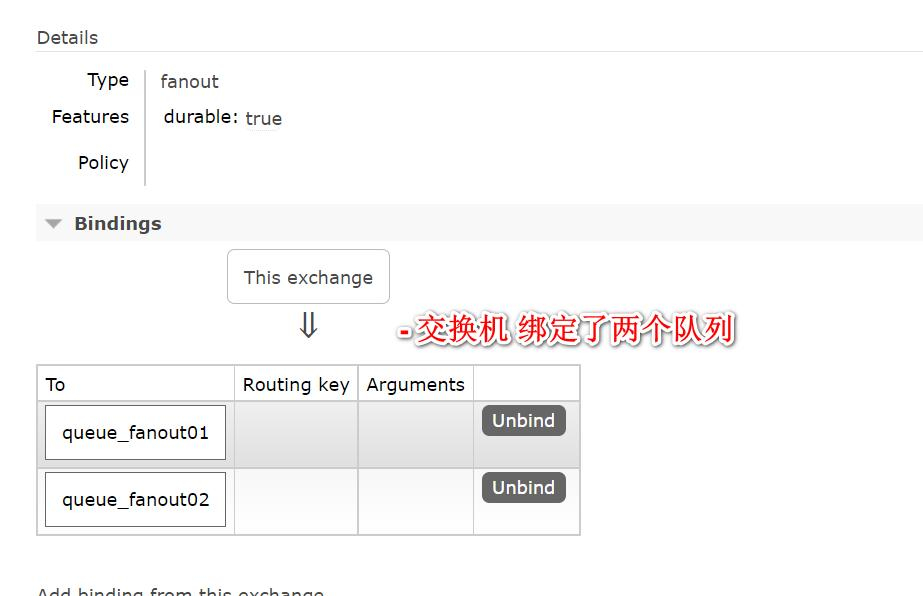
观察后台输出
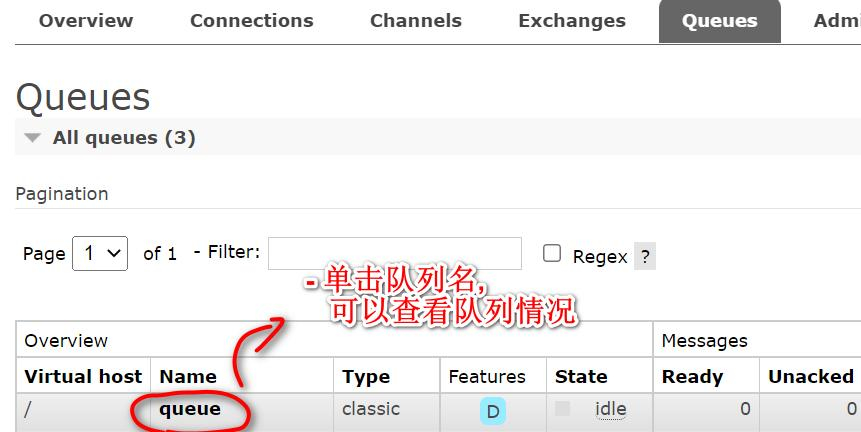
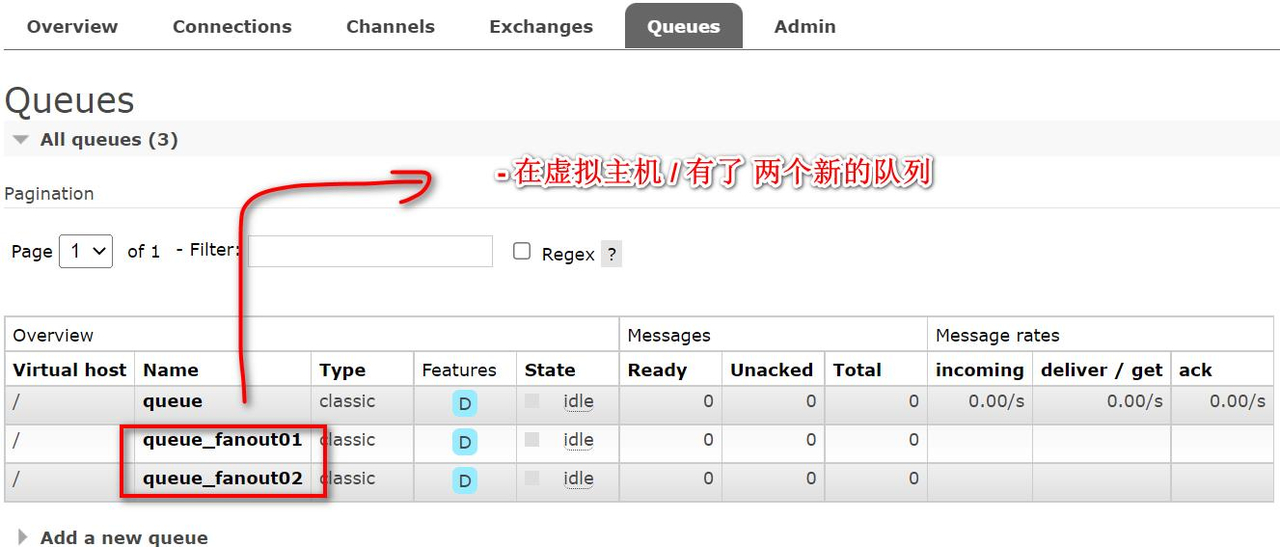
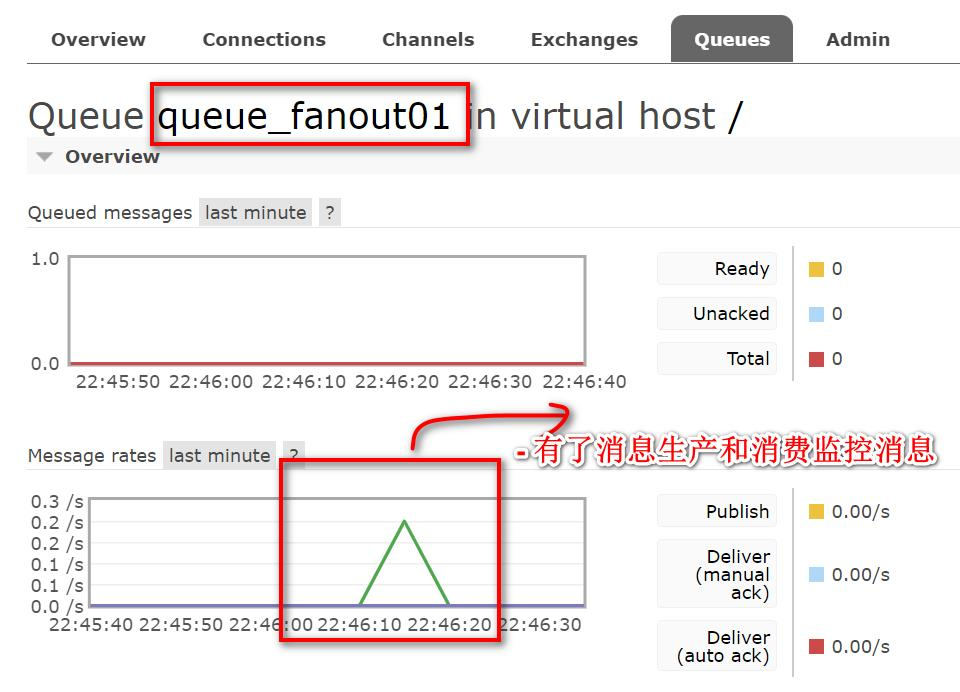
点击队列名,查看队列情况

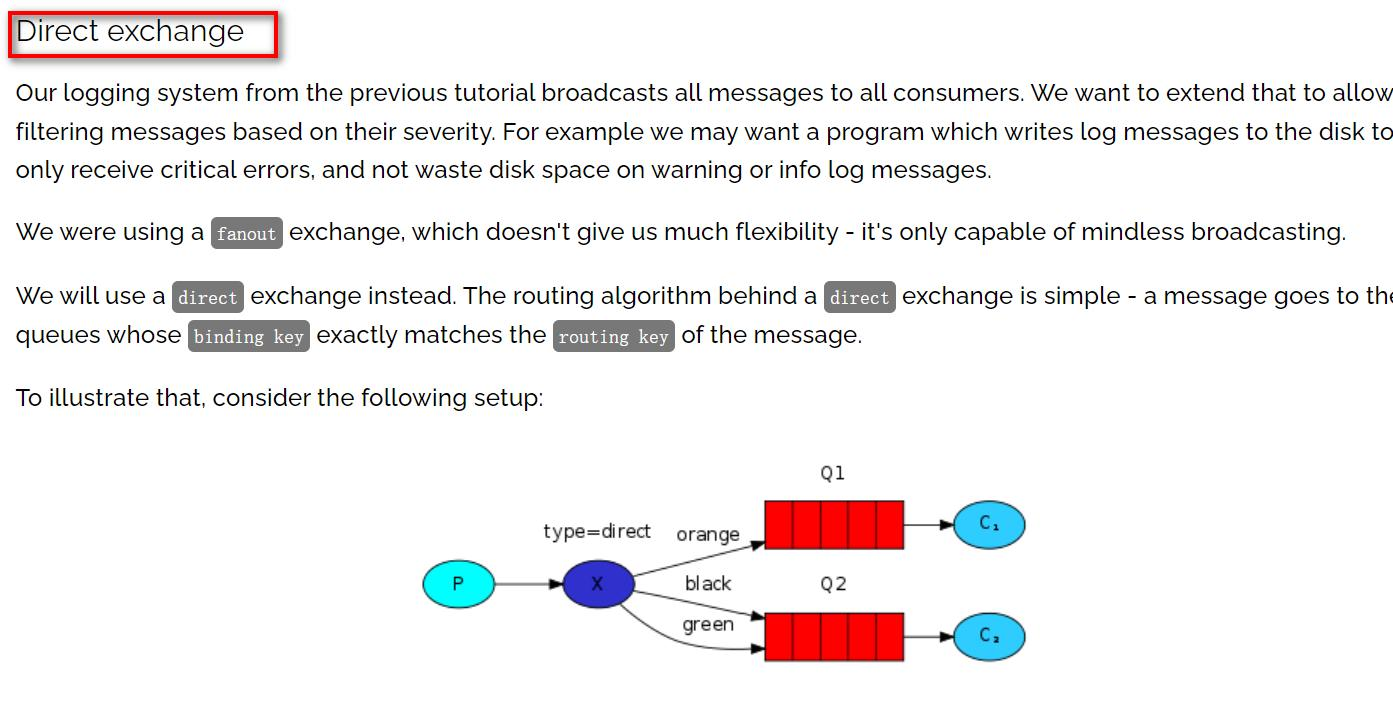
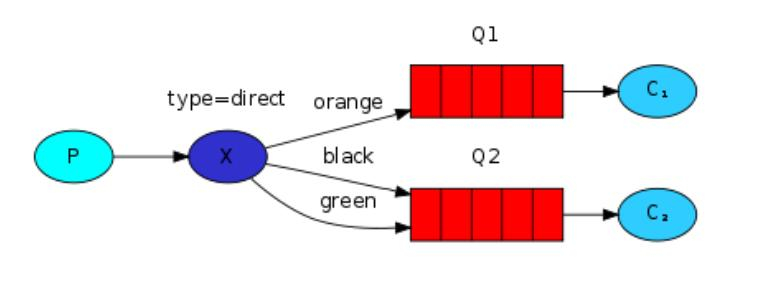
2.Direct-路由模式
Direct简介
- direct 就是路由模式, 路由模式是在使用交换机的同时,生产者指定路由发送数据,
消费者绑定路由接受数据。 - 与广播模式不同的是,广播模式只要是绑定了交换机的队列都会收到生产者向交换
机推送过来的数据。而路由模式下加了一个路由设置,生产者向交换机发送数据时,会
声明发送给交换机下的哪个路由,并且只有当消费者的队列绑定了交换机并且声明了路
由,才会收到数据 - 示意图
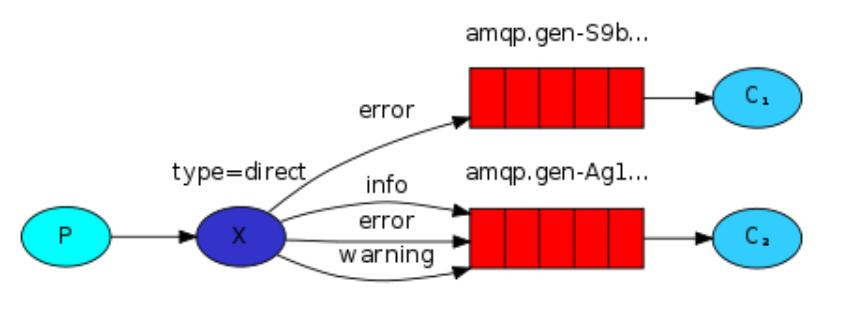
- P:消息的生产者
- X:交换机
- 红色:队列
- C1,C2:消息消费者
- error,info,warning:路由
应用实例
- 需求说明/图解
- 执行效果
代码实现
声明队列、交换机、路由
@Configuration
public class RabbitMQConfig {

    //direct
    private static final String QUEUE_DIRECT1 = "queue_direct01";
    private static final String QUEUE_DIRECT2 = "queue_direct02";
    private static final String EXCHANGE_DIRECT = "directExchange";
    //路由
    private static final String routing_key01 = "queue.red";
    private static final String routing_key02 = "queue.green";


    //--------direct路由模式---------
    @Bean
    public Queue queue_direct1() {
        return new Queue(QUEUE_DIRECT1);
    }

    @Bean
    public Queue queue_direct2() {
        return new Queue(QUEUE_DIRECT2);
    }

    @Bean
    public DirectExchange exchange_direct() {
        return new DirectExchange(EXCHANGE_DIRECT);
    }

    @Bean
    public Binding binding_direct1() {
        //将队列queue_direct1和交换机进行绑定,并给队列绑定路由
        return BindingBuilder.bind(queue_direct1()).to(exchange_direct()).with(routing_key01);
    }

    @Bean
    public Binding binding_direct2() {
        //将队列queue_direct2和交换机进行绑定,并给队列绑定路由
        return BindingBuilder.bind(queue_direct2()).to(exchange_direct()).with(routing_key02);
    }

}
消息发送者
/**
 * 消息发送者
 */
@Slf4j
@Service
public class MQSender {

    @Resource
    private RabbitTemplate rabbitTemplate;

    public void sendDirect1(Object msg){
        log.info("发送消息-" + msg);
        rabbitTemplate.convertAndSend("directExchange","queue.red",msg);
    }

    public void sendDirect2(Object msg){
        log.info("发送消息-" + msg);
        rabbitTemplate.convertAndSend("directExchange","queue.green",msg);
    }

}
消息接收者
/**
* 消息接收者
*/
@Service
@Slf4j
public class MQReceiver {
@RabbitListener(queues = "queue_direct01")
public void queue_direct1(Object msg){
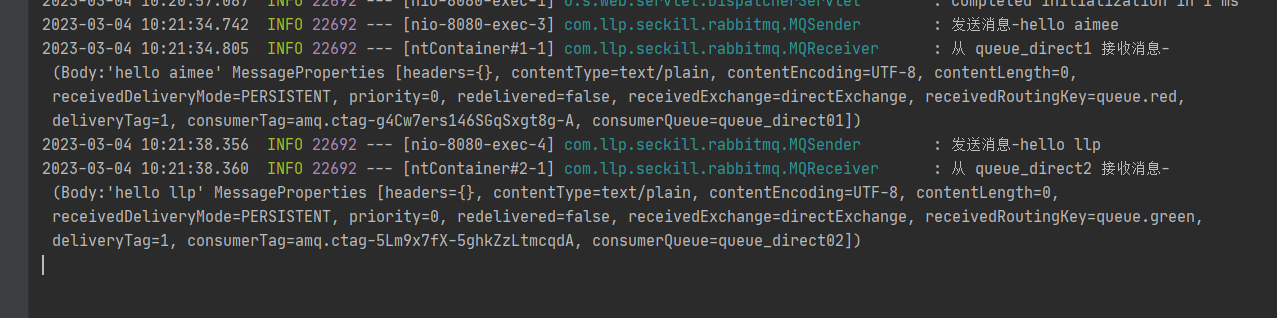
log.info("从 queue_direct1 接收消息-" + msg);
}
@RabbitListener(queues = "queue_direct02")
public void queue_direct2(Object msg){
log.info("从 queue_direct2 接收消息-" + msg);
}
}
controller测试
@Controller
public class RabbitMQHandler {

    //装配MQSender
    @Resource
    private MQSender mqSender;

    //direct 模式
    @GetMapping("/mq/direct01")
    @ResponseBody
    public void direct01() {
        mqSender.sendDirect1("hello aimee");
    }

    //direct 模式
    @GetMapping("/mq/direct02")
    @ResponseBody
    public void direct02() {
        mqSender.sendDirect2("hello llp");
    }
}
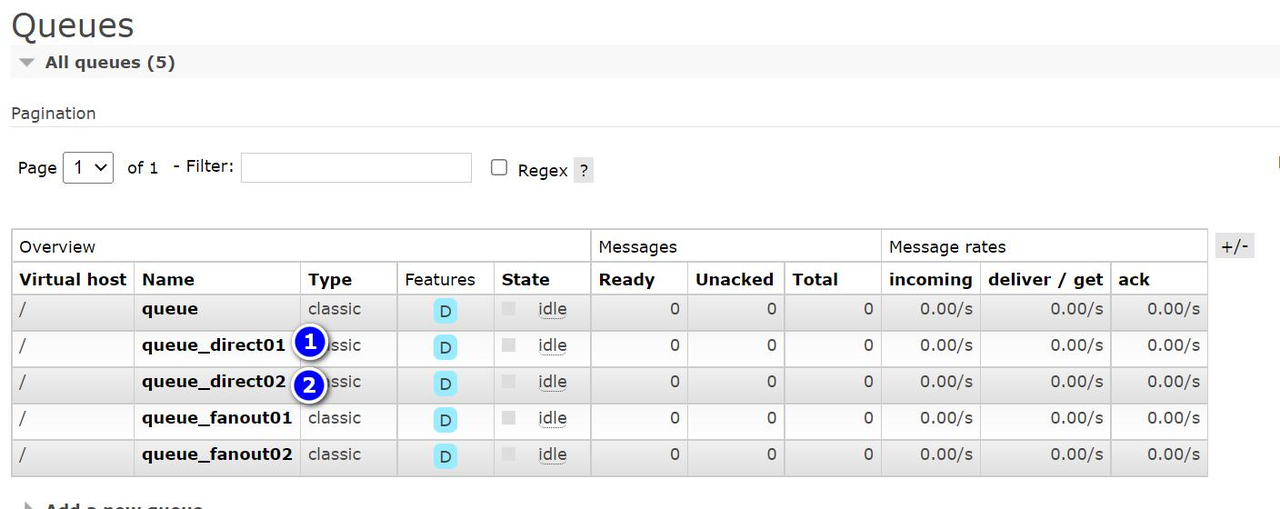
完成测试
-
启动项目, 再观察 RabbitMQ 管控台

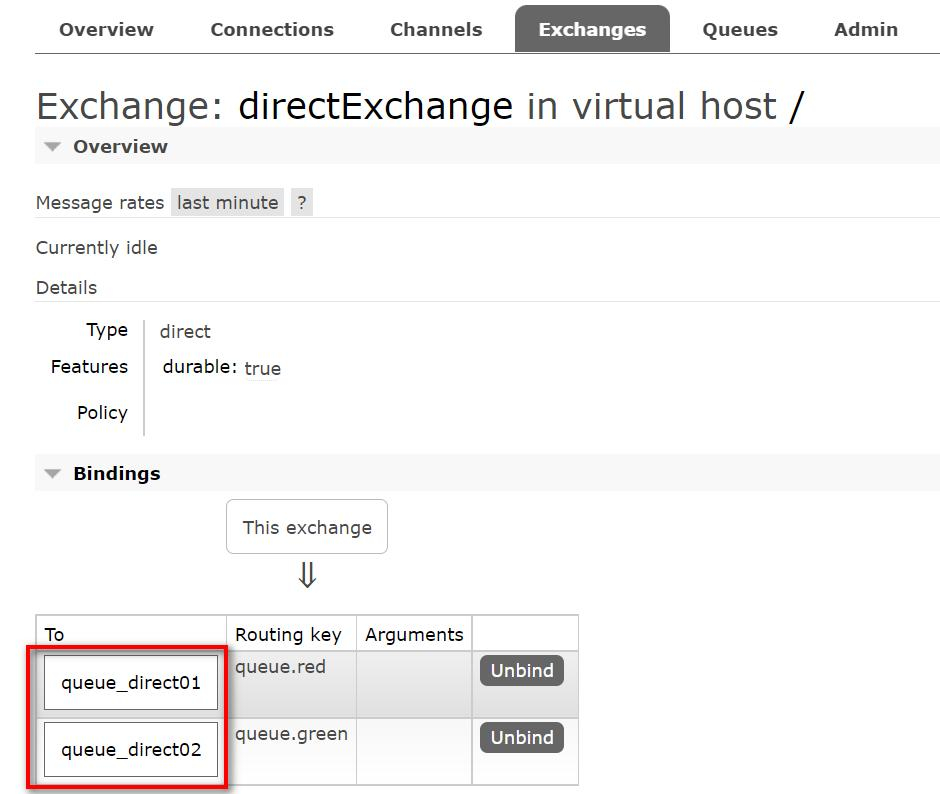
点击交换机 directExchange, 查看绑定情况
查看控制台数据情况

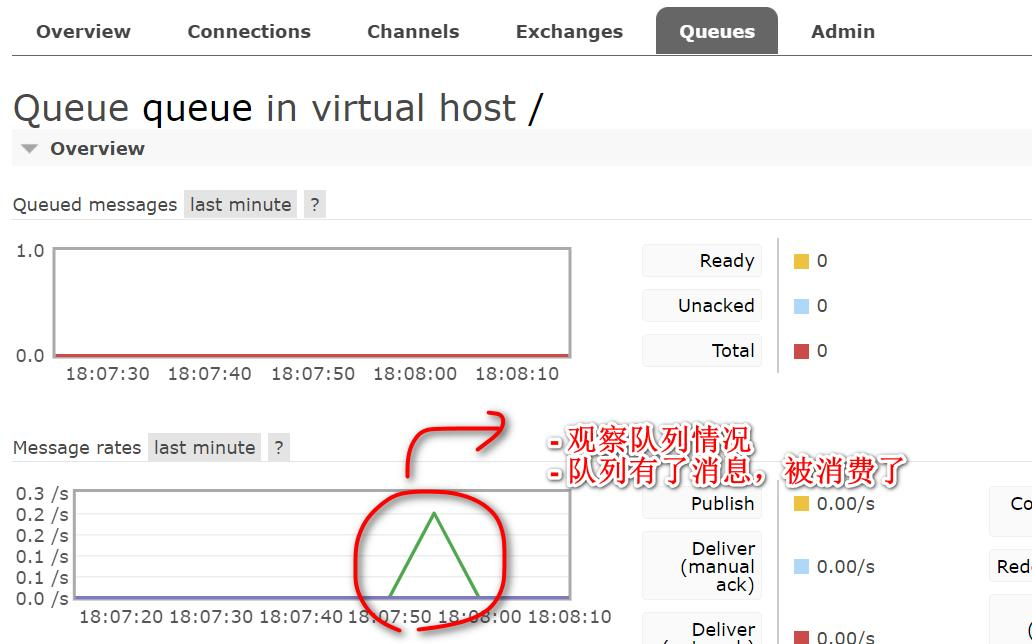
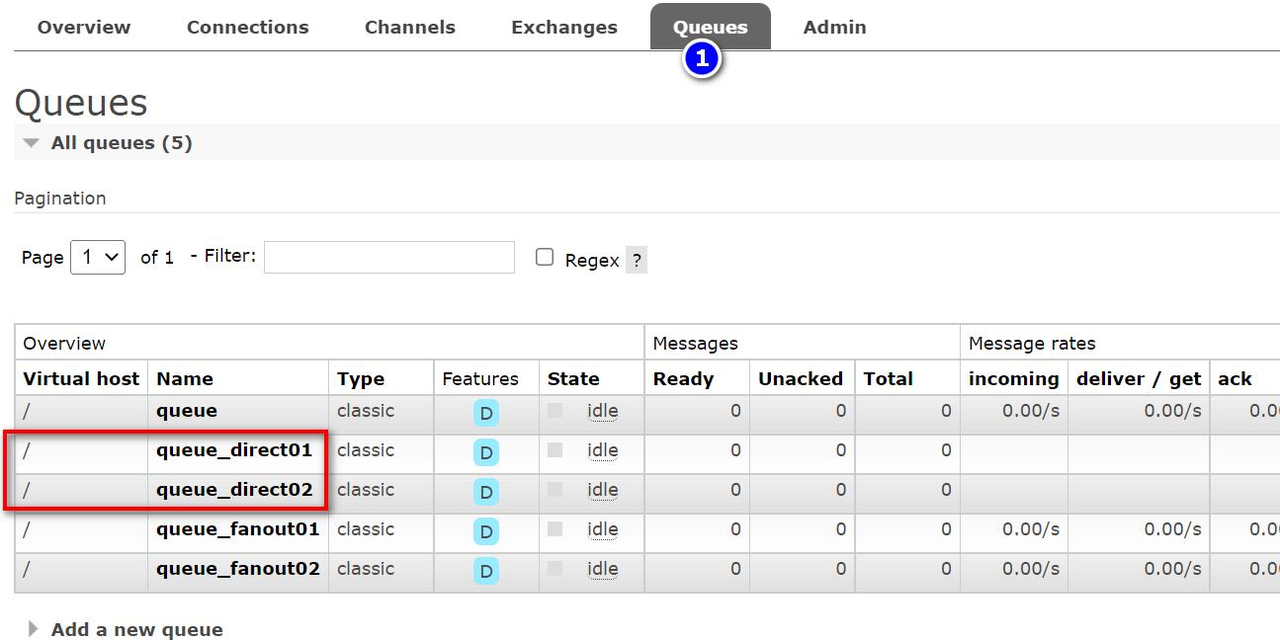
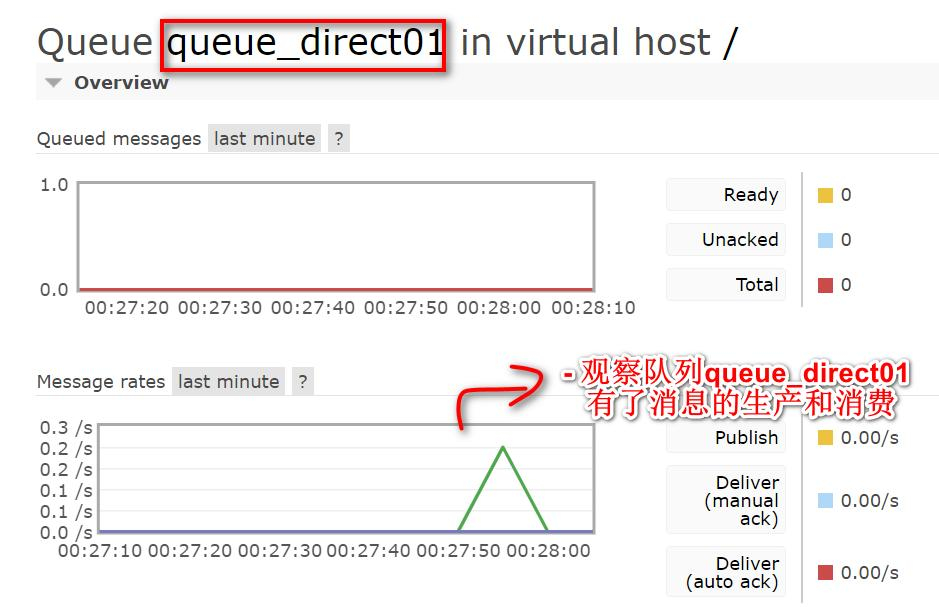
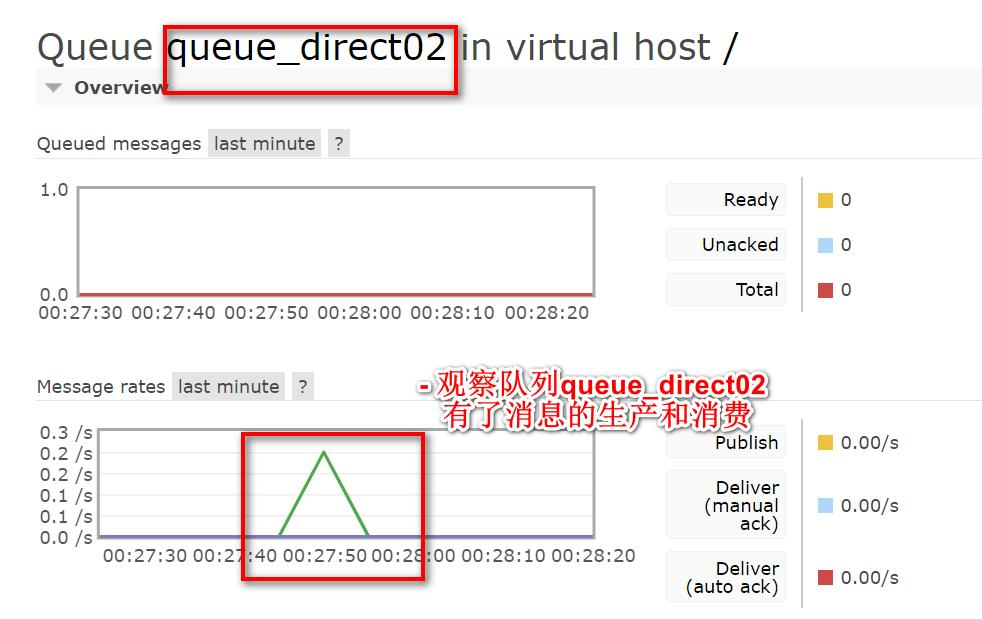
点击相应的队列, 观察队列已经有了消息变化, (提示:发送消息后就观察, 因为是实时刷新
的)
3.Topic主题模式
Topic 介绍
- direct 模式会造成路由 RoutingKey 太多, 而实际开发中往往是按照某个规则来进行路
由匹配的, RabbitMQ 提供了 Topic 模式/主题模式来适应这种需求. - Topic 模式是 direct 模式上的一种扩展/叠加, 扩展/叠加了模糊路由 RoutingKey 的模
式, 可以理解为是模糊的路由匹配模式
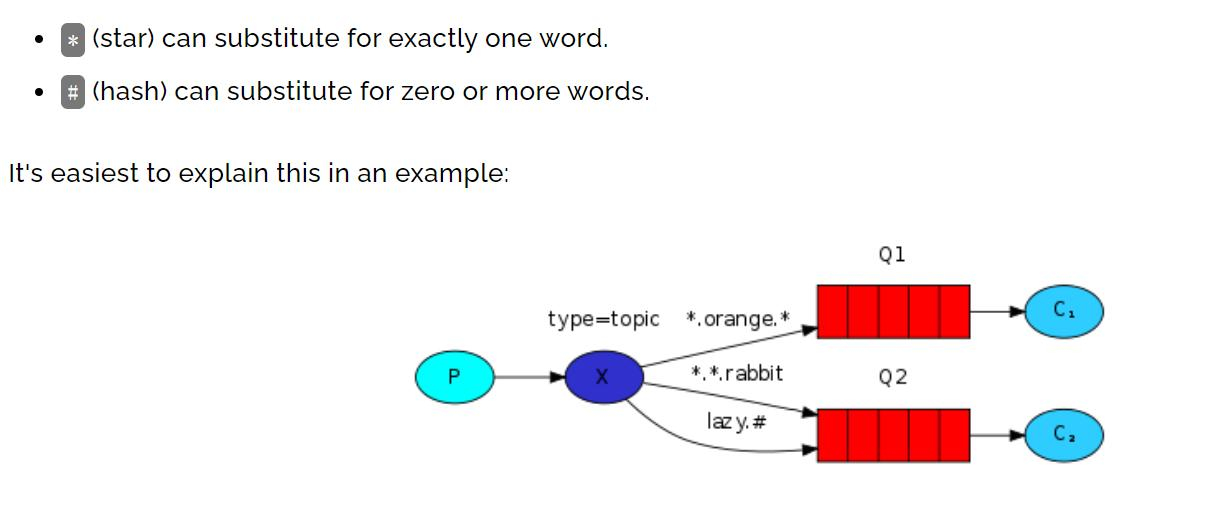
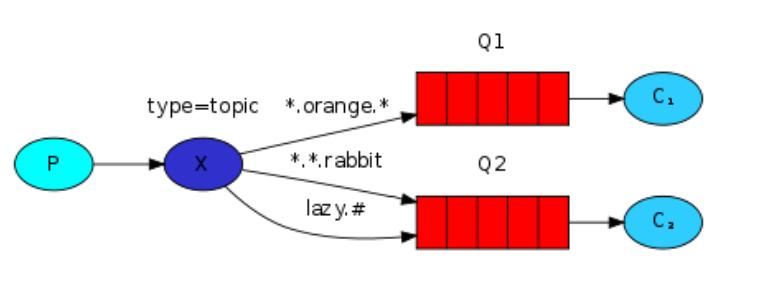
*(星号):可以(只能)匹配一个单词#(井号):可以匹配多个单词(或者零个)
示意图:

应用实例
- 需求说明/图解
- 执行效果
代码实现
配置队列、交换机、路由
import org.springframework.amqp.core.Binding;
import org.springframework.amqp.core.BindingBuilder;
import org.springframework.amqp.core.Queue;
import org.springframework.amqp.core.TopicExchange;
import org.springframework.context.annotation.Bean;
import org.springframework.context.annotation.Configuration;

@Configuration
public class RabbitMQTopicConfig {

    //topic主题模式
    private static final String QUEUE_TOPIC1 = "queue_topic01";
    private static final String QUEUE_TOPIC2 = "queue_topic02";
    private static final String EXCHANGE_TOPIC = "topicExchange";
    //路由
    private static final String routing_key01 = "#.queue.#";
    private static final String routing_key02 = "*.queue.#";


    @Bean
    public Queue queue_topic01() {
        return new Queue(QUEUE_TOPIC1);
    }

    @Bean
    public Queue queue_topic02() {
        return new Queue(QUEUE_TOPIC2);
    }

    @Bean
    public TopicExchange topicExchange() {
        return new TopicExchange(EXCHANGE_TOPIC);
    }

    @Bean
    public Binding binding_topic1() {
        //将队列queue1和交换机进行绑定
        return BindingBuilder.bind(queue_topic01()).to(topicExchange()).with(routing_key01);
    }

    @Bean
    public Binding binding_topic2() {
        //将队列queue1和交换机进行绑定
        return BindingBuilder.bind(queue_topic02()).to(topicExchange()).with(routing_key02);
    }

}
消息发送者
/**
 * 消息发送者
 */
@Slf4j
@Service
public class MQSender {

    @Resource
    private RabbitTemplate rabbitTemplate;

    public void sendTopic1(Object msg) {
        log.info("发送消息-" + msg);
        rabbitTemplate.convertAndSend("topicExchange", "queue.red.message", msg);
    }

    public void sendTopic2(Object msg) {
        log.info("发送消息-" + msg);
        rabbitTemplate.convertAndSend("topicExchange", "green.queue.green.message", msg);
    }

}
消息接收者
/**
 * 消息接收者
 */
@Service
@Slf4j
public class MQReceiver {
-
    @RabbitListener(queues = "queue_topic01")
    public void queue_topic1(Object msg) {
        log.info("从 queue_topic01 接收消息-" + msg);
    }

    @RabbitListener(queues = "queue_topic02")
    public void queue_topic2(Object msg) {
        log.info("从 queue_topic02 接收消息-" + msg);
    }
}
编写controller层测试方法
@Controller
public class RabbitMQHandler {

    //装配MQSender
    @Resource
    private MQSender mqSender;

    //topic 模式
    @GetMapping("/mq/topic01")
    @ResponseBody
    public void topic01() {
        mqSender.sendDirect1("hello aimee topic");
    }

    //topic 模式
    @GetMapping("/mq/topic02")
    @ResponseBody
    public void topic02() {
        mqSender.sendDirect2("hello llp topic");
    }

}
完成测试
- 启动项目, 再观察 RabbitMQ 管控台
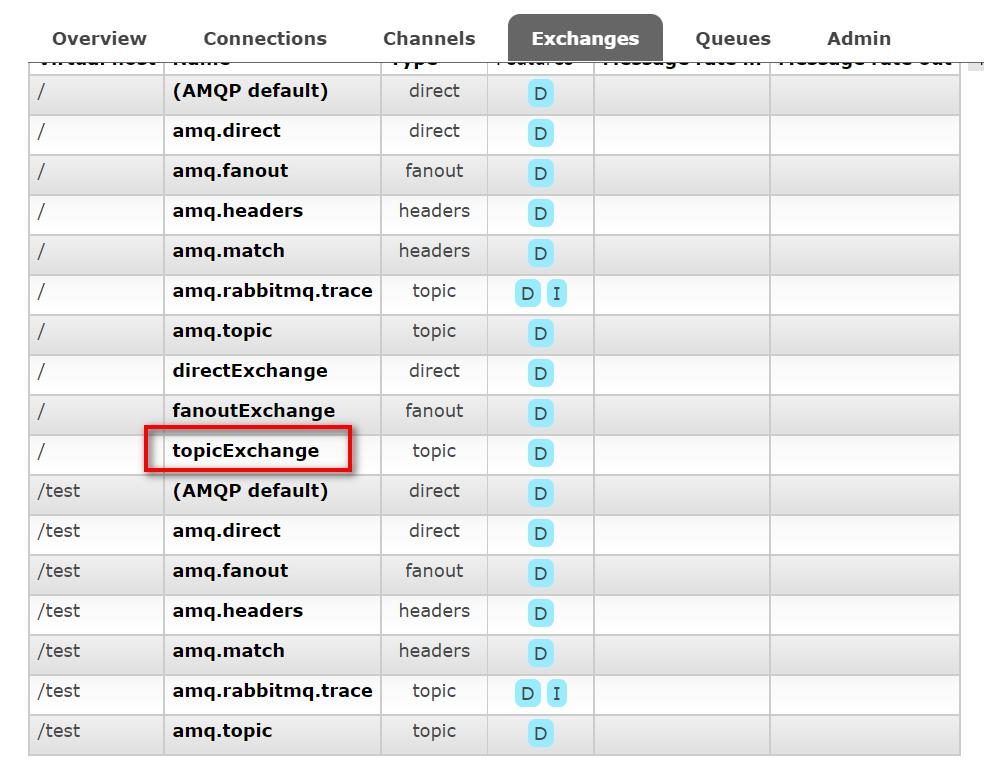
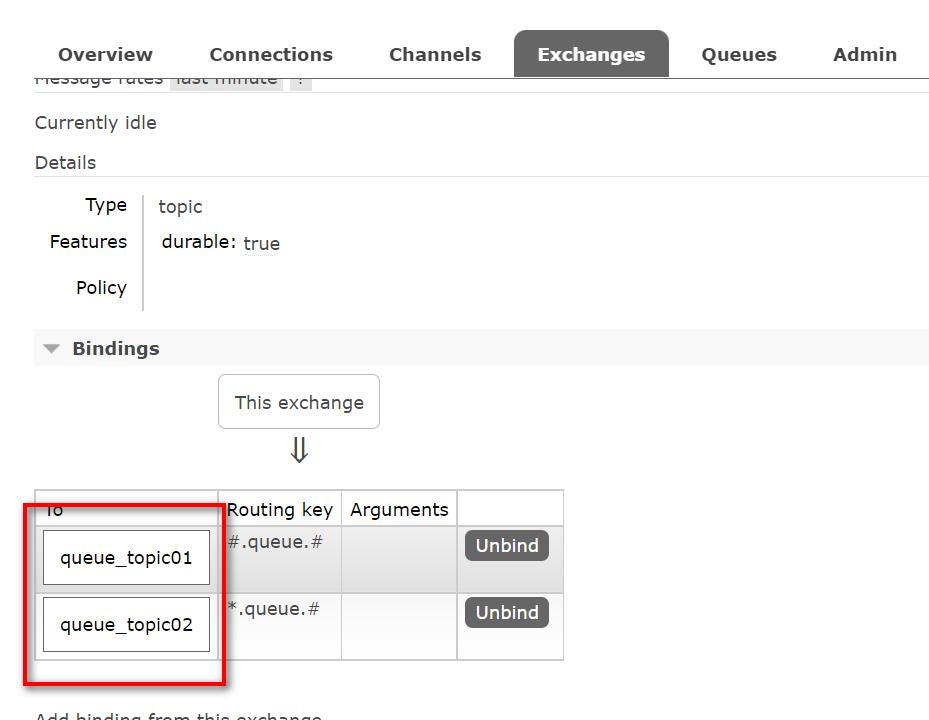
点击交换机 topicExchange, 查看绑定情况
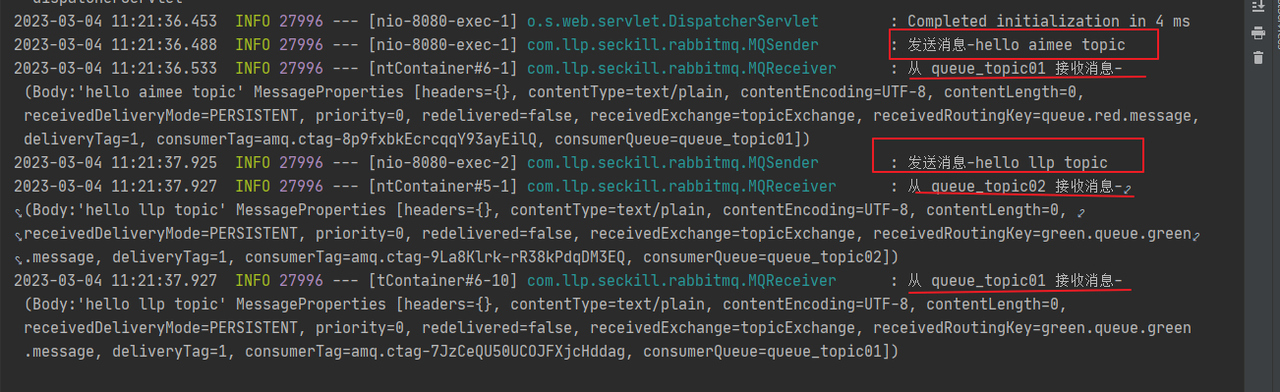
观察后台输出
queue.red.message
green.queue.green.message
#.queue.#
*.queue.#
调用topic1, queue.red.message匹配到的路由是#.queue.#
调用topic2, green.queue.green.message匹配到的路由是*.queue.#和#.queue.#
* 有且仅有一个
# 可以有多个也可以没有
4.Headers模式
Headers 介绍
- headers 模式/headers 头路由模式 使用比较少
- headers 交换机是一种比较复杂且少见的交换机,不同于 direct 和 topic,它不关心路由 key 是否匹配,而只关心 header 中的 key-value 对是否匹配(这里的匹配为精确匹配,包含键和值都必须匹配), 有点类似于 http 中的请求头。
- headers 头路由模型中,消息是根据 prop 即请求头中 key-value 来匹配的。
- 绑定的队列(也可以理解成消费方) 指定的 headers 中必须包含一个"x-match"的键
- 键"x-match"的值有 2 个:all 和 any。
all:表示绑定的队列/消费方 指定的所有 key-value 都必须在消息 header 中出现并匹配
any:表示绑定的队列/消费方 指定的 key-value 至少有一个在消息 header 中出现并匹配即可
应用实例
- 需求说明/图解
- 给 headers 交换机发送消息 hello ABC, 让 QUEUE01 和 QUEUE02 两个队列都接收
- 给 headers 交换机发送消息 hello llp, 让 QUEUE01 队列都接收
- 适应 headers 模式完成
代码实现
创建队列、交换机
@Configuration
public class RabbitMQHeadersConfig {
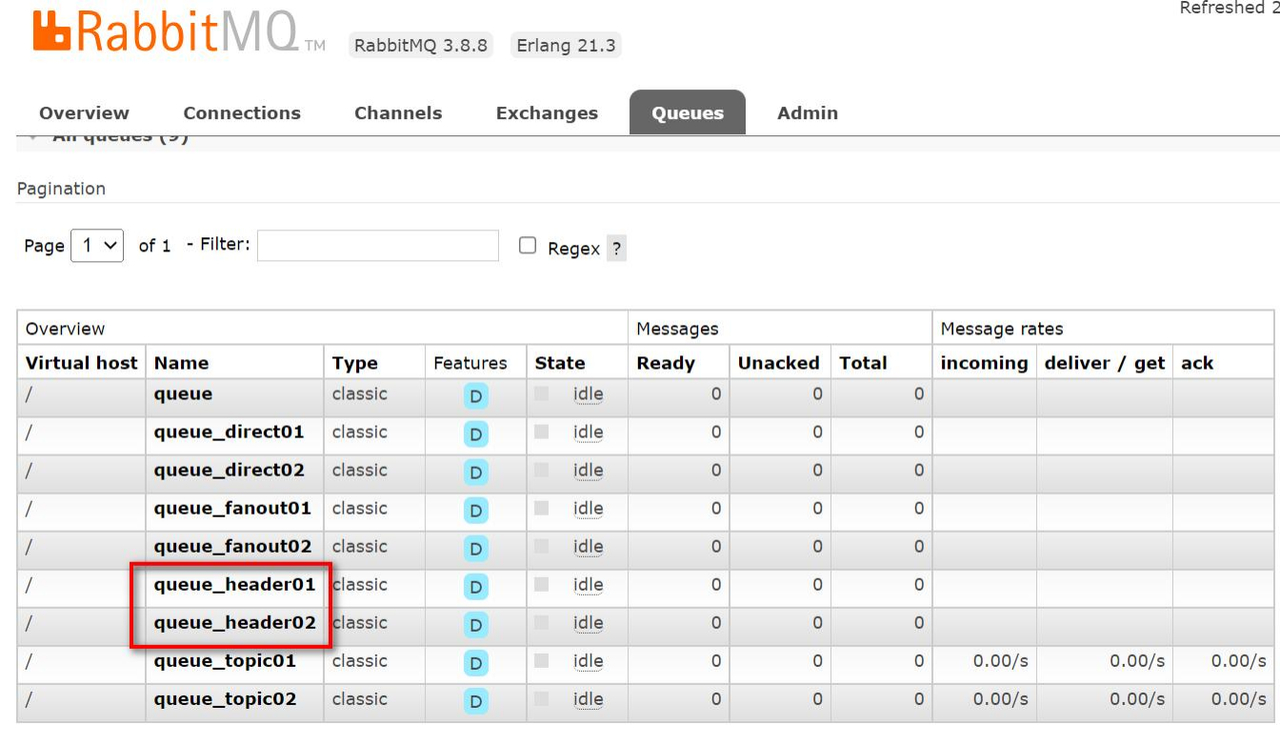
private static final String QUEUE01 = "queue_header01";
private static final String QUEUE02 = "queue_header02";
private static final String EXCHANGE = "headersExchange";
@Bean
public Queue queue_header01() {
return new Queue(QUEUE01);
}
@Bean
public Queue queue_header02() {
return new Queue(QUEUE02);
}
@Bean
public HeadersExchange headersExchange() {
return new HeadersExchange(EXCHANGE);
}
@Bean
public Binding binding_header01() {
Map<String,Object> map = new HashMap<>();
map.put("color","red");
map.put("speed","low");
System.out.println("yy=" + headersExchange().hashCode());
//whereAny(map): 只要发送的消息的属性 MessageProperties 有任意一个k-v匹配就 OK
return BindingBuilder.bind(queue_header01()).to(headersExchange()).whereAny(map).match();
}
@Bean
public Binding binding_header02() {
Map<String, Object> map = new HashMap<>();
map.put("color", "red");
map.put("speed", "fast");
System.out.println("xx=" + headersExchange().hashCode());
//whereAll(map): 发送的消息的属性 MessageProperties 要全部匹配才 OK
return BindingBuilder.bind(queue_header02()).to(headersExchange()).whereAll(map).match();
}
}
消息发送者
@Slf4j
@Service
public class MQSender {

    @Resource
    private RabbitTemplate rabbitTemplate;

    public void sendHeader1(String msg) {
        MessageProperties properties = new MessageProperties();
        properties.setHeader("color", "red");
        properties.setHeader("speed", "fast");
        Message message = new Message(msg.getBytes(), properties);
        rabbitTemplate.convertAndSend("headersExchange","",message);
    }

    public void sendHeader2(String msg) {
        MessageProperties properties = new MessageProperties();
        properties.setHeader("color", "red");
        properties.setHeader("speed", "normal");
        Message message = new Message(msg.getBytes(), properties);
        rabbitTemplate.convertAndSend("headersExchange","",message);
    }

}
消息接收者
/**
 * 消息接收者
 */
@Service
@Slf4j
public class MQReceiver {

    @RabbitListener(queues = "queue_header01")
    public void queue_header1(Message message) {
        log.info("queue_header01 接收消息 message 对象" + message);
        log.info("queue_header01 接收消息" + new String(message.getBody()));
    }

    @RabbitListener(queues = "queue_header02")
    public void queue_header2(Message message) {
        log.info("queue_header2 接收消息 message 对象" + message);
        log.info("queue_header2 接收消息" + new String(message.getBody()));
    }
}
完成测试
- 启动项目, 再观察 RabbitMQ 管控台
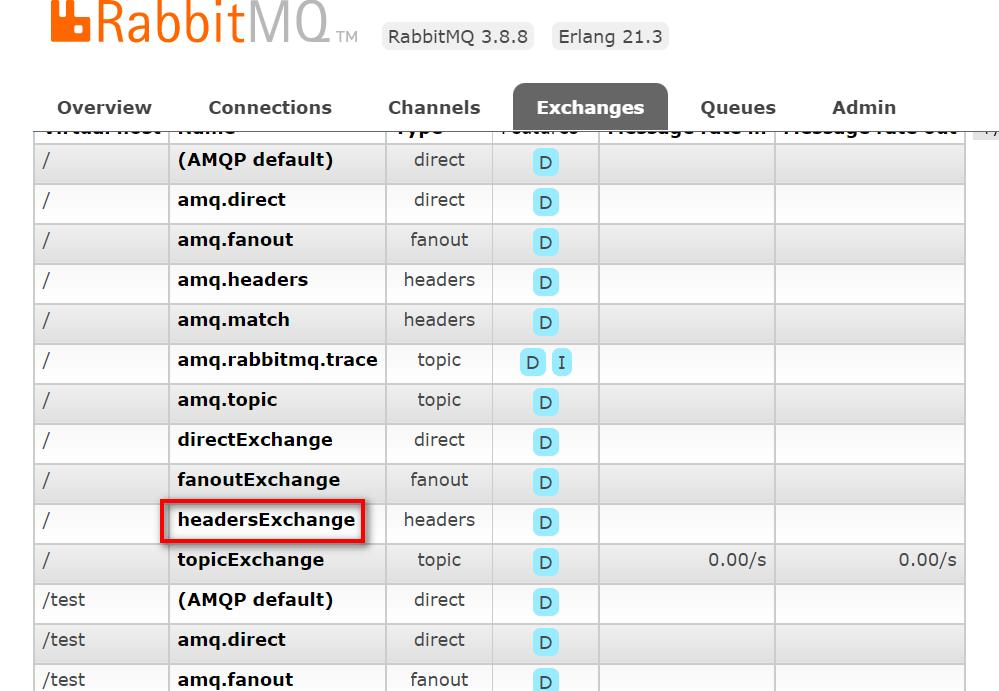
点击交换机 headersExchange, 查看绑定情况
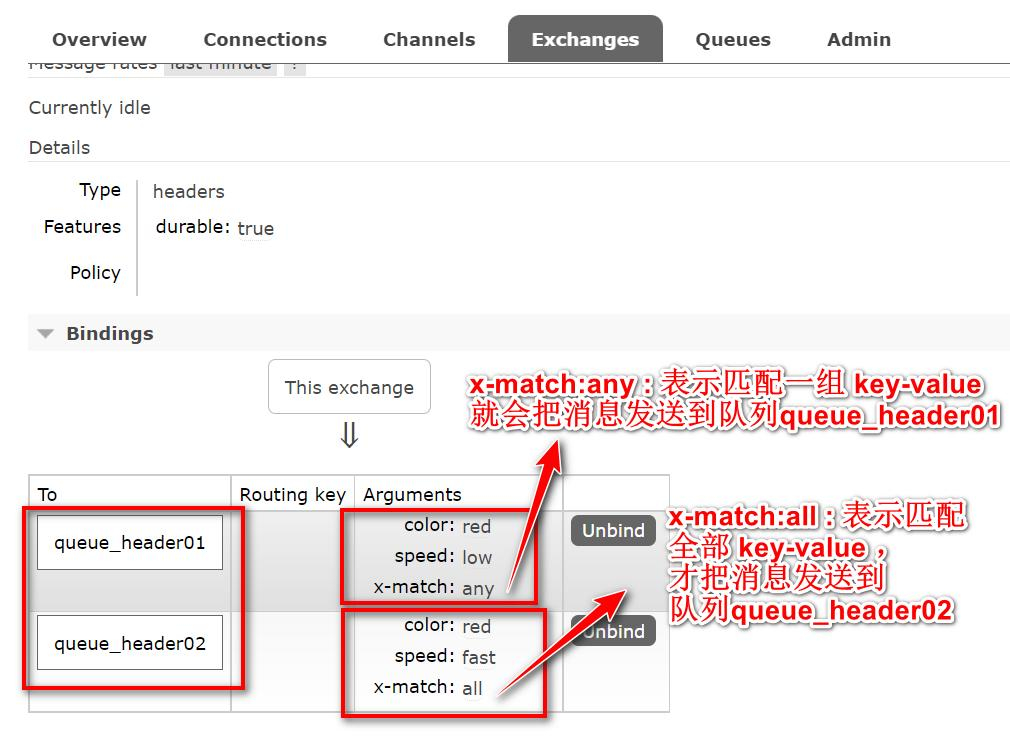
调用header1,队列1和队列2都能接收
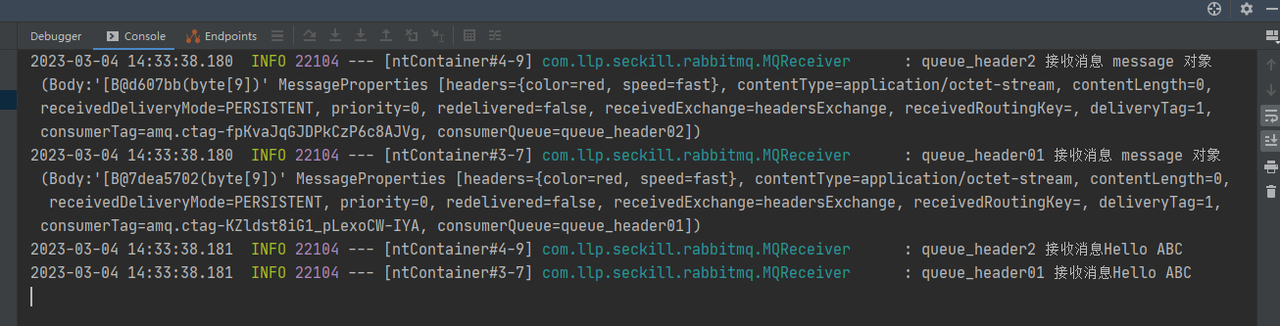
调用header2,header头并不完全匹配,因此只有队列1能够接收到消息
