 JavaWeb
 Spring
 MyBatis
 linux
linux
 消息队列
消息队列
 JavaSE
 工具
工具
 AI
AI
 搜索
搜索
 dy
dy
nginx+lua+redis实践

nginx+lua+redis实践
1.概述
nginx、lua访问redis的三种方式:
- HttpRedis模块。
指令少,功能单一,适合简单的缓存。只支持get 、select命令。
- HttpRedis2Module模块。
功能强大,比较灵活。
- lua-resty-redis库
OpenResty。api。适合复杂业务,节省内存。
OpenResty:基于nginx开源版本的一个扩展版本。集成了大量的精良的lua库。
2.OpenResty安装
安装wget
yum install wget
下载资源库
wget https://openresty.org/package/centos/openresty.repo
得到文件: openresty.repo
安装OpenResty
yum install openresty
启动OpenResty,也可以进去到sbin目录下,执行./nginx进行启动
/usr/local/openresty/nginx/sbin/nginx -p /usr/local/openresty/nginx/
OpenResty安装失败参考:https://blog.csdn.net/weixin_57147852/article/details/132800949
测试访问:
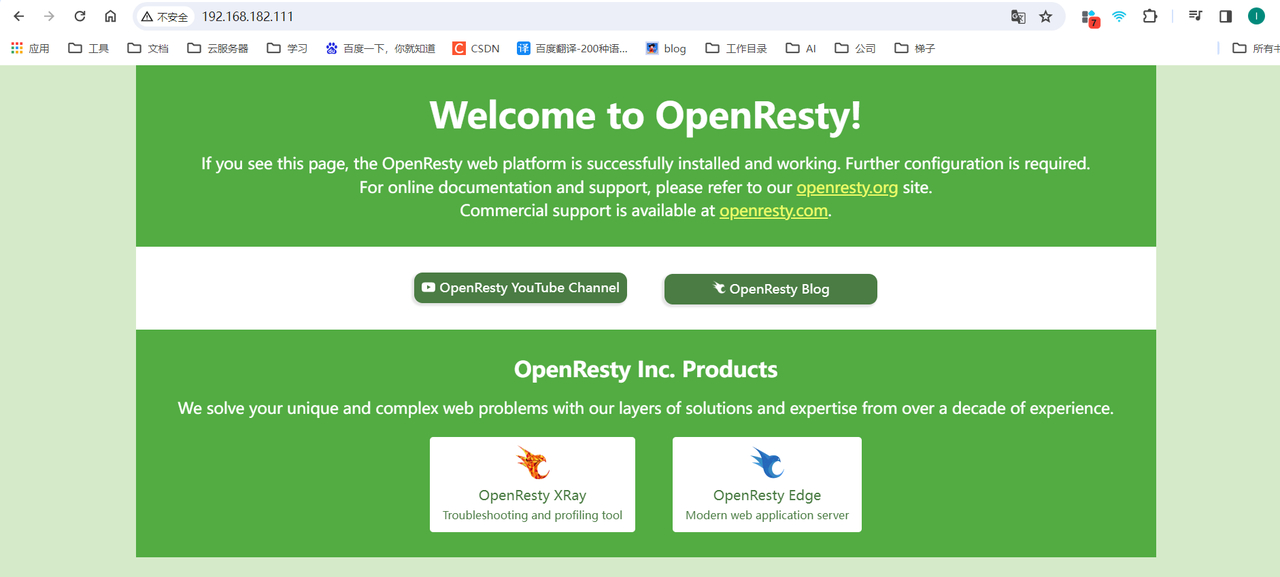
初试测试lua,修改conf
server {
        listen 8080;
        location / {
          default_type text/html;
          content_by_lua 'ngx.say("hello my openresty")';
        }
}
3.redis安装
安装epel:第三方的源(软件安装包)
yum install epel-release
安装redis
yum install redis
启动redis
systemctl start redis
测试redis
redis服务端和redis客户端
which redis-cli
# /usr/bin/redis-cli
cd /usr/bin/
./redis-cli

4.HttpRedis
修改配置文件,在配置文件目录下cp一份 nginx.conf 得到nginx-httpredis.conf文件,修改该文件并使用该文件进行启动
nginx-httpredis.conf
worker_processes  1;


events {
    worker_connections  1024;
}


http {
    include       mime.types;
    default_type  application/octet-stream;

    sendfile        on;

    keepalive_timeout  65;

    server {
        listen       80;
        server_name  www.cpf.com;
	root html;
	index index.html;

        location / {
	    default_type text/plain;
    	    set $redis_key "m";
            redis_pass 127.0.0.1:6379;
	    	error_page 404 = @fetch;
        }

	location @fetch {
 	    root html;
 	}


        error_page   500 502 503 504  /50x.html;
        location = /50x.html {
            root   html;
        }

    }
}
在sbin目录下执行
./nginx -c /usr/local/openresty/nginx/conf/nginx-httpredis.conf
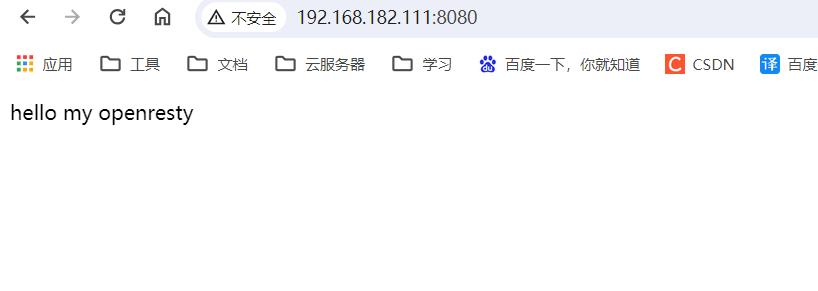
测试一下:
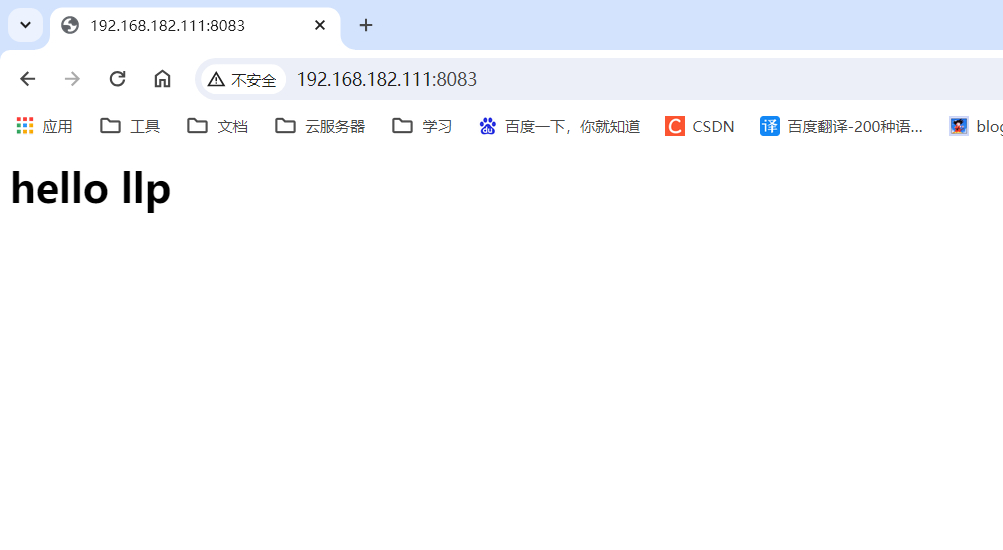
-
redis中没有 key为m的 键值对,在
/usr/local/openresty/nginx/html目录下创建1.html内容如下hello llp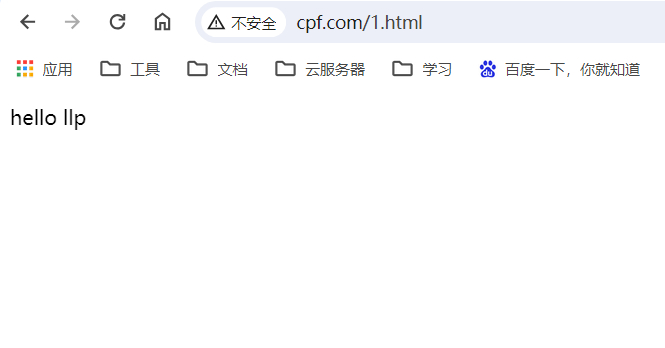
-
我们通过redis,设置key为m的value是:"llp"(m=llp)
扩展:用于降级,当redis中存在某个key时,就访问缓存中的数据,不存在则正常访问页面,当流量过大时我们将redis对应的限流的key进行赋值就可以实现限流
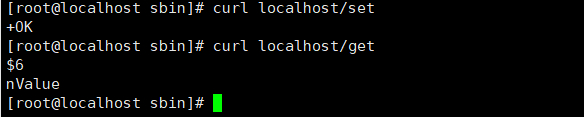
5.HttpRedis2Module
修改配置文件,在配置文件目录下cp一份 nginx.conf 得到nginx-httpRedis2Module.conf文件,修改该文件并使用该文件进行启动
nginx-httpRedis2Module.conf
worker_processes  1;


events {
    worker_connections  1024;
}


http {
    include       mime.types;
    default_type  application/octet-stream;

    sendfile        on;

    keepalive_timeout  65;

    server {
        listen       80;
        server_name  www.cpf.com;
	root html;
	index index.html;


	location /get {
 		redis2_query get $key;
 		redis2_pass 127.0.0.1:6379;
 	}
	location /set {
 		redis2_query set $key 'nValue';
 		redis2_pass 127.0.0.1:6379;
 	}

        error_page   500 502 503 504  /50x.html;
        location = /50x.html {
            root   html;
        }

    }

}
6.openresty-lua-redis
参考地址:https://github.com/openresty/lua-resty-redis
修改配置文件,在配置文件目录下cp一份 nginx.conf 得到nginx-openresty-lua-redis.conf文件,修改该文件并使用该文件进行启动
nginx-openresty-lua-redis.conf
worker_processes  1;

error_log  logs/error.log;

events {
    worker_connections  1024;
}


http {
    include       mime.types;
    default_type  application/octet-stream;

    sendfile        on;
    keepalive_timeout  65;
    server {
        listen       80;
        server_name  localhost;

	location / {
	    # 请求没有指定内容类型,Nginx会返回HTML内容。
 	    default_type text/html;
 	    content_by_lua_file /usr/local/openresty/nginx/lua/lua-openresty-redis.lua;
	 }
        error_page   500 502 503 504  /50x.html;
        location = /50x.html {
            root   html;
        }
    }
}
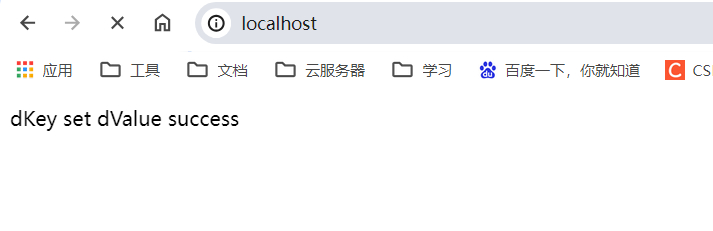
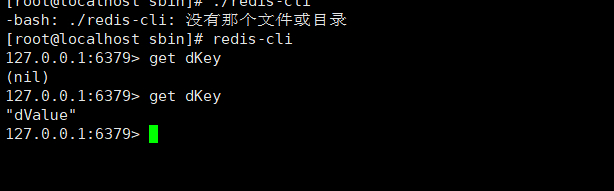
lua-openresty-redis.lua
-- 引用resty的redis
local redis = require "resty.redis";
local red = redis:new();

-- 连接redis
local ok,err = red:connect("127.0.0.1",6379);
if not ok then
 ngx.say("faild to connect",err);
 return
end

ok,err = red:set("dKey","dValue");
if not ok then
 ngx.say("failed to set dKey",err);
 return
end
ngx.say("dKey set dValue success")
return
测试效果
分析OpenResty响应信息:
目的:为了修改以后的响应信息。
server {
 listen 8081;
 location / {
 	default_type text/html;
 	content_by_lua_block {
 		ngx.say("hi block");
 		}
 	}
 }
7.获取请求参数信息
修改配置文件,在配置文件目录下cp一份 nginx.conf 得到nginx-param.conf文件,修改该文件并使用该文件进行启动
nginx-param.conf
worker_processes  1;

error_log  logs/error.log;

events {
    worker_connections  1024;
}


http {
    include       mime.types;
    default_type  application/octet-stream;

    sendfile        on;
    keepalive_timeout  65;
    server {
        listen       80;
        server_name  localhost;

        location / {
            # 请求没有指定内容类型,Nginx会返回HTML内容。
            default_type text/html;
            content_by_lua_file /usr/local/openresty/nginx/lua/lua-http-param.lua;
         }
        error_page   500 502 503 504  /50x.html;
        location = /50x.html {
            root   html;
        }
    }
}
编写lua脚本,在/usr/local/openresty/nginx/lua目录下创建lua-http-param.lua文件
lua-http-param.lua
-- 获取get请求的参数
local arg = ngx.req.get_uri_args();
for k,v in pairs(arg)
do
 ngx.say("key:",k," value:",v);
end
将请求参数保存到redis中:
-- 获取get请求的参数
local redis = require "resty.redis";
local red = redis:new();
red:connect("127.0.0.1",6379);
-- 省去链接错误的判断,前面课程中有
local arg = ngx.req.get_uri_args();
for k,v in pairs(arg)
do
 ngx.say("key:",k," value:",v);
 red:set(k,v);
end
测试: http://192.168.182.111/?id=1
8.获取请求头参数
修改配置文件,在配置文件目录下cp一份 nginx.conf 得到nginx-header.conf文件,修改该文件并使用该文件进行启动
nginx-header.conf
worker_processes  1;

error_log  logs/error.log;

events {
    worker_connections  1024;
}


http {
    include       mime.types;
    default_type  application/octet-stream;

    sendfile        on;
    keepalive_timeout  65;
    server {
        listen       80;
        server_name  localhost;

        location / {
            # 请求没有指定内容类型,Nginx会返回HTML内容。
            default_type text/html;
            content_by_lua_file /usr/local/openresty/nginx/lua/lua-http-header-param.lua;
         }
        error_page   500 502 503 504  /50x.html;
        location = /50x.html {
            root   html;
        }
    }
}
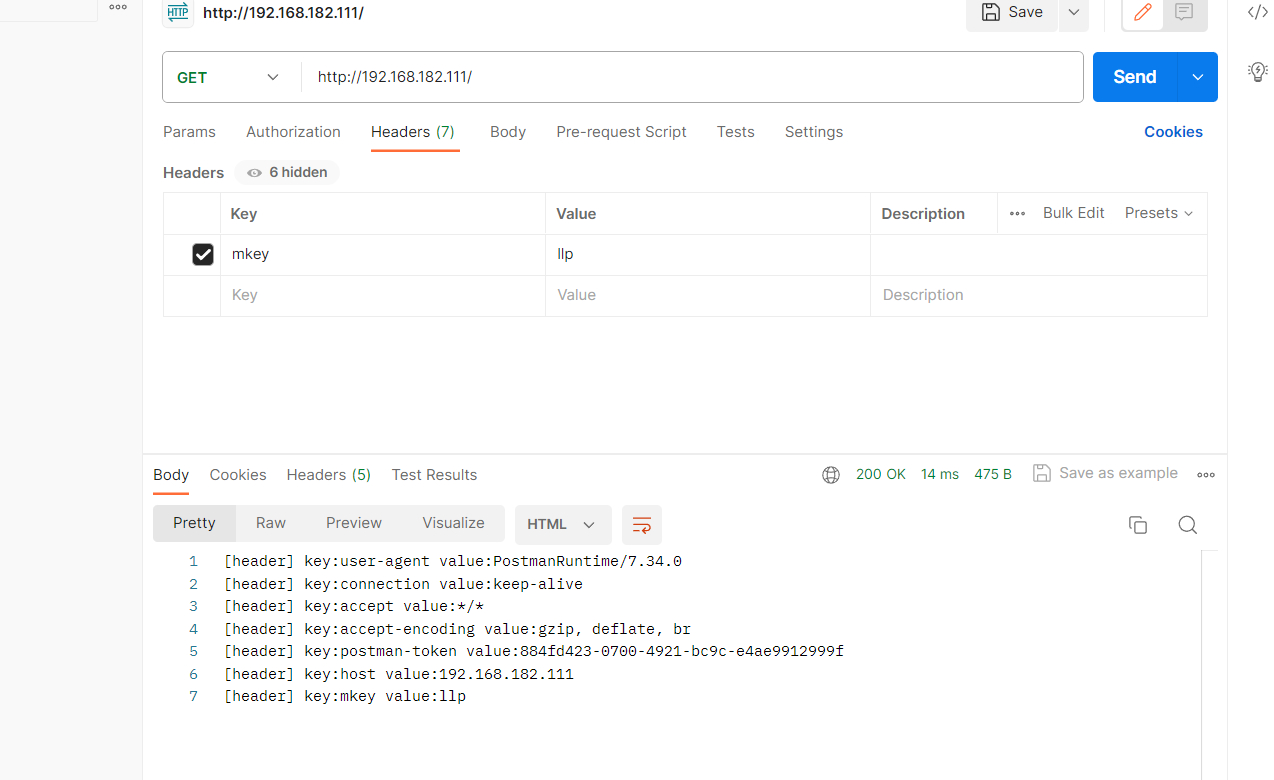
编写lua脚本,在/usr/local/openresty/nginx/lua目录下创建lua-http-header-param.lua文件
lua-http-header-param.lua
-- 获取header参数
local headers = ngx.req.get_headers();
for k,v in pairs(headers)
do
 ngx.say("[header] key:",k," value:",v);
end
测试:
9.获取post body 键值对 参数
修改配置文件,在配置文件目录下cp一份 nginx.conf 得到nginx-body.conf文件,修改该文件并使用该文件进行启动
nginx-body.conf
worker_processes  1;

error_log  logs/error.log;

events {
    worker_connections  1024;
}


http {
    include       mime.types;
    default_type  application/octet-stream;

    sendfile        on;
    keepalive_timeout  65;
    server {
        listen       80;
        server_name  localhost;

        location / {
            # 请求没有指定内容类型,Nginx会返回HTML内容。
            default_type text/html;
            content_by_lua_file /usr/local/openresty/nginx/lua/lua-body.param.lua;
         }
        error_page   500 502 503 504  /50x.html;
        location = /50x.html {
            root   html;
        }
    }
}
编写lua脚本,在/usr/local/openresty/nginx/lua目录下创建lua-body.param.lua文件
lua-body.param.lua
-- 获取post body kv参数
-- 重要:读取body
ngx.req.read_body();
local postArgs = ngx.req.get_post_args();
for k,v in pairs(postArgs)
do
 ngx.say("[post] key:",k," value:",v);
end
测试:
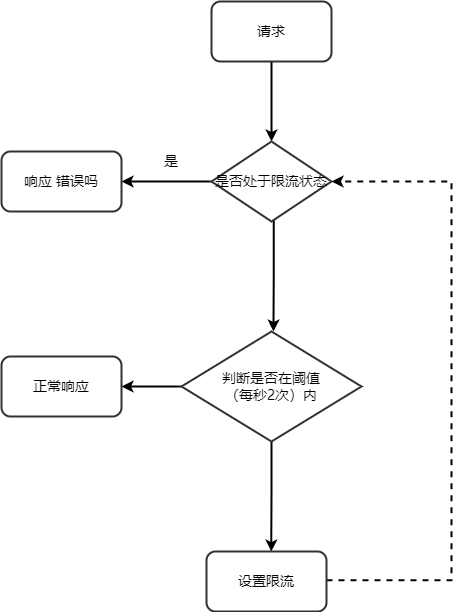
10.nginx+lua+redis限流实战
限流业务
需求:系统每秒限流2个请求,如果超过 阈值(每秒2个请求),则系统限制10秒内,不能被访问。
修改配置文件,在配置文件目录下cp一份 nginx.conf 得到nginx-lmit-ip.conf文件,修改该文件并使用该文件进行启动
nginx-lmit-ip.conf
worker_processes  1;
error_log  logs/error.log;

events {
    worker_connections  1024;
}


http {
    include       mime.types;
    default_type  application/octet-stream;

    sendfile        on;

    keepalive_timeout  65;

    server {
        listen       8083;
        server_name  localhost;
        location / {
                default_type text/html;
                #限流脚本
                access_by_lua_file /usr/local/openresty/nginx/lua/ip-limit-access.lua;
                #日志记录
                log_by_lua_file /usr/local/openresty/nginx/lua/ip-limit-log.lua;
                proxy_pass http://localhost:8080/;
        }
    }
}
限流脚本ip-limit-access.lua
ngx.log(ngx.INFO,"ip limit access");
local redis = require "resty.redis";
local red = redis:new();
--链接redis
local ok,err = red:connect("127.0.0.1",6379);
-- 需要写链接成功的判断。
if not ok then
ngx.say("faild to connect",err);
return
end
--判断是否限流,limit为限流标记1表示需要进行限流
limit = red:get("limit");
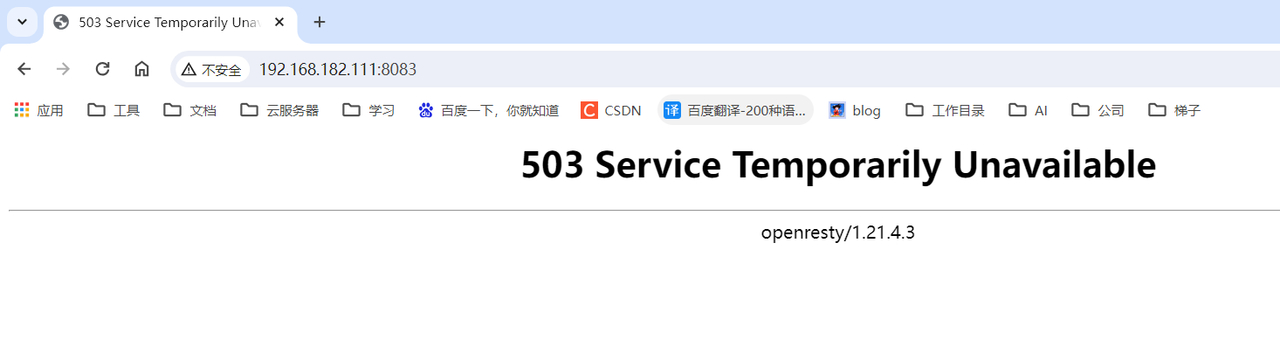
if limit == '1' then
return ngx.exit(503);
end
inc = red:incr("testLimit");
if inc <= 2 then
red:expire("testLimit",1);
else
red:set("limit",1);
red:expire("limit",10);
end
编写日志脚本ip-limit-log.lua
ngx.log(ngx.INFO,"ip limit log");
测试限流:
每秒两个请求以内
每秒请求超过两次请求,则会进行限流
11.防爬虫
概述
当爬虫影响到我们网站的性能。
爬虫的种类:
- 善意的。百度,google。
- 恶意的。恶意窃取网站内容。
robots协议:
防爬虫的方法:现在爬虫ip,对我们系统的请求。
扩展:限制爬虫的方法:
- 限制user-agent。
- 限制ip。
- 添加验证码。
- 限制cookie
这里以限制ip为例:
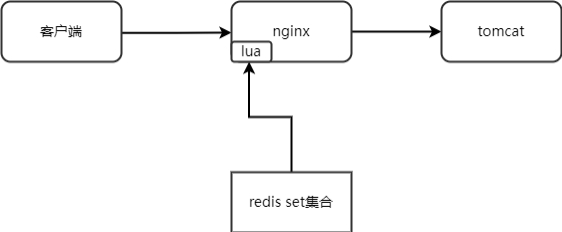
需求&步骤分解
- 收集黑名单IP
- 存储到redis的set集合中
- nginx定期(2s)去从redis取 黑名单 ip 集合
- 当请求来的时候,进行判断。请求来源的ip是否在ip黑名单中
Redis黑名单准备
用set类型
key:ip-black-list
192.168.25.69