JavaWeb
 Spring
 MyBatis
 linux
linux
 消息队列
消息队列
 JavaSE
 工具
工具
 AI
AI
 搜索
搜索
 dy
dy
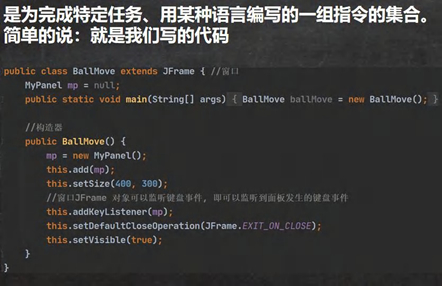
多线程基础
多线程基础
1.线程相关概念
1.1 程序(program)
1.2 进程

1.3 什么是线程

1.4其他相关概念


2.线程基本使用
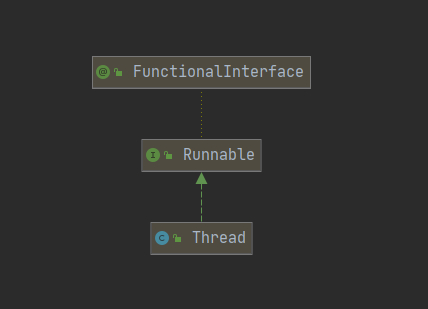
2.1.创建线程的两种方式
在java中线程使用主要有两种方法
1.继承Thread类,重新run方法
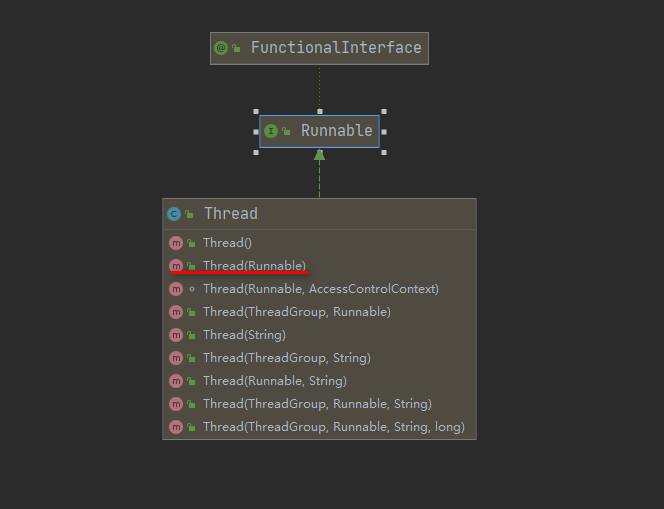
2.实现Runnbale接口,重新run方法
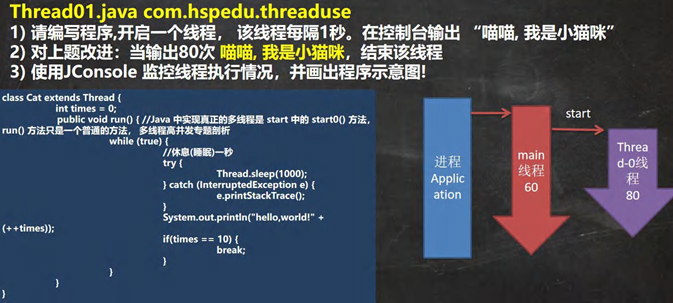
1.继承Thread类
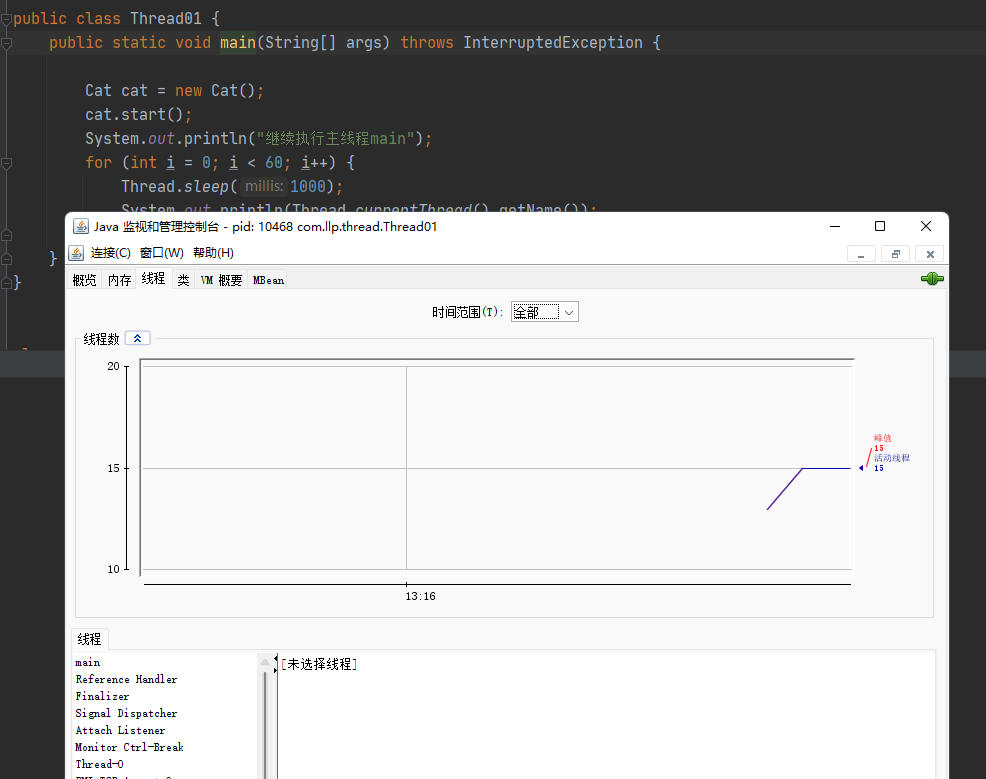
使用JConsole监控线程执行情况

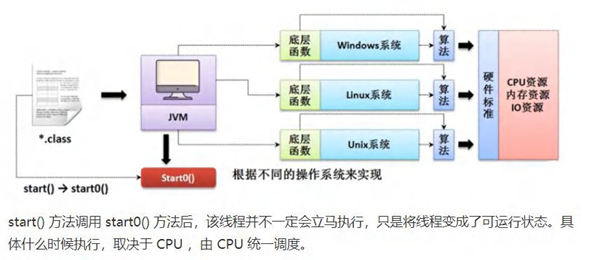
为什么是statrt方法而不是run方法
start方法才会开启线程
public class Thread01 {
    public static void main(String[] args) throws InterruptedException {

        //创建Cat对象,可以当做线程使用
        Cat cat = new Cat();

        //老韩读源码
        /*
            (1)
            public synchronized void start() {
                start0();
            }
            (2)
            //start0() 是本地方法,是JVM调用, 底层是c/c++实现
            //真正实现多线程的效果, 是start0(), 而不是 run
            private native void start0();

         */

        cat.start();//启动线程-> 最终会执行cat的run方法


        //cat.run();//run方法就是一个普通的方法, 没有真正的启动一个线程,就会把run方法执行完毕,才向下执行
        //说明: 当main线程启动一个子线程 Thread-0, 主线程不会阻塞, 会继续执行
        //这时 主线程和子线程是交替执行..
        System.out.println("主线程继续执行" + Thread.currentThread().getName());//名字main
        for(int i = 0; i < 60; i++) {
            System.out.println("主线程 i=" + i);
            //让主线程休眠
            Thread.sleep(1000);
        }

    }
}

//老韩说明
//1. 当一个类继承了 Thread 类, 该类就可以当做线程使用
//2. 我们会重写 run方法,写上自己的业务代码
//3. run Thread 类 实现了 Runnable 接口的run方法
/*
    @Override
    public void run() {
        if (target != null) {
            target.run();
        }
    }
 */


class Cat extends Thread {

    int times = 0;
    @Override
    public void run() {//重写run方法,写上自己的业务逻辑

        while (true) {
            //该线程每隔1秒。在控制台输出 “喵喵, 我是小猫咪”
            System.out.println("喵喵, 我是小猫咪" + (++times) + " 线程名=" + Thread.currentThread().getName());
            //让该线程休眠1秒 ctrl+alt+t
            try {
                Thread.sleep(1000);
            } catch (InterruptedException e) {
                e.printStackTrace();
            }
            if(times == 80) {
                break;//当times 到80, 退出while, 这时线程也就退出..
            }
        }
    }
}
2.实现Runnable接口


public class Thread02 {
    public static void main(String[] args) {
        Dog dog = new Dog();
        Thread thread = new Thread(dog);
        thread.start();
    }
}

class Dog implements Runnable{
    int count = 0;
    @Override
    public void run() {
        while (true){
            try {
                Thread.sleep(1000);
                System.out.println("小狗汪汪叫-"+(++count)+","+Thread.currentThread().getName());
                if(count == 10){
                    break;
                }
            } catch (InterruptedException e) {
                e.printStackTrace();
            }
        }
    }
}
静态代理模式
在java中类不能多继承,而接口可以多实现;
这里ThreadProxy定义了Runnable字段,通过构造函数对Runnable进行赋值
public class StaticProxy {
    public static void main(String[] args) {
        Tiger tiger = new Tiger();
        ThreadProxy threadProxy = new ThreadProxy(tiger);
        threadProxy.start();
    }
}

class Animal{

}

class Tiger extends Animal implements Runnable{
    @Override
    public void run() {
        System.out.println("老虎嗷嗷叫,"+Thread.currentThread().getName());
    }
}


class ThreadProxy extends Thread{
    private Runnable target = null;//属性,类型是 Runnable

    @Override
    public void run() {
        if (target != null) {
            target.run();//动态绑定(运行类型Tiger)
        }
    }

    public ThreadProxy(Runnable target) {
        this.target = target;
    }

    public void start() {
        //这个方法是真正实现多线程方法
        start0();
    }

    //真正创建线程的方法
    public void start0() {
        run();
    }
}
2.2多线程执行

public class Thread03 {
    public static void main(String[] args) {

        T1 t1 = new T1();
        T2 t2 = new T2();
        Thread thread1 = new Thread(t1);
        Thread thread2 = new Thread(t2);
        thread1.start();//启动第1个线程
        thread2.start();//启动第2个线程
        //...

    }
}

class T1 implements Runnable {

    int count = 0;

    @Override
    public void run() {
        while (true) {
            //每隔1秒输出 “hello,world”,输出10次
            System.out.println("hello,world " + (++count));
            try {
                Thread.sleep(1000);
            } catch (InterruptedException e) {
                e.printStackTrace();
            }
            if(count == 60) {
                break;
            }
        }
    }
}

class T2 implements Runnable {

    int count = 0;

    @Override
    public void run() {
        //每隔1秒输出 “hi”,输出5次
        while (true) {
            System.out.println("hi " + (++count));
            try {
                Thread.sleep(1000);
            } catch (InterruptedException e) {
                e.printStackTrace();
            }
            if(count == 50) {
                break;
            }
        }
    }
}
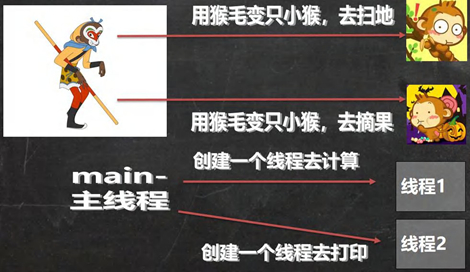
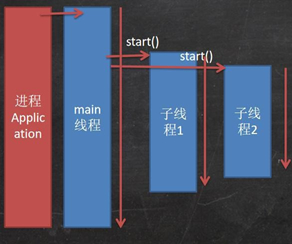
2.3线程如何理解
2.4 继承Thread VS实现Runnable的区别


public class SellTicket {
    public static void main(String[] args) {
        SellTicket01 SellTicket01 = new SellTicket01();
        new Thread(SellTicket01).start();
        new Thread(SellTicket01).start();
        new Thread(SellTicket01).start();
    }
}


class SellTicket01 implements Runnable{
    //实现接口的方式,在创建线程时传入的时相同的对象保证了ticketNum的共享
    private  int ticketNum = 100;
    @Override
    public void run() {
        while (true){
            if(ticketNum <= 0){
                System.out.println("票已售完");
                break;
            }
            try {
                Thread.sleep(1);
                System.out.println(Thread.currentThread().getName()+",售出一张票,还剩余"+(--ticketNum));
            } catch (InterruptedException e) {
                e.printStackTrace();
            }
        }
    }
}

/**
Thread-0,售出一张票,还剩余0
票已售完
票已售完
Thread-2,售出一张票,还剩余-1
票已售完
*/
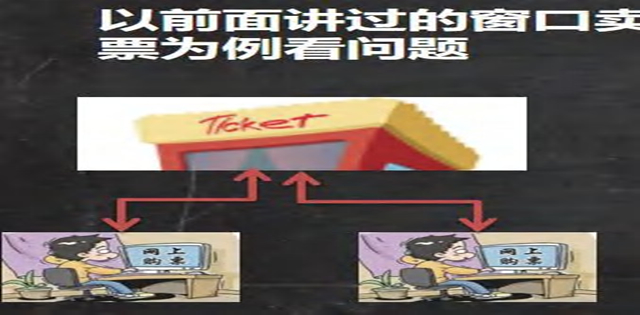
存在的问题
当三个窗口(线程)同时售票的时候,当票还剩下1或者2张的时候,会出现超售的情况
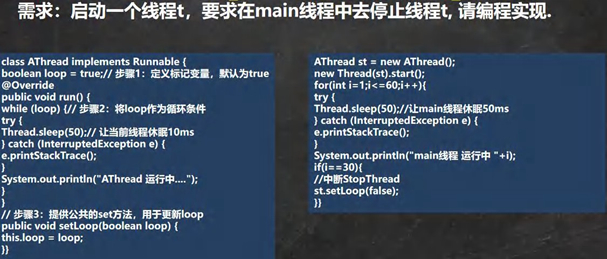
2.5线程终止

需求
public class ThreadExit {
    public static void main(String[] args) throws InterruptedException {
        T t = new T();
        Thread thread = new Thread(t);
        thread.start();

        System.out.println("main线程休眠10s...");
        Thread.sleep(10 * 1000);
        //主线程停止线程t
        t.setLoop(true);
    }
}

class T implements Runnable {
    private boolean loop = true;

    @Override
    public void run() {
        while (loop) {
            try {
                Thread.sleep(1000);
                System.out.println("小狗汪汪叫");
            } catch (InterruptedException e) {
                e.printStackTrace();
            }
        }
    }

    public void setLoop(boolean loop) {
        this.loop = loop;
    }
}
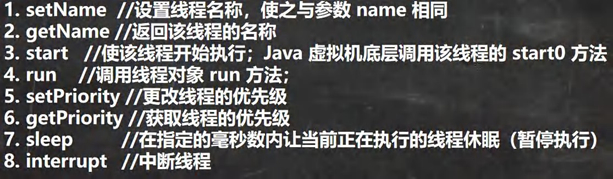
2.6线程常用方法
第一组
注意事项和细节

public class ThreadMethod01 {
    public static void main(String[] args) throws InterruptedException {
        Pig pig = new Pig();
        pig.start();
        //setPriority()设置线程优先级
        pig.setPriority(Thread.MIN_PRIORITY);

        for (int i = 0; i < 10; i++) {
            Thread.sleep(1000);
            //getName()获取线程名称
            System.out.println("主线程执行了"+Thread.currentThread().getName());
            //getPriority()获取线程优先级
            System.out.println("主线程优先级-"+Thread.currentThread().getPriority());
            if(i == 5){
                //中断线程,这里并不会结束线程而是结束线程休眠
                pig.interrupt();
            }
        }
    }
}

class Pig extends Thread{
    @Override
    public void run() {
        while (true){
            try {
                //sleep(1000) 让线程休眠传入参数单位为毫秒
                Thread.sleep(1000);
                System.out.println("猪猪饿了~");
            } catch (InterruptedException e) {
                e.printStackTrace();
            }
        }
    }
}
常用方法第二组

public class ThreadMethod02 {
    public static void main(String[] args) throws InterruptedException {
        Thread t = new Thread(new Eat());
        t.start();
        for (int i = 1; i <=20; i++) {
            Thread.sleep(1000);
            System.out.println(Thread.currentThread().getName()+"主线程(小弟),吃了"+i+"个包子");
            if(i == 5){
                //yield(礼让)
                //Thread.yield();
                t.join();
                System.out.println("主线程(小弟)让子线程(大哥)先吃");
            }
        }
    }
}

class Eat implements Runnable{

    @Override
    public void run() {
        for (int i = 1; i <=20; i++) {
            try {
                Thread.sleep(1000);
                System.out.println(Thread.currentThread().getName()+"子线程(大哥),吃了"+i+"个包子");
            } catch (InterruptedException e) {
                e.printStackTrace();
            }
        }
    }
}
2.7 用户线程和守护线程

守护线程应用场景例举:当有多个用户线程在执行时,可以使用守护线程对这些线程进行监控或获取其他线程的信息
public class ThreadMethod03 {
    public static void main(String[] args) throws InterruptedException {
        Thread thread = new Thread(new Chat());
        //将线程设置为守护线程,当主线程结束后守护线程自动结束
        thread.setDaemon(true);
        thread.start();

        for (int i = 0; i < 20; i++) {
            Thread.sleep(1000);
            System.out.println("宝强正在辛苦工作。。。。");
        }

        System.out.println("宝强工作结束。。。");
    }
}

class Chat implements Runnable {
    @Override
    public void run() {
        for (;;){
            try {
                Thread.sleep(1000);
                System.out.println("马蓉和宋喆快乐聊天。。。。");
            } catch (InterruptedException e) {
                e.printStackTrace();
            }
        }
    }
}
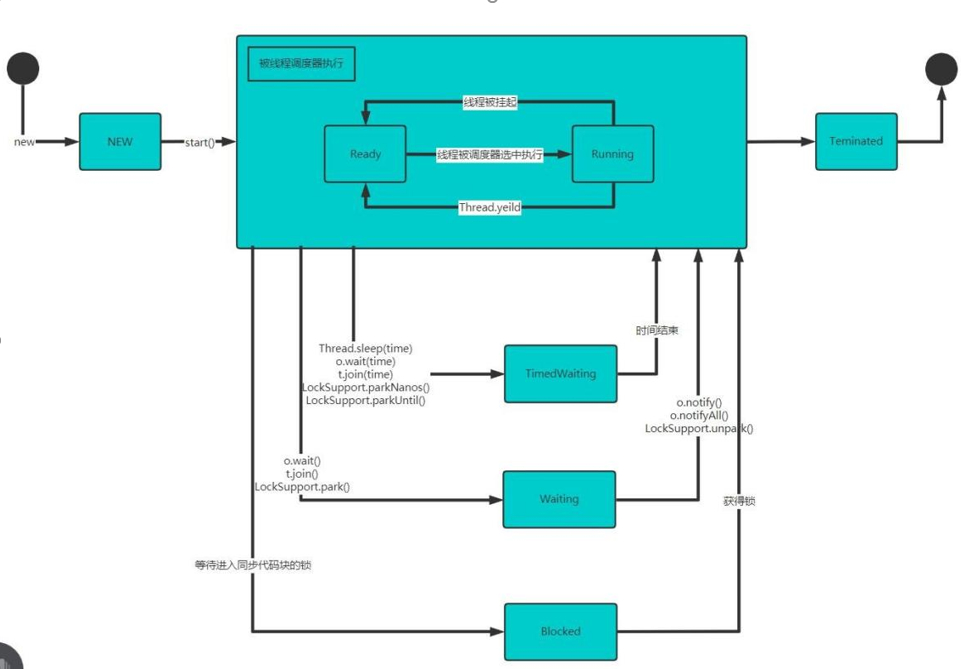
2.8 线程的生命周期
1.线程的几种状态
JDK中用Thread.State枚举表示线程的几种状态
public static enum Thread.State extends Enum<Thread.State>
线程状态。 线程可以处于以下状态之一:
NEW  尚未启动的线程处于此状态。
RUNNABLE  在Java虚拟机中执行的线程处于此状态。
BLOCKED  被阻塞等待监视器锁定的线程处于此状态。
WAITING  正在等待另一个线程执行特定动作的线程处于此状态。
TIMED_WAITING  正在等待另一个线程执行动作达到指定等待时间的线程处于此状态。
TERMINATED  已退出的线程处于此状态。
一个线程可以在给定时间点处于一个状态。 这些状态是不反映任何操作系统线程状态的虚拟机状态。
2.线程状态转换图
NEW——线程创建
RUNNABLE—— 执行线程状态,在RUNNABLE(运行时状态)中分为了Ready和Running
Ready——就绪状态
Running——运行状态
TIMED_WAITING —— 线程等待达到指定时间 Thread.sleep(1000)
WAITING——等待另一个线程执行特定动作的线程 t.join()
BLOCKED—— 被阻塞等待监视器锁定的线程 synchronized
3.通过程序查看线程状态
public class ThreadState_ {
    public static void main(String[] args) throws InterruptedException {
        T t = new T();
        System.out.println(t.getName() + " 状态 " + t.getState());
        t.start();

        while (Thread.State.TERMINATED != t.getState()) {
            System.out.println(t.getName() + " 状态 " + t.getState());
            Thread.sleep(500);
        }

        System.out.println(t.getName() + " 状态 " + t.getState());

    }
}

class T extends Thread {
    @Override
    public void run() {
        while (true) {
            for (int i = 0; i < 10; i++) {
                System.out.println("hi " + i);
                try {
                    Thread.sleep(1000);
                } catch (InterruptedException e) {
                    e.printStackTrace();
                }
            }
            break;
        }
    }
}
2.9 线程的同步
从售票超买问题引出
public class SellTicket {
    public static void main(String[] args) {
        SellTicket01 SellTicket01 = new SellTicket01();
        new Thread(SellTicket01).start();
        new Thread(SellTicket01).start();
        new Thread(SellTicket01).start();
    }
}


class SellTicket01 implements Runnable {
    private boolean loop = true;
    //实现接口的方式,在创建线程时传入的时相同的对象保证了ticketNum的共享
    private int ticketNum = 100;

    @Override
    public void run() {
        while (loop) {
            sell();
        }
    }

    public synchronized  void sell() {
        if (ticketNum <= 0) {
            System.out.println("票已售完");
            loop = false;
            return;
        }
        try {
            Thread.sleep(1);
            System.out.println(Thread.currentThread().getName() + ",售出一张票,还剩余" + (--ticketNum));
        } catch (InterruptedException e) {
            e.printStackTrace();
        }
    }
}
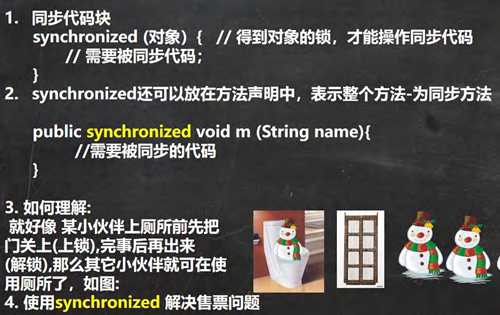
2.10 Synchronized
1.线程同步机制

2.同步具体方法-Synchronized
3.分析同步原理
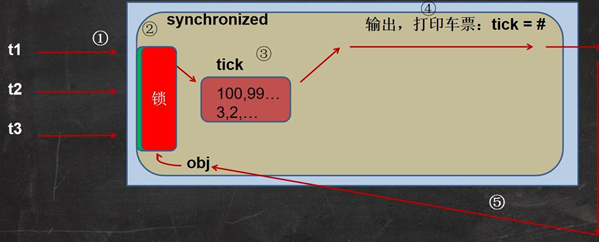
2.11互斥锁
1.基本介绍
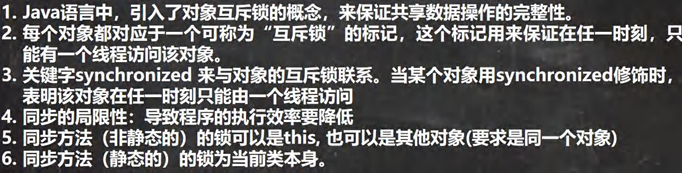
2.注意事项

//同步方法(静态的)的锁为当前类本身
    //1. public synchronized static void m1() {} 锁是加在 SellTicket03.class
    //2. 如果在静态方法中,实现一个同步代码块.
    /*
        synchronized (SellTicket03.class) {
            System.out.println("m2");
        }
     */
    public synchronized static void m1() {

    }
//老韩说明
    //1. public synchronized void sell() {} 就是一个同步方法
    //2. 这时锁在 this对象
    //3. 也可以在代码块上写 synchronize ,同步代码块, 互斥锁还是在this对象
    public /*synchronized*/ void sell() { //同步方法, 在同一时刻, 只能有一个线程来执行sell方法

        synchronized (/*this*/ object) {
            if (ticketNum <= 0) {
                System.out.println("售票结束...");
                loop = false;
                return;
            }

            //休眠50毫秒, 模拟
            try {
                Thread.sleep(50);
            } catch (InterruptedException e) {
                e.printStackTrace();
            }

            System.out.println("窗口 " + Thread.currentThread().getName() + " 售出一张票"
                    + " 剩余票数=" + (--ticketNum));//1 - 0 - -1  - -2
        }
    }
2.12 线程的死锁
1.基本介绍

2.应用案例

模拟线程死锁
死锁的形成,这里A、B线程都想拿到各自想要的锁对象
但A的锁o1没办法释放,B的锁o2也没办法释放;A拿不到B的锁对象,B拿不到A的锁对象从而导致死锁
public class DeadLock_ {
    public static void main(String[] args) {
        //模拟死锁现象
        DeadLockDemo A = new DeadLockDemo(true);
        A.setName("A线程");
        DeadLockDemo B = new DeadLockDemo(false);
        B.setName("B线程");
        A.start();
        B.start();
    }
}


//线程
class DeadLockDemo extends Thread {
    // 保证多线程,共享一个对象,这里使用static
    static Object o1 = new Object();
    static Object o2 = new Object();
    boolean flag;

    public DeadLockDemo(boolean flag) {//构造器
        this.flag = flag;
    }

    @Override
    public void run() {

        //下面业务逻辑的分析
        //1. 如果flag 为 T, 线程A 就会先得到/持有 o1 对象锁, 然后尝试去获取 o2 对象锁
        //2. 如果线程A 得不到 o2 对象锁,就会Blocked
        //3. 如果flag 为 F, 线程B 就会先得到/持有 o2 对象锁, 然后尝试去获取 o1 对象锁
        //4. 如果线程B 得不到 o1 对象锁,就会Blocked
        if (flag) {
            synchronized (o1) {//对象互斥锁, 下面就是同步代码
                System.out.println(Thread.currentThread().getName() + " 进入1");
                synchronized (o2) { // 这里获得li对象的监视权
                    System.out.println(Thread.currentThread().getName() + " 进入2");
                }

            }
        } else {
            synchronized (o2) {
                System.out.println(Thread.currentThread().getName() + " 进入3");
                synchronized (o1) { // 这里获得li对象的监视权
                    System.out.println(Thread.currentThread().getName() + " 进入4");
                }
            }
        }
    }
}
2.13 释放锁
下面操作会释放锁

下面操作不会释放锁